Hyundai Construction Wheel Loader HL970 Factory Service & Shop Manual
Catalog:
Model:
Complete workshop repair service manual with electrical wiring diagrams for Hyundai Construction Wheel Loader HL970. It's the same service manual used by dealers that guaranteed to be fully functional and intact without any missing page.
This Hyundai Construction Wheel Loaders HL970 service & repair manual (including maintenance, overhaul, disassembling & assembling, adjustment, tune-up, operation, inspecting, diagnostic & troubleshooting…) is divided into different sections. Each section covers a specific component or system with detailed illustrations. A table of contents is placed at the beginning of each section. Pages are easily found by category, and each page is expandable for great detail. The printer-ready PDF documents work like a charm on all kinds of devices.
EXCERPT:
CONTENTS
SECTION 1 GENERAL
Group 1 Safety Hints - - - - 1-1
Group 2 Specifications - - - 1-10
Group 3 Operational Checkout Record Sheet - - - 1-23
SECTION 2 ENGINE
Group 1 Structure and Function - - - - 2-1
Group 2 Engine speed and Stall rpm - - - 2-3
SECTION 3 POWER TRAIN SYSTEM
Group 1 Structure and Function - - - - 3-1
Group 2 Operational Checks and Troubleshooting - - - 3-85
Group 3 Test and Adjustments - - - - 3-97
Group 4 Disassembly and Assembly - - - 3-99
SECTION 4 BRAKE SYSTEM
Group 1 Structure and Function - - - - 4-1
Group 2 Operational Checks and Troubleshooting - - - 4-32
Group 3 Tests and Adjustments - - - - 4-39
Group 4 Disassembly and assembly - - - - 4-41
SECTION 5 STEERING SYSTEM
Group 1 Structure and Function - - - - 5-1
Group 2 Operational Checks and Troubleshooting - - - 5-16
Group 3 Tests and Adjustments - - - - 5-24
Group 4 Disassembly and Assembly - - - 5-31
SECTION 6 WORK EQUIPMENT
Group 1 Structure and Function - - - - 6-1
Group 2 Operational Checks and Troubleshooting - - - 6-40
Group 3 Tests and Adjustments - - - - 6-51
Group 4 Disassembly and Assembly - - - 6-63
SECTION 7 ELECTRICAL SYSTEM
Group 1 Component Location - - - 7-1
Group 2 Electrical Circuit - - - 7-3
Group 3 Monitoring System - - - - 7-22
Group 4 Electrical Component Specification - - - 7-67
Group 5 Connectors - - - 7-74
Group 6 Troubleshooting - - - - 7-95
…
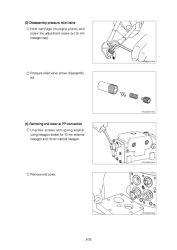
(3) Disassembly pressure relief valve
① Hold cartridge (multigrip pliers) and screw the adjustment screw out (5 mm hexagon key).
② Pressure relief valve shown disassembled.
(4) Removing end cover at PP-connection
① Unscrew screws with spring washer using hexagon socket for 13 mm external hexagon and 10 mm internal hexagon.
② Remove end cover.
…


