John Deere Tractors 5220, 5320, 5420, 5520 Repair Service Technical Manual - TM2048
Catalog:
Model:
Complete Repair Technical for John Deere Tractors 5220, 5320, 5420, 5520, with all the service information to maintain, repair, and rebuild like professional mechanics.
John Deere Tractors 5220, 5320, 5420, 5520 workshop Repair technical manual includes:
* Numbered table of contents easy to use so that you can find the information you need fast.
* Detailed sub-steps expand on repair procedure information
* Numbered instructions guide you through every repair procedure step by step.
* Notes, cautions and warnings throughout each chapter pinpoint critical information.
* Bold figure number help you quickly match illustrations with instructions.
* Detailed illustrations, drawings and photos guide you through every procedure.
* Enlarged inset helps you identify and examine parts in detail.
TM2048 English - 5220, 5320, 5420, and 5520 Tractors Repair Technical Manual -: (420001-,-420000,420001-,-420000,420001-,-420000,420001-,-420000).pdf
tm9109 French - Manuel technique de remise en état des tracteurs 5220, 5320, 5420 et 5520 -: (420001-,-420000,420001-,-420000,420001-,-420000,420001-,-420000)
PRODUCT DETAILS:
Total Pages: 1,634 pages
File Format: PDF (bookmarked, ToC, Searchable, Printable, high quality)
Language: English French
MAIN SECTIONS
Foreword
General Information
Safety
General Specifications
Fuel and Lubricants
Serial Number Locations
Features and Accessories
Engine Repair
Engine
Cooling System
Fuel and Air Repair
Fuel System
Air Intake System
Speed Control Linkage
Electrical Repair
Battery, Starter and Alternator
Electrical System Components
Wiring Harness
Power Train Repair
Clutch Housing
Clutch Assembly-CollarShift/SyncShuttle™ Transmissions
Clutch Assembly-PowrReverser™ Transmission
PowrReverser™
CollarShift/SyncShuttle™ Transmission
PowrReverser™ Transmission
Rear PTO Drive Shaft
Differential
Final Drives
Hi-Crop Final Drives
Mechanical Front Wheel Drive
Creeper Assembly
Steering and Brake Repair
Steering Repair
Brake Repair
Hydraulic Repair
Hydraulic Pump and Filter
Hydraulic Oil Cooler
Rockshaft
Selective Control Valve
Hydraulic Mid Mount Control Valve
Miscellaneous Repair
Front Axle-2WD
Wheels
3-Point Hitch
Fenders
Operator Station Repair
Seat and Support
Control Console and Panel
ROLL-GARD™
Cab Components
Isolated Open Operator Station Components
Air Conditioning System
Heating System
TABLE OF CONTENTS
Section 10: General Information................20
Group 05: Safety................20
Recognize Safety Information................24
Understand Signal Words................25
Follow Safety Instructions................26
Handle Fluids Safely—Avoid Fires................27
Prevent Battery Explosions................28
Prepare for Emergencies................29
Prevent Acid Burns................30
Service Cooling System Safely................32
Handle Chemical Products Safely................33
Avoid High-Pressure Fluids................34
Park Machine Safely................35
Support Machine Properly................36
Wear Protective Clothing................37
Work in Clean Area................38
Service Machines Safely................39
Work In Ventilated Area................40
Illuminate Work Area Safely................41
Replace Safety Signs................42
Use Proper Lifting Equipment................43
Keep ROPS Installed Properly................44
Service Tires Safely................45
Avoid Harmful Asbestos Dust................46
Avoid Heating Near Pressurized Fluid Lines................47
Remove Paint Before Welding or Heating................48
Use Proper Tools................49
Dispose of Waste Properly................50
Live With Safety................51
Group 10: General Specifications................1300
Machine Specifications 5220 and 5320................56
Machine Specifications 5420 and 5520................60
Collar Shift and SyncShuttle™ Transmission Ground Speed Estimates................64
Collar Shift and SyncShuttle™ Creeper Transmissions Ground Speed Estimates................65
PowrReverser™ Transmission Ground Speed Estimates................66
PowrReverser™ Creeper Transmissions Ground Speed Estimates................67
Correction Factors for Other Tire Sizes................68
Machine Dimensions (Straddle Mount)................69
Machine Dimensions (5520 Series Hi-Crop Straddle Mount)................72
Machine Dimensions (Isolated Open Operator Station)................74
Machine Dimensions (Cab)................77
Repair Specifications................1300
Service Recommendations for O-Ring Boss Fittings................87
Service Recommendations For Flat Face O-Ring Seal Fittings................89
Metric Cap Screw Torque Values—Grade 7................91
Metric Bolt and Screw Torque Values................92
Unified Inch Bolt and Screw Torque Values................94
Abbreviations................96
Group 20: Fuel and Lubricants................21
Diesel Fuel Specifications................1300
Storing Fuel................101
Do Not Use Galvanized Containers................102
Fill Fuel Tank................103
Diesel Engine Oil — Non-Emissions Certified and Certified Tier 1 and Stage I................105
Diesel Engine Coolant (engine with wet sleeve cylinder liners)................107
Liquid Coolant Conditioner................109
Transmission and Hydraulic Oil................110
MFWD Gear Oil................111
Grease (Specific Application)................112
Grease................113
Alternative and Synthetic Lubricants................114
Lubricant Storage................115
Group 25: Serial Number Locations................21
Serial Numbers................117
Product Identification Number Location................118
Engine Serial Number Location................119
Fuel Injection Pump Serial Number Location................120
Alternator Serial Number Location................121
Power Steering Valve Serial Number Location................122
Starter Serial Number Location................123
Transmission Serial Number Location................124
Front Axle (2WD) Serial Number Location................125
Mechanical Front Wheel Drive (MFWD) Serial Number Location................126
Air Conditioning Compressor Serial Number Location................127
Group 30: Features and Accessories................129
Features and Accessories................129
Standard Features—Straddle Mount and Isolated Open Operator Station Tractors................130
Standard Features—Cab Tractor................132
Standard Features—5520 Hi-Crop Straddle Mount Tractors................134
Standard Features—5220 through 5520................136
Factory Installed Optional Equipment (5220—5520)................137
Field Installed Optional Kits and Accessories—5220 through 5520................139
Section 20: Engine Repair................141
Group 05: Engine................141
Service Equipment and Tools................1298
Specifications................1300
John Deere Engine Repair—Use CTM104 or CTM125................145
Remove Engine—Tractors Without Cab................146
Install Engine—Tractors Without Cab................154
Remove Engine—Tractors With Cab................162
Install Engine—Tractors With Cab................177
Group 10: Cooling System................141
Specifications................1300
Engine Water Pump Repair—Use CTM104 or CTM125................193
Remove and Inspect Radiator................194
Install Radiator................198
Replace Thermostat................202
Inspect and Replace Belt Tensioner—Models 5420 and 5520................205
Section 30: Fuel and Air Repair................209
Group 05: Fuel System................209
Specifications................1300
Injection Pump, Nozzle and Governor Repair—Use CTM104 or CTM125................212
Remove, Inspect and Install Fuel Tank—Straddle Mount Tractors................213
Remove, Inspect, and Install Fuel Tank—Isolated Open Operator Station and Cab Tractors (S.N. —420000)................218
Remove, Inspect, and Install Fuel Tank—Isolated Open Operator Station and Cab Tractors (S.N. 420001— )................227
Replace Fuel Filter................237
Remove and Install Fuel Filter/Primer Pump Assembly................238
Group 10: Air Intake System................209
Turbocharger Repair—Use CTM104 or CTM125................240
Other Material................1299
Specifications................1300
Remove, Inspect, and Install Air Cleaner Elements—5220 and 5320 Tractors................243
Remove, Inspect, and Install Air Cleaner Elements—5420 and 5520 Tractors................246
Remove Turbocharger—5320 Tractors................249
Install Turbocharger—5320 Tractors................251
Remove Turbocharger—5520 Tractors................253
Install Turbocharger—5520 Tractors................255
Turbocharger Break-In................257
Group 15: Speed Control Linkage................209
Inspect and Repair Speed Control Linkage—Without 540/540E PTO—Straddle Mount Tractors................260
Inspect and Repair Speed Control Linkage—With 540/540E PTO—Straddle Mount Tractors................262
Inspect and Repair Speed Control Linkage—Without 540/540E PTO—Isolated Open Operator Station and Cab Tractors................264
Inspect and Repair Speed Control Linkage—With 540/540E PTO—Isolated Open Operator Station and Cab Tractors................266
Section 40: Electrical Repair................268
Group 05: Battery, Starter and Alternator................268
Starter Repair—Use CTM77................271
Remove and Install Battery—Straddle Mount and Isolated Open Operator Station................272
Remove and Install Battery—Cab Tractors................274
Remove and Install Starter—5220 and 5320 Tractors................276
Remove and Install Starter—5420 and 5520 Tractors................278
Replace Alternator/Regulator—3-Cylinder Engines................280
Replace Alternator/Regulator—4-Cylinder Engines................281
Group 10: Electrical System Components................268
Replace Air Filter Restriction Switch—5220 and 5320 Tractors................284
Replace Air Filter Restriction Switch—5420 and 5520 Tractors................285
Replace Cold Start Advance Switch................286
Replace Coolant Temperature Sender—5220 and 5320 Tractors................287
Replace Coolant Temperature Sender—5420 and 5520 Tractors................288
Replace Engine Speed Sensor................289
Replace Engine Oil Pressure Switch................290
Replace Air Intake Heater (Optional)................291
Replace Air Intake Heater Relay (Optional)................292
Replace Key Switch................294
Replace Tractor Light Switch (S.N. —420000)................296
Replace Light Switch (S.N. 420001— )................298
Replace Speakers (S.N. —420000)................300
Replace Speakers (S.N. 420001— )................301
Replace Antenna (S.N. —420000)................302
Replace Antenna (S.N. 420001— )................305
Replace Turn Signal Controller—Straddle Mount................309
Replace Turn Signal Switch—Isolated Open Operator Station and Cab Tractors................310
Replace Instrument Panel—Straddle Mount (S.N. —420000)................311
Replace Instrument Panel—Straddle Mount (S.N. 420001— )................315
Replace Instrument Panel—Isolated Open Operator Station and Cab Tractors (S.N. —420000)................318
Replace Instrument Panel—Isolated Open Operator Station and Cab Tractors (S.N. 420001— )................322
Replace Rear PTO Switch—Straddle Mount................325
Replace Rear PTO Switch—Isolated Open Operator Station and Cab Tractors................326
Replace Neutral Start Switch—Straddle Mount................327
Replace Neutral Start Switch—Isolated Open Operator Station and Cab Tractors................328
Replace Fuel Level Sender—Straddle Mount................329
Replace Fuel Level Sender—Isolated Open Operator Station and Cab Tractors................330
Replace Wiper Control Switch................332
Replace Wiper Motor................334
Replace Blower Control Switch................336
Replace Air Conditioning ON/OFF Switch................337
Replace A/C Temperature Control Switch (S.N. —420000)................338
Replace A/C Temperature Control Switch (S.N. 420001— )................341
Replace Dome Light (S.N. —420000)................343
Replace Dome Light (S.N. 420001— )................345
Replace Door Switch (S.N. —420000)................346
Replace Door Switch (S.N. 420001— )................348
Group 15: Wiring Harness................269
Service Equipment and Tools................1298
Service Parts Kits................1301
Replace Connector Body—Blade Terminals................352
Replace WEATHER PACK WEATHER PACK is a trademark of Packard Electric. Connector................269
Install WEATHER PACK WEATHER PACK is a trademark of Packard Electric. Contact................269
Replace Front Wiring Harness—3-Cylinder................357
Replace Front Wiring Harness—4-Cylinder................359
Replace Rear Electrical Harness—Straddle Mount................361
Replace Rear Electrical Harness—Isolated Open Operator Station (S.N. —420000)................364
Replace Rear Electrical Harness—Isolated Open Operator Station (S.N. 420001— )................366
Replace Rear Electrical Harness—Cab Tractors (S.N. —420000)................368
Replace Rear Electrical Harness—Cab Tractors (S.N. 420001— )................371
Replace Cab Roof Electrical Harness (S.N. —420000)................374
Replace Cab Roof Electrical Harness (S.N. 420001— )................376
Section 50: Power Train Repair................378
Group 05: Clutch Housing................378
Service Equipment and Tools................1298
Other Material................1299
Specifications................1300
Separate Engine from Clutch Housing—Straddle Mount................387
Install Engine to Clutch Housing—Straddle Mount................393
Separate Engine from Clutch Housing—Isolated Open Operator Station and Cab Tractors................399
Install Engine to Clutch Housing—Isolated Open Operator Station and Cab Tractors................408
Replace Clutch Housing Seal................418
Inspect and Repair Clutch Pedal and Linkage—Straddle Mount (CollarShift, SyncShuttle™ and PowrReverser™ Transmissions)................420
Inspect and Repair Clutch Pedal and Linkage—Isolated Open Operator Station and Cab Tractors (CollarShift and SyncShuttle™ Transmissions)................422
Inspect and Repair Clutch Pedal and Linkage—Isolated Open Operator Station and Cab Tractors (PowrReverser™ Transmissions)................424
Group 10: Clutch Assembly—CollarShift/SyncShuttle™ Transmissions................378
Essential Tools................1295
Service Equipment and Tools................1298
Other Material................1299
Specifications................1300
Remove and Install Clutch Assembly................468
Disassemble and Inspect Clutch Assembly................470
Assemble Clutch Assembly................474
Traction Clutch Finger Adjustment................451
PTO Clutch Finger Adjustment................476
Remove and Inspect Clutch Release Mechanism and Shafts................478
Install Clutch Release Mechanism and Shafts................481
Group 11: Clutch Assembly—PowrReverser™ Transmission................378
Essential Tools................1295
Service Equipment and Tools................1298
Other Material................1299
Specifications................1300
Service Parts Kits................1301
Remove and Install Clutch Assembly................468
Disassemble and Inspect Clutch Assembly................470
Assemble Clutch Assembly................474
PTO Clutch Finger Adjustment................476
Remove and Inspect Clutch Release Mechanism and Shafts................478
Install Clutch Release Mechanism and Shafts................481
Remove, Inspect, and Repair Transmission Pump................484
Group 12: PowrReverser™................379
Essential Tools................1295
Service Equipment and Tools................1298
Other Material................1299
Specifications................1300
Remove and Install PowrReverser™ Control Valve................491
Disassemble, Inspect, and Repair PowrReverser™ Control Valve................493
Remove and Install PowrReverser™................502
Disassemble, Inspect, and Repair Reverse Idle Gear................507
Disassemble, Inspect, and Repair Clutch Gear................509
Disassemble, Inspect, and Repair Driven Shaft................511
Disassemble, Inspect, and Repair PowrReverser™................513
Group 15: CollarShift/SyncShuttle™ Transmission................379
Essential Tools................1295
Service Equipment and Tools................1298
Other Material................1299
Specifications................1300
Separate Clutch Housing from Transmission—Straddle Mount................526
Install Clutch Housing to Transmission—Straddle Mount................532
Separate Clutch Housing from Transmission—Isolated Open Operator Station and Cab Tractors................538
Install Clutch Housing to Transmission—Isolated Open Operator Station and Cab Tractors................541
Inspect and Repair Gear and Range Shift Levers................544
Remove Transmission................597
Disassemble and Inspect Transmission................603
Assemble Transmission................608
Install Transmission................615
Disassemble, Inspect and Assemble Gear Shift Shaft Assemblies................573
Disassemble, Inspect, and Assemble Transmission Top Shaft—CollarShift Transmission................576
Disassemble, Inspect, and Assemble Transmission Top Shaft—SyncShuttle™ Transmission................579
Disassemble, Inspect, and Assemble Range Reduction Shaft................631
Disassemble, Inspect and Assemble Driven Shaft................584
Remove, Inspect, and Install MFWD and Range Gears................635
Remove, Inspect, and Install Reverse Idler Shaft................588
Group 16: PowrReverser™ Transmission................380
Essential Tools................1295
Service Equipment and Tools................1298
Other Material................1299
Specifications................1300
Separate Clutch Housing from Transmission................595
Install Clutch Housing to Transmission................596
Remove Transmission................597
Disassemble and Inspect Transmission................603
Assemble Transmission................608
Install Transmission................615
Disassemble, Inspect, and Assemble Gear Shift Shaft Assemblies................626
Disassemble, Inspect, and Assemble Transmission Bottom Shaft................628
Disassemble, Inspect, and Assemble Range Reduction Shaft................631
Disassemble, Inspect, and Assemble Top Shaft................633
Remove, Inspect, and Install MFWD and Range Gears................635
Remove, Inspect and Install F-N-R Selector Lever and Linkage................637
Group 20: Rear PTO Drive Shaft................380
Service Equipment and Tools................1298
Other Material................1299
Specifications................1300
Remove, Inspect and Install Rear PTO Lever and Linkage—Straddle Mount................647
Remove, Inspect and Install Rear PTO Lever and Linkage—Isolated Open Operator Station and Cab Tractors................649
Inspect and Repair PTO 540/540E Shift Lever and Linkage—Straddle Mount................651
Inspect and Repair PTO 540/540E Shift Lever and Linkage—Isolated Open Operator Station and Cab Tractors................653
Remove and Install Standard Rear PTO Drive Shaft Assembly................655
Disassemble, Inspect and Assemble Standard Rear PTO Drive Shaft Assembly................657
Remove and Install 540/540E Rear PTO Drive Shaft Assembly................660
Disassemble, Inspect, and Assemble Rear 540/540E PTO Drive Shaft Assembly................662
Group 25: Differential................381
Essential Tools................1295
Service Equipment and Tools................1298
Other Material................1299
Specifications................1300
Service Parts Kits................1301
Remove and Install Differential Assembly................672
Disassemble, Inspect, and Assemble Differential Assembly................674
Remove and Inspect Differential Drive Shaft................676
Install Differential Drive Shaft................679
Remove, Inspect, and Install Differential Lock Assembly................683
Differential Cone Point Adjustment................685
Differential Backlash Adjustment................687
Group 30: Final Drives................381
Service Equipment and Tools................1298
Other Material................1299
Specifications................1300
Remove and Install Final Drive Assembly................693
Remove and Inspect Planetary Drive Assembly................695
Install Planetary Drive Assembly................698
Remove, Inspect, and Install Axle Shaft Assembly................701
Group 31: Hi-Crop Final Drives................381
Other Material................1299
Specifications................1300
Remove and Install Hi-Crop Axle Assembly................708
Remove, Inspect and Install Hi-Crop Final Drive Assembly................714
Group 35: Mechanical Front Wheel Drive................381
Essential Tools................1295
Service Equipment and Tools................1298
Other Material................1299
Specifications................1300
Inspect and Repair MFWD Lever and Linkage—Straddle Mount................739
Inspect and Repair MFWD Lever and Linkage—Isolated Open Operator Station and Cab Tractors................741
Remove and Install MFWD Drop Gearbox................743
Disassemble and Inspect MFWD Drop Gearbox................745
MFWD Drop Gearbox Cross Section................748
Assemble MFWD Drop Gearbox................750
Remove, Inspect and Install MFWD Drive Shaft................756
Remove and Install MFWD Axle Housing Assembly................757
Remove, Inspect and Install MFWD Axle Supports................759
Disassemble and Inspect MFWD Outer Drive................761
Assemble MFWD Outer Drive................765
Remove, Inspect, and Install MFWD Swivel Housing................768
Remove, Inspect, and Install MFWD Axle Shaft................772
Remove and Install MFWD Differential Carrier Assembly................774
Disassemble and Inspect MFWD Differential Carrier Assembly................776
Assemble MFWD Differential Carrier Assembly................781
Group 40: Creeper Assembly................382
Other Material................1299
Specifications................1300
Remove and Install Creeper Assembly................795
Disassemble, Inspect, and Assemble Creeper Assembly................797
Section 60: Steering and Brake Repair................799
Group 05: Steering Repair................799
Other Material................1299
Specifications................1300
Service Parts Kits................1301
Remove and Install Steering Column and Valve—Non-Telescoping Column................805
Remove and Install Tilt/Telescoping Steering Column................807
Remove and Install Steering Valve—Telescoping Steering Column................810
Disassemble and Inspect Steering Valve................813
Assemble Steering Valve................817
Remove and Install Steering Cylinder—2WD Axle................822
Disassemble, Inspect, and Assemble Steering Cylinder—2WD Axle................823
Remove and Install Steering Cylinder—MFWD Axle................825
Disassemble, Inspect, and Assemble Steering Cylinder—MFWD Axle................828
Remove, Inspect and Install Tie Rod Assembly—2WD Axle................829
Remove, Inspect and Install Tie Rod Assembly—MFWD Axle................831
Inspect and Replace Steering Hydraulic Lines—Straddle Mount Tractors (Without Oil Cooler)................833
Inspect and Replace Steering Hydraulic Lines—Straddle Mount Tractors (With Oil Cooler)................835
Inspect and Replace Steering Hydraulic Lines—Isolated Open Operator Station and Cab Tractors (Without Oil Cooler)................837
Inspect and Replace Steering Hydraulic Lines—Isolated Open Operator Station and Cab Tractors (With Oil Cooler)................839
Group 10: Brake Repair................799
Service Equipment and Tools................1298
Other Material................1299
Specifications................1300
Remove and Install Brake Valve and Pedals................845
Disassemble and Inspect Brake Pedals and Valve (S.N. —420000)................847
Brake Valve Cross Section (S.N. —420000)................850
Assemble Brake Valve (S.N. —420000)................852
Disassemble and Inspect Brake Pedals and Valve (S.N. 420001— )................856
Brake Valve Cross Section (S.N. 420001— )................859
Assemble Brake Valve (S.N. 420001— )................861
Remove and Inspect Brakes................864
Install Brakes................867
Inspect and Replace Brake Hydraulic Lines................870
Section 70: Hydraulic Repair................872
Group 05: Hydraulic Pump and Filter................872
Service Parts Kit................876
Service Equipment and Tools................1298
Specifications................1300
Remove, Inspect, and Install Hydraulic Oil Pick-Up Screen................879
Remove and Install Hydraulic Pump—5220 and 5320................880
Remove Hydraulic Pump External Components—5220 and 5320................882
Disassemble and Inspect Hydraulic Pump—5220 and 5320................884
Assemble Hydraulic Pump—5220 and 5320................887
Install Hydraulic Pump External Components—5220 and 5320................889
Remove and Install Hydraulic Pump—5420 and 5520................891
Remove Hydraulic Pump External Components—5420 and 5520................893
Disassemble and Inspect Hydraulic Pump—5420 and 5520................895
Assemble Hydraulic Pump—5420 and 5520................898
Install Hydraulic Pump External Components—5420 and 5520................900
Remove and Install Hydraulic Oil Filter/Manifold................902
Inspect and Replace Hydraulic Supply/Return Lines—Straddle Mount Tractors................903
Inspect and Replace Hydraulic Supply/Return Lines—Isolated Open Operator Station Tractors (without SCV)................905
Inspect and Replace Hydraulic Supply/Return Lines—Isolated Open Operator Station and Cab Tractors (with SCV)................907
Group 06: Hydraulic Oil Cooler................872
Remove, Inspect, and Install Hydraulic Oil Cooler................912
Group 10: Rockshaft................872
Service Parts Kits................1301
Other Material................1299
Specifications................1300
Inspect and Repair Rockshaft Control Assembly—Straddle Mount Tractors................919
Inspect and Repair Rockshaft Control Assembly—Isolated Open Operator Station and Cab Tractors................924
Inspect and Repair Rockshaft Control Levers and Cables—Isolated Open Operator Station and Cab Tractors (S.N. —420000)................929
Inspect and Repair Rockshaft Control Levers and Cables—Isolated Open Operator Station and Cab Tractors (S.N. 420001— )................934
Inspect and Repair Rockshaft Control Linkage................938
Inspect and Repair Draft Sensing Support Assembly................942
Replace Main Relief Valve—Straddle Mount Tractors................944
Replace Main Relief Valve—Isolated Open Operator Station and Cab Tractors................946
Replace Rockshaft Surge Relief Valve................948
Remove, Inspect, and Install Rate-of-Drop Valve—Straddle Mount Tractors................949
Remove, Inspect, and Install Rate-of-Drop Valve—Isolated Open Operator Station and Cab Tractors (S.N. —420000)................952
Remove, Inspect, and Install Rate-of-Drop Valve—Isolated Open Operator Station and Cab Tractors (S.N. 420001— )................956
Replace Rockshaft Control Valve—Straddle Mount Tractors................960
Replace Rockshaft Control Valve—Isolated Open Operator Station and Cab Tractors................967
Remove and Install Rockshaft Case—Straddle Mount Tractors................973
Remove and Install Rockshaft Case—Isolated Open Operator Station and Cab Tractors................976
Remove, Inspect, and Install Rockshaft Lift Arms................980
Remove, Inspect, and Install Rockshaft Piston and Cylinder................982
Group 15: Selective Control Valve................873
Service Parts Kits................1301
Other Material................1299
Specifications................1300
Inspect and Repair SCV Levers and Linkage—Straddle Mount Tractors................989
Inspect and Repair SCV Levers and Linkage—Isolated Open Operator Station and Cab Tractors................991
Remove and Install Dual Selective Control Valve (SCV)—Straddle Mount Tractors................993
Remove and Install Dual or Triple Selective Control Valve (SCV)—Isolated Open Operator Station and Cab Tractors................997
Remove and Install Single (Third) Selective Control Valve (SCV)—Straddle Mount Tractors................1000
Disassemble, Inspect, and Assemble Dual Selective Control Valve (SCV)—Straddle Mount Tractors................1003
Disassemble, Inspect, and Assemble Dual or Triple Selective Control Valve (SCV)—Isolated Open Operator Station and Cab Tractors................1007
Disassemble, Inspect, and Assemble Single (Third) Selective Control Valve (SCV)—Straddle Mount Tractors................1013
Inspect and Replace Hydraulic Hoses—Dual Selective Control Valve (SCV)—Straddle Mount Tractors (S.N. —420000)................1015
Inspect and Replace Hydraulic Hoses—Single (Third) Selective Control Valve (SCV)—Straddle Mount Tractors (S.N. —420000)................1017
Inspect and Replace Hydraulic Hoses—Selective Control Valves (SCV)—Straddle Mount Tractors (S.N. 420001— )................1019
Inspect and Replace Hydraulic Lines Dual or Triple Selective Control Valve (SCV)—Isolated Open Operator Station and Cab Tractors................1022
Group 20: Hydraulic Mid Mount Control Valve................874
Service Parts Kits................1301
Other Material................1299
Specifications................1300
Inspect and Repair Joystick and Linkage................1029
Remove and Install Mid Mount Control Valve—Straddle Mount Tractors................1042
Remove and Install Mid Mount Control Valve—Isolated Open Operator Station and Cab Tractors (S.N. —420000)................1045
Remove and Install Mid Mount Control Valve—Cab Tractors (S.N. 420001— )................1048
Disassemble, Inspect, and Assemble Mid Mount Control Valve................1051
Inspect and Replace Hydraulic Hoses—Straddle Mount Tractors................1057
Inspect and Replace Hydraulic Lines—Isolated Open Operator Station and Cab Tractors (S.N. —420000)................1059
Inspect and Replace Hydraulic Lines—Cab Tractors (S.N. 420001— )................1061
Section 80: Miscellaneous Repair................1063
Group 05: Front Axle—2WD................1063
Specifications................1300
Remove and Install Front Axle—2WD................1066
Inspect and Replace Pivot Pin and Bushings—2WD Axle................1069
Remove and Install Spindle Assembly—2WD Axle................1070
Inspect and Replace Spindle Shaft Bushings—2WD Axle................1072
Group 10: Wheels................1063
Specifications................1300
Inspect and Replace Front Wheel Bearings................1075
Group 15: 3-Point Hitch................1063
Specifications................1300
Inspect and Repair Fixed Draft Links................1079
Inspect and Repair Telescoping Draft Links................1081
Inspect and Repair Standard Lift Link................1083
Inspect and Repair Adjustable Lift Link................1085
Inspect and Repair Center Link................1087
Remove and Install Draw Bar and Support................1089
Group 20: Fenders................1063
Other Material................1299
Specifications................1300
Remove and Install Fenders—5220, 5320, and 5420 Straddle Mount Tractors................1094
Remove and Install Fenders—5520 Straddle Mount Tractors................1096
Remove and Install Fenders—Isolated Open Operator Station Tractors (S.N. —420000)................1098
Remove and Install Fenders—Isolated Open Operator Station Tractors (S.N. 420001—)................1102
Remove and Install Fenders—Cab Tractors (S.N. —420000)................1106
Remove and Install Fenders—Cab Tractors (S.N. 420001— )................1112
Section 90: Operator Station Repair................1118
Group 05: Seat and Support................1118
Specifications................1300
Remove and Install Seat and Support—Straddle Mount................1123
Remove and Install Seat and Support—Isolated Open Operator Station and Cab Tractors (S.N. —420000)................1124
Remove and Install Seat and Support—Isolated Open Operator Station and Cab Tractors (S.N. 420001— )................1126
Group 06: Control Console and Panel................1118
Remove and Install Right-Side Control Console and Panel—Straddle Mount................1136
Remove and Install Left-Side Control Console—Straddle Mount................1144
Remove and Install Right-Side Control Console—Isolated Open Operator Station................1146
Remove and Install Left-Side Control Console—Isolated Open Operator Station................1149
Remove and Install Right-Side Control Console—Cab Tractors................1151
Remove and Install Left-Side Control Console—Cab Tractors................1157
Group 10: ROLL-GARDROLL-GARD is a trademark of Deere & Company................1118
Specifications................1300
Remove and Install ROLL-GARD ROLL-GARD is a trademark of Deere & Company —Straddle Mount................1118
Remove and Install ROLL-GARD ROLL-GARD is a trademark of Deere & Company —Isolated Open Operator Station................1118
Group 15: Cab Components................1118
Essential Tools................1295
Service Equipment and Tools................1298
Other Material................1299
Specifications................1300
Remove, Inspect, and Install Cab Interior Recirculating Air Filters................1174
Remove, Inspect, and Install Exterior Cab Intake Air Filter................1176
Remove and Install Headliner................1178
Remove and Install Left-Side Upholstery (S.N. —420000)................1181
Remove and Install Left-Side Upholstery (S.N. 420001— )................1183
Remove and Install Right-Side Upholstery................1184
Remove and Install Windshield................1186
Remove and Install Front Lower Windows................1191
Remove and Install Rear Lower Window................1193
Remove and Install Rear Upper Window................1195
Remove and Install Side Windows................1196
Remove and Install Cab Doors................1198
Remove and Install Cab Outer Roof (S.N. —420000)................1201
Remove and Install Cab Outer Roof (S.N. 420001— )................1203
Remove and Install A/C Housing Inner Roof (S.N. —420000)................1205
Remove and Install A/C Housing Inner Roof (S.N. 420001— )................1221
Remove Cab................1233
Install Cab................1252
Group 16: Isolated Open Operator Station Components................1119
Specifications................1300
Remove Isolated Open Operator Station................1272
Install Isolated Open Operator Station................1282
Group 20: Air Conditioning System................1119
Essential Tools................1295
Service Equipment and Tools................1298
Other Material................1299
Specifications................1300
Service Parts Kits................1301
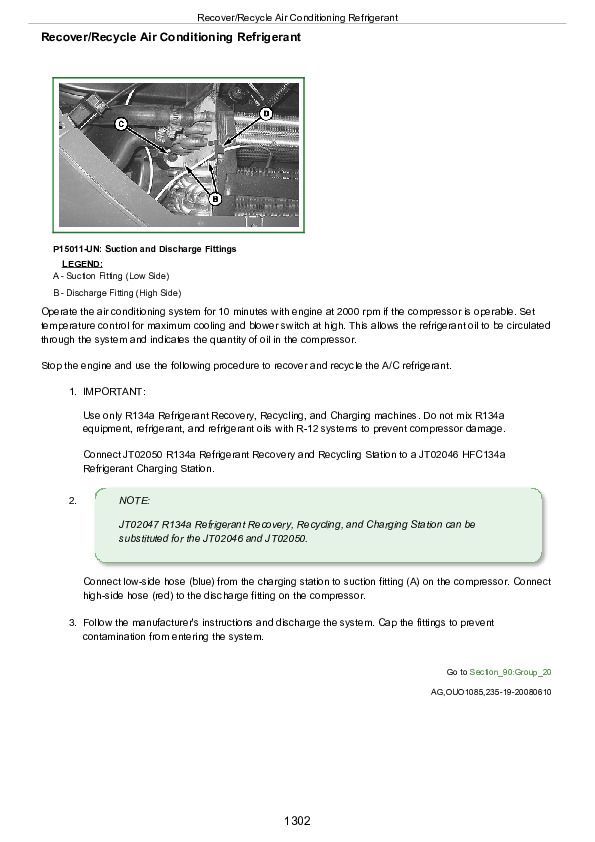
Recover/Recycle Air Conditioning Refrigerant................1302
Replace Air Conditioning Receiver-Dryer................1303
Remove, Inspect, and Install Air Conditioning Condenser................1305
Remove, Inspect, and Install Air Conditioning Compressor................1308
Test Volumetric Efficiency of Compressor................1312
Test Compressor Shaft Seal Leakage................1314
Disassemble and Assemble Compressor Clutch................1316
Disassemble, Inspect, and Assemble Compressor................1318
Check Compressor Clutch Hub Clearance................1322
Inspect Compressor Manifold................1323
Remove and Install Compressor Relief Valve................1324
Remove and Install Evaporator/Heater Core Housing Cover................1325
Remove Blower Motors................1326
Remove Evaporator/Heater Core................1327
Leak Test Evaporator/Heater Core................1329
Install Evaporator/Heater Core................1330
Service Expansion Valve................1332
Expansion Valve Bench Test................1333
Refrigerant Oil Information................1335
Check Compressor Oil Charge................1336
Determine Correct Refrigerant Oil Charge................1337
Add Refrigerant Oil to System................1339
System Information................1340
Flush Air Conditioning System................1341
Evacuate Air Conditioning System................1346
Charge Air Conditioning System................1348
Group 25: Heating System................1120
Replace Heater Temperature Control Cable................1352
Remove Heater Control Valve................1355
Leak Test Heater Control Valve................1356
Install Heater Control Valve................1357
John Deere Tractors 5220, 5320, 5420, 5520 Repair Service Technical Manual - TM2048


