Daihatsu Terios 1997-2015 Workshop Repair & Service Manual
Catalog:
Model:
Complete official workshop manual contains service, maintenance, and troubleshooting information for the 1997-2015 Daihatsu Terios. Diagnostic and repair procedures are covered in great detail to repair, maintain, rebuild, refurbish or restore your vehicle like a professional mechanic in local service/repair workshop. This cost-effective quality manual is 100% complete and intact as should be without any missing pages. It is the same factory shop manual used by dealers that guaranteed to be fully functional to save your precious time.
This manual for 1997-2015 Daihatsu Terios is divided into different sections. Each section covers a specific component or system and, in addition to the standard service procedures, includes disassembling, inspecting, and assembling instructions. A table of contents is placed at the beginning of each section. Pages are easily found by category, and each page is expandable for great detail. It is in the cross-platform PDF document format so that it works like a charm on all kinds of devices. You do not need to be skilled with a computer to use the manual.
MAKE: Daihatsu
YEAR: 1997 1998 1999 2000 2001 2002 2003 2004 2005 2006 2007 2008 2009 2010 2011 2012 2013 2014 2015
MODEL: Terios (Model J100 , J200, J210, J211 Series)
LANGUAGE: English/Spanish
EXCERPT:
ENGINE HOOD / DOOR - FRONT DOOR
FRONT DOOR
COMPONENTS
DISASSEMBLY
1. REMOVE FRONT DOOR LOWER FRAME BRACKET GARNISH RH
2. REMOVE FRONT DOOR ASSIST GRIP COVER RH
(a) Disengage the claws and remove the front door assist grip cover RH.
3. REMOVE DOOR ASSIST GRIP BASE
(a) Remove the 2 screws and door assist grip base.
4. REMOVE FRONT DOOR TRIM BOARD RH
(a) Remove the 2 screws and the clip.
(b) Using a clip remover, disengage the 8 clips of the front door trim board RH.
(c) Disconnect the connector from behind of the front door trim board RH.
5. REMOVE OUTER REAR VIEW MIRROR ASSEMBLY RH
6. REMOVE FRONT DOOR GLASS WEATHERSTRIP INN RH
(a) Remove the front door glass weatherstrip INN RH from the front door trip board RH.
7. REMOVE FRONT ARMREST BASE PANEL UPR RH
(a) Disconnect the 10 claws and remove the front armrest base panel UPR RH.
8. REMOVE POWER WINDOW REGULATOR MASTER SWITCH ASSEMBLY (DRIVER'S SEAT SIDE)
(a) Remove the 2 screws and power window regulator master switch assembly from the front armrest base panel UPR RH.
9. REMOVE POWER WINDOW REGULATOR SWITCH ASSEMBLY
(PASSENGER SEAT SIDE)
(a) Disengage the 2 claws and remove the power window switch assembly.
10. REMOVE FRONT DOOR INSIDE HANDLE RH
(a) Disengage the claw of the rear side.(*1)
(b) Pull the front claw toward the rear side and disengage it. (*2)
(c) Disconnect the front door lock remote control cable RH and the front door inside locking cable RH, and remove the front door inside handle RH.
11. REMOVE DOOR TRIM BRACKET NO. 1
(a) Remove the 2 screws, then remove the door trim bracket No. 1 RH.
12. REMOVE FRONT SPEAKER ASSEMBLY NO. 1
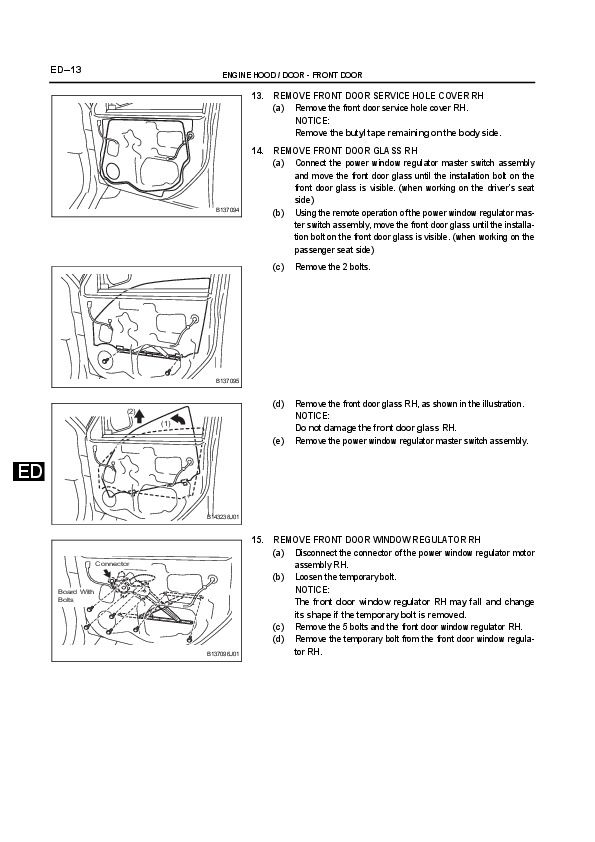
13. REMOVE FRONT DOOR SERVICE HOLE COVER RH
(a) Remove the front door service hole cover RH.
NOTICE:
Remove the butyl tape remaining on the body side.
14. REMOVE FRONT DOOR GLASS RH
(a) Connect the power window regulator master switch assembly and move the front door glass until the installation bolt on the front door glass is visible. (when working on the driver's seat side)
(b) Using the remote operation of the power window regulator master switch assembly, move the front door glass until the installation bolt on the front door glass is visible. (when working on the passenger seat side)
(c) Remove the 2 bolts.
(d) Remove the front door glass RH, as shown in the illustration.
NOTICE: Do not damage the front door glass RH.
(e) Remove the power window regulator master switch assembly.
15. REMOVE FRONT DOOR WINDOW REGULATOR RH
(a) Disconnect the connector of the power window regulator motor assembly RH.
(b) Loosen the temporary bolt.
NOTICE:
The front door window regulator RH may fall and change its shape if the temporary bolt is removed.
(c) Remove the 5 bolts and the front door window regulator RH.
(d) Remove the temporary bolt from the front door window regulator RH.
...
Daihatsu Terios 1997-2015 Workshop Repair & Service Manual


