Honda Legend 2007-2008 Factory Service & Shop Manual
Catalog:
Model:

Complete workshop repair service manual with electrical wiring diagrams for Honda Legend MY2007-2008. It's the same service manual used by dealers that guaranteed to be fully functional and intact without any missing page.
This service & repair manual (including maintenance, overhaul, disassembling & assembling, adjustment, tune-up, operation, inspecting, diagnostic & troubleshooting…) is divided into different sections. Each section covers a specific component or system with detailed illustrations. A table of contents is placed at the beginning of each section. Pages are easily found by category, and each page is expandable for great detail.
MAKE: Honda
MODEL: Legend (Model KB1), a.k.a. Acura RL
YEAR: 2007 2008
LANGUAGE: German English Italian Spanish Portuguese
EXCERPT:
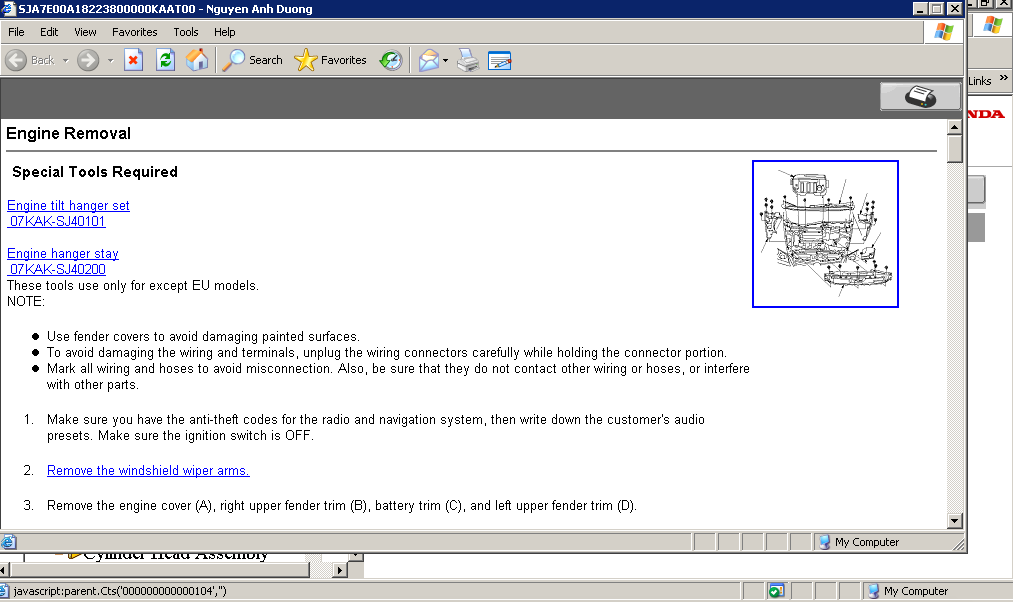
Engine Removal
Special Tools Required
Engine tilt hanger set
07KAK-SJ40101
Engine hanger stay
07KAK-SJ40200
These tools use only for except EU models.
NOTE:
Use fender covers to avoid damaging painted surfaces.
To avoid damaging the wiring and terminals, unplug the wiring connectors carefully while holding the connector portion.
Mark all wiring and hoses to avoid misconnection. Also, be sure that they do not contact other wiring or hoses, or interfere with other parts.
Make sure you have the anti-theft codes for the radio and navigation system, then write down the customer's audio presets. Make sure the ignition switch is OFF.
Remove the windshield wiper arms.
Remove the engine cover (A), right upper fender trim (B), battery trim (C), and left upper fender trim (D).
Remove the upper grille cover (E) and cowl cover (F).
Disconnect the support struts from both sides of the pivot ball (bolted to the hood). Secure the hood in a vertical position. Remove the right side pivot ball and install it into the lower threaded hole, then reattach the support strut.
NOTE: Do not attempt to close the hood with the support strut in the vertical position, as it will damage the support strut and hood.
Relieve fuel pressure.
Disconnect the negative cable from the battery first, then disconnect the positive cable.
Remove the battery.
Remove the air cleaner.
Remove the air intake duct cover.
Remove the harness clamps (A), starter cable (B), and ground cable (C).
Remove the two bolts (A), and loosen the two bolts (B), then remove the battery base (C).
Remove the battery cable (A) from the under-hood fuse/relay box.
Remove the harness clamp (B), then disconnect the harness connector (C).
Remove the two bolts (D) securing the under-hood fuse/relay box.
LHD model: Remove the harness clamp (A), and disconnect the engine wire harness connectors (B) on the left side of the engine compartment.
LHD model: Remove the connectors (A).
Remove the transfer breather hose (B), then remove the front tower bar (C).
RHD model: Remove the Passenger's dashboard under cover.
RHD model: Disconnect the powertrain control module (PCM) connectors (A) and main wire harness connectors (B), then remove the harness clamps (C).
RHD model: Remove the harness clamp (A) and grommet (B), then pull the engine wire harness through the bulkhead.
Remove the quick-connect fitting cover (A), then disconnect the fuel feed hose.
Remove the brake booster vacuum hose (A), evaporative emission (EVAP) canister hose (B).
Remove the shift cable.
Remove the drive belt.
Remove the heat shield.
Remove the radiator cap.
Raise the vehicle on the hoist to full height.
Remove the front wheels.
Remove the splash shield.
Loosen the drain plug in the radiator, and drain the engine coolant.
Drain the automatic transmission fluid (ATF).
Drain the engine oil.
Disconnect the stabilizer links.
Remove the damper fork.
Separate the tie-rod end ball joints from the knuckles.
Separate the knuckles from the lower arms.
Remove the driveshafts. Coat all precision-finished surfaces with clean engine oil. Tie plastic bags over the driveshaft ends.
Remove the exhaust pipe assembly.
Remove the propeller shaft.
Remove the transfer assembly.
Remove the ATF cooler hoses from the transmission.
With power steering: Remove the power steering (P/S) line from the clamps (A), then remove the P/S line bracket mounting bolt (B).
Remove the bolts securing the transmission lower mount.
Lower the vehicle on the hoist.
Remove the upper radiator hose (A) and lower radiator hose (B).
Remove the heater hoses.
Remove the radiator.
Remove the four bolts securing the A/C compressor.
Remove the two bolts securing the upper bracket.
With power steering: Remove the P/S pump (A) without disconnecting the P/S hoses from the pump, then remove the P/S hose clamp (B).
Attach the special tools (Commercially available tool for EU models) to the engine as shown.
LHD model: Remove the P/S hose from the clamp (A), then remove the shift cable bracket mounting bolt (B) and P/S line bracket mounting bolt (C).
RHD model with power steering: Remove the shift cable bracket mounting bolt (A) and P/S line bracket mounting bolt (B).
RHD model with electrical power steering: Remove the harness clamp bracket mounting bolt (A), then remove the shift cable bracket mounting bolt (B).
Remove the vacuum hose (A) and front mount stop (B), then remove the front mount bolt (C).
Remove the vacuum hose (A) and vacuum hose bracket mounting bolt (B).
Remove the rear mount stop (C), then remove the rear mount bolt (D).
Remove the rear mount (E).
Remove the steering gearbox mounting bolts (A), then remove the steering gearbox stiffener (B) and damper (C).
Make sure the hoist brackets are positioned properly. Raise the hoist to full height.
Support the front subframe with a 4 x 4 x 40 in. piece of wood and a jack.
Remove the subframe.
Check that the engine/transmission is completely free of vacuum hoses, fuel and coolant hoses, and electrical wiring.
Slowly lower the engine/transmission assembly about 150 mm (6 in.). Check once again that all hoses and electrical wiring are disconnected and free from the engine/transmission, then lower it all the way.
Disconnect the chain hoist from the engine/ transmission assembly.
Remove the engine/transmission assembly from under the vehicle.
...
Honda Legend 2007-2008 Factory Service & Shop Manual


