Mercedes-Benz ML350 2002-2016 Workshop Repair & Service Manual
Catalog:
Model:
Complete digital workshop manual contains service, maintenance, and troubleshooting information for the 2002-2016 Mercedes-Benz (W163/W164/W166) ML350, ML350 4Matic, ML350 BlueTEC. Diagnostic and repair procedures are covered in great detail to repair, maintain, rebuild, refurbish or restore your vehicle like a professional mechanic in local service/repair workshop. This cost-effective quality manual is 100% complete and intact as should be without any missing pages. It is the same factory shop manual used by dealers that guaranteed to be fully functional to save your precious time.
This manual for 2002-2016 Mercedes-Benz (W163/W164/W166) ML350, ML350 4Matic is divided into different sections. Each section covers a specific component or system and, in addition to the standard service procedures, includes disassembling, inspecting, and assembling instructions. A table of contents is placed at the beginning of each section. Pages are easily found by category, and each page is expandable for great detail. It is in the cross-platform PDF document format so that it works like a charm on all kinds of devices. You do not need to be skilled with a computer to use the manual.
EXCERPT:
DRIVELINE/AXLES Rear Axle - 164 Chassis
TESTING & REPAIR
TESTING AND REPAIR WORK: PASSENGER CARS: REAR AXLE - AR35.00-Z-9164AA
REMOVE/INSTALL COMPLETE REAR AXLE - AR35.10-P-0010GZ
MODEL 164
Shown on model 164.1 with AIRmatic (air suspension with level adjustment and adaptive damping system ADS), code 489 and with offroad package, code 430
Fig. 1: Identifying Complete Rear Axle Components - Shown On Model 164.1 (1 Of 3)
Shown on model 164.1 with Airmatic (air suspension with level adjustment and adaptive damping system ADS), code 489
Fig. 2: Identifying Complete Rear Axle Components - Shown On Model 164.1 (2 Of 3)
Shown on model 164.1 with Airmatic (air suspension with level adjustment and adaptive damping system ADS), code 489
Fig. 3: Identifying Complete Rear Axle Components - Shown On Model 164.1 (3 Of 3)
...
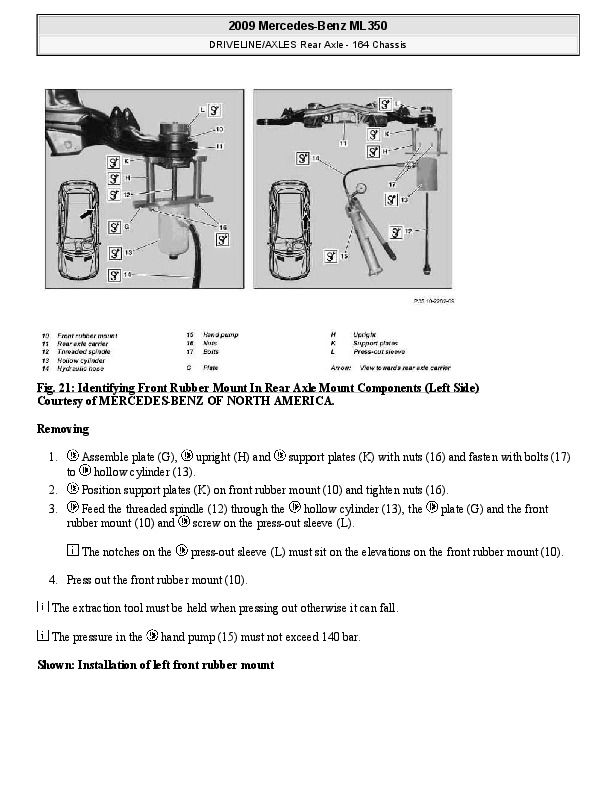
Fig. 21: Identifying Front Rubber Mount In Rear Axle Mount Components (Left Side)
Removing
1. Assemble plate (G), upright (H) and support plates (K) with nuts (16) and fasten with bolts (17) to hollow cylinder (13).
2. Position support plates (K) on front rubber mount (10) and tighten nuts (16).
3. Feed the threaded spindle (12) through the hollow cylinder (13), the plate (G) and the front rubber mount (10) and screw on the press-out sleeve (L).
The notches on the press-out sleeve (L) must sit on the elevations on the front rubber mount (10).
4. Press out the front rubber mount (10).
The extraction tool must be held when pressing out otherwise it can fall.
The pressure in the hand pump (15) must not exceed 140 bar.
Shown: Installation of left front rubber mount
Fig. 22: Identifying Front Rubber Mount In Rear Axle Mount Components (Left Side)
Install
1. Assemble hollow cylinder (13), hydraulic hose (14) and hand pump (15).
2. Fit front plate (M) and front rubber mount (10) on to the hollow cylinder (13). Feed threaded spindle (12) through the hollow cylinder (13), the front plate (M), the front rubber mount (10) and the rear axle carrier (11), screw on nut block (F).
Be careful when screwing on the nut block (F). Otherwise the paintwork on the rear axle carrier (11) can be damaged.
3. Align front rubber mount (10) with the markings and press in.
Use lubricant
The pressure in the hand pump (15) must not exceed 140 bar.
Remove/install rear rubber mount in rear axle mount - AR35.10-P-0040-03GZ
...


