Toyota Matrix 2002-2014 Workshop Repair & Service Manual
Catalog:
Model:
Complete digital workshop manual contains service, maintenance, and troubleshooting information for the 2002-2014 Toyota Matrix. Diagnostic and repair procedures are covered in great detail to repair, maintain, rebuild, refurbish or restore your vehicle like a professional mechanic in local service/repair workshop. This cost-effective quality manual is 100% complete and intact as should be without any missing pages. It is the same factory shop manual used by dealers that guaranteed to be fully functional to save your precious time.
This manual for 2002-2014 Toyota Matrix is divided into different sections. Each section covers a specific component or system and, in addition to the standard service procedures, includes disassembling, inspecting, and assembling instructions. A table of contents is placed at the beginning of each section. Pages are easily found by category, and each page is expandable for great detail. It is in the cross-platform PDF document format so that it works like a charm on all kinds of devices. You do not need to be skilled with a computer to use the manual.
MAKE: Toyota
MODEL: Matrix (a.k.a. Corola Matrix)
YEAR: 2002 2003 2004 2005 2006 2007 2008 2009 2010 2011 2012 2013 2014
EXCERPT:
1ZZ-FE ENGINE MECHANICAL – ENGINE UNIT EM–107
DISASSEMBLY
1. REMOVE OIL FILLER CAP SUB-ASSEMBLY
(a) Remove the oil filler cap from the cylinder head cover.
2. REMOVE OIL FILLER CAP GASKET
(a) Using a screwdriver, remove the gasket from the oil filler cap.
3. REMOVE VENTILATION VALVE SUB-ASSEMBLY
(a) Remove the ventilation valve from the cylinder head cover.
4. REMOVE SPARK PLUG
(a) Using a spark plug wrench, remove the 4 spark plugs.
5. REMOVE CYLINDER HEAD COVER SUB-ASSEMBLY
(a) Remove the 9 bolts, 2 seal washers and 2 nuts, then remove the cylinder head cover.
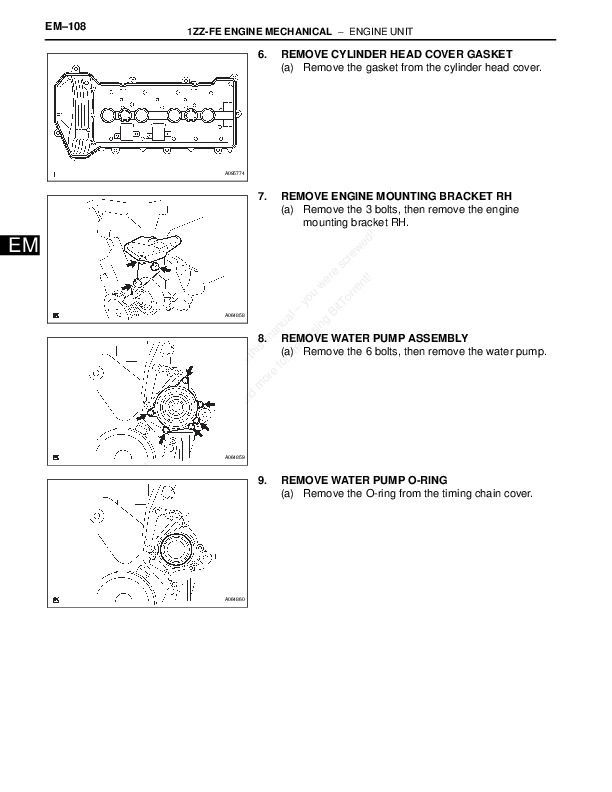
6. REMOVE CYLINDER HEAD COVER GASKET
(a) Remove the gasket from the cylinder head cover.
7. REMOVE ENGINE MOUNTING BRACKET RH
(a) Remove the 3 bolts, then remove the engine mounting bracket RH.
8. REMOVE WATER PUMP ASSEMBLY
(a) Remove the 6 bolts, then remove the water pump.
9. REMOVE WATER PUMP O-RING
(a) Remove the O-ring from the timing chain cover.
10. REMOVE CRANKSHAFT PULLEY
(a) Set the No. 1 cylinder to the TDC/compression.
(1) Turn the crankshaft pulley until its groove and timing mark "0" of the timing chain cover are aligned.
(2) Check that the point marks of the camshaft timing gears are in a straight line on the timing chain cover surface as shown in the illustration.
If not, turn the crankshaft 1 revolution (360°) to align the marks as above.
(b) Using SST, remove the crankshaft pulley bolt.
SST 09960-10010 (09962-01000, 09963-01000)
(c) Remove the crankshaft pulley from the crankshaft.
11. REMOVE CHAIN TENSIONER ASSEMBLY NO.1
(a) Remove the 2 nuts, then remove the chain tensioner.
12. REMOVE TIMING CHAIN OR BELT COVER SUBASSEMBLY
(a) Remove the 10 bolts and 2 nuts.
(b) Remove the timing chain cover by prying the portions between the timing chain cover, cylinder head and cylinder block with a screwdriver.
NOTICE: Be careful not to damage the contact surfaces of the timing chain cover, cylinder head and cylinder block.
(c) Using a "TORX" socket wrench E5, remove the 3 stud bolts.
13. REMOVE TIMING CHAIN OR BELT COVER OIL SEAL
(a) Place the timing chain cover on wooden blocks.
(b) Using a screwdriver, remove the oil seal.
14. REMOVE CRANKSHAFT POSITION SENSOR PLATE NO.1
(a) Remove the crankshaft position sensor plate from the crankshaft.
...
MAIN SECTIONS
Section 01: introduction
01-01 how to use this manual
01-04 identification information
01-05 repair instruction
01-20 vehicle lift and support locations
01-23 how to troubleshoot ecu controlled systems
01-24 how to proceed with troubleshooting ecu controlled systems
01-34 electronic circuit inspection procedure
01-39 term and abbreviations
01-44 glossary of sae and toyota terms
Section 02: preparation
02-01 diagnostics
02-02 engine control system
02-03 fuel
02-04 emission control
02-05 engine mechanical
02-12 exhaust
02-13 cooling
02-14 lubrication
02-15 ignition
02-16 starting and charging
02-17 front suspension
02-18 rear suspension
02-21 tire and wheel
02-22 differential
02-27 drive shaft / propeller shaft
02-32 transfer
02-37 brake
02-39 parking brake
02-40 automatic transmission / transaxle
02-44 manual transmission / transaxle
02-51 clutch
02-52 steering column
02-53 power steering
02-57 heater and air conditioner
02-61 supplemental restraint system
02-63 seat belt
02-64 lighting
02-65 wiper and washer
02-66 audio and visual system
02-68 communication system
02-69 windshield / windowglass / mirror
02-70 instrument panel
02-71 seat
02-72 theft deterrent and door lock
02-73 sliding roof / convertible
02-74 exterior interior trim
02-75 vehicle control system
02-76 cruise control
Section 03: service specifications
03-01 standard bolt - how to determine bolt strength
03-02 standard bolt - specified torque for standard bolts
03-03 standard bolt - how to determine nut strength
03-04 engine control system service data
03-05 engine control system torque specification
03-06 fuel service data
03-07 fuel torque specification
03-08 emission control service data
03-09 engine mechanical service data
03-14 engine mechanical torque specification
03-18 exhaust service data
03-19 exhaust torque specification
03-20 cooling service data
03-21 cooling torque specification
03-22 lubrication service data
03-23 lubrication torque specification
03-24 ignition service data
03-25 ignition torque specification
03-26 starting and charging service data
03-27 starting and charging torque specification
03-28 front suspension service data
03-29 front suspension torque specification
03-30 rear suspension service data
03-31 rear suspension torque specification
03-32 tire and wheel service data
03-33 differential service data
03-35 differential torque specification
03-36 drive shaft / propeller shaft / axle service data
03-37 drive shaft torque specification
03-38 transfer assembly service data
03-41 transfer assembly torque specification
03-42 brake service data
03-43 brake torque specification
03-44 parking brake service data
03-45 parking brake torque specification
03-46 automatic transmission / transaxle service data
03-48 automatic transmission torque specification
03-51 manual transmission service data
03-57 manual transmission torque specification
03-59 clutch service data
03-60 clutch torque specification
03-61 steering column service data
03-62 steering column torque specification
03-63 power steering service data
03-64 power steering torque specification
03-65 heater and air conditioner service data
03-66 heater and air conditioner torque specification
03-67 supplemental restraint system torque specification
03-68 seat belt torque specification
03-69 wiper and washer torque specification
03-70 audio and visual system torque specification
03-71 instrument panel / meter torque specification
03-72 seat torque specification
03-73 sliding roof / convertible service data
03-74 sliding root / convertible torque specification
03-75 engine hood / door torque specification
03-76 exterior / interior trim torque specification
03-77 cruise control service data
03-78 cruise control torque specification
Section 05: diagnostics
sfi system (1zz-fe)
05-001 sfi system (1zz-fe) - how to proceed with troubleshooting
05-004 customer problem analysis check
05-005 pre-check
05-016 diagnostic trouble code chart
05-020 location diagram
05-021 terminals of ecm
05-023 problem symptoms table
05-025 mass air flow circuit malfunction
05-030 mass air flow circuit range/performance problem
05-031 intake air temp circuit malfunction
05-034 engine coolant temp circuit malfunction
05-037 engine coolant temp circuit range/performance problem
05-038 throttle/pedal position sensor/switch A circuit malfunction
05-043 throttle/pedal position sensor/switch A circuit range/performance problem
05-044 insufficient coolant temp for closed loop fuel control
05-049 thermostat malfunction
05-051 heated oxygen sensor circuit malfunction (bank 1 sensor 1)
05-056 heated oxygen sensor slow response (bank 1 sensor 1)
05-060 heated oxygen sensor heater circuit malfunction (bank 1 sensor 1)
05-063 oxygen sensor circuit malfunction (bank 1 sensor 2)
05-064 system too lean (fuel trim) (bank 1) system too rich (fuel trim) (bank 1)
05-068 random/multiple cylinder misfire detected
05-073 knock sensor 1 circuit malfunction (bank 1)
05-076 crankshaft position sensor A circuit malfunction
05-079 camshaft position sensor circuit malfunction
05-081 catalyst system efficency below threshold (bank 1)
05-084 evaporative emission control system malfunction
05-093 evaporative emission control system incorrect purge flow
05-108 evaporative emission control system pressure sensor malfunction
05-110 vehicle speed sensor malfunction
05-112 idle control system malfunction
05-115 igniter circuit malfunction
05-121 crankshaft position sensor circuit malfunction (during engine running)
05-122 vvt sensor/camshaft position sensor circuit range/performance problem (bank1)
05-123 vvt system malfunction (bank 1)
05-128 stop light switch circuit malfunction
05-132 back-up power source circuit malfunction
05-135 ocv circuit malfunction (bank 1)
05-138 park/neutral position switch malfunction
05-139 starter signal circuit
05-144 fuel pump control circuit
05-148 ecm power circuit
sfi system (2zz-ge)
05-153 sfi system (2zz-ge) - how to proceed with troubleshooting
05-156 customer problem analysis check
05-157 pre-check
05-168 diagnostic trouble code chart
05-172 location diagram
05-173 terminals of ecm
05-175 problem symptoms table 2zz
05-177 mass air flow circuit malfunction
05-182 mass air flow circuit range/performance problem
05-183 intake air temp circuit malfunction
05-186 engine coolant temp circuit malfunction
05-189 engine coolant temp circuit range/performance problem
05-190 throttle/pedal position sensor/switch A circuit malfunction
05-195 throttle/pedal position sensor/switch A circuit range/performance problem
05-196 insufficient coolant temp for closed loop fuel control
05-201 thermostat malfunction
05-203 heated oxygen sensor circuit malfunction (bank 1 sensor 1)
05-208 heated oxygen sensor slow response (bank 1 sensor 1)
05-212 heated oxygen sensor heater circuit malfunction (bank 1 sensor 1)
05-215 oxygen sensor circuit malfunction (bank 1 sensor 2)
05-216 system too lean (fuel trim) (bank 1) system too rich (fuel trim) (bank 1)
05-220 random/multiple cylinder misfire detected
05-225 knock sensor 1 circuit malfunction (bank 1)
05-228 crankshaft position sensor A circuit malfunction
05-231 camshaft position sensor circuit malfunction
05-233 catalyst system efficency below threshold (bank 1)
05-236 evaporative emission control system malfunction
05-245 evaporative emission control system incorrect purge flow
05-260 evaporative emission control system pressure sensor malfunction
05-262 vehicle speed sensor malfunction
05-264 idle control system malfunction
05-267 igniter circuit malfunction
05-273 crankshaft position sensor circuit malfunction (during engine running)
05-274 vvt sensor/camshaft position sensor circuit range/performance problem (bank1)
05-275 vvt system malfunction (bank 1)
05-280 stop light switch circuit malfunction
05-284 back-up power source circuit malfunction
05-287 ocv circuit malfunction (bank 1)
05-290 ocv for vvtl circuit malfunction
05-294 ocv for vvtl open malfunction (bank 1)
05-298 park/neutral position switch malfunction
05-299 starter signal circuit
05-304 fuel pump control circuit
05-308 ecm power circuit
Section 10: engine control system
10-02 sfi system (1zz-fe) inspection
10-01 sfi system (1zz-fe) on-vehicle inspection
10-05 throttle body assembly (1zz-fe) components
10-06 throttle body assembly (1zz-fe) removal and installation/disassembly and reassembly
10-12 sfi system (2zz-ge) inspection
10-11 sfi system (2zz-ge) on-vehicle inspection
10-15 throttle body assembly (2zz-ge) components
10-16 throttle body assembly (2zz-ge) removal and installation/disassembly and reassembly
Section 11: fuel system
11-01 precautions
11-05 on-vehicle inspection
11-07 inspection
11-09 fuel injector assy (1zz-fe)
11-10 fuel injector replacement (1zz-fe)
11-14 fuel injector assy (2zz-ge)
11-15 fuel injector replacement (2zz-ge)
11-19 fuel pump assy components
11-21 fuel pump assy removal/install and disassembly and reassembly
11-27 fuel pump assy components (4wd)
11-29 fuel pump assy removal/install and disassembly/reassembly (4wd)
11-35 fuel tank assy components
11-38 fuel tank assy removal/install and disassembly and reassembly
11-47 fuel tank assy components (4wd)
11-51 fuel tank assy removal/install and disassembly/reassembly (4wd)
Section 12: emission control system
12-01 emission control system (1zz-fe) on-vehicle inspection
12-07 charcoal canister assy (1zz-fe)
12-13 emission control system (2zz-ge) on-vehicle inspection
12-18 charcoal canister assy (2zz-ge)
Section 14: engine mechanical
14-001 engine assy (1zz-fe) inspection
14-004 fan and generator v belt (1zz-fe) replacement
14-005 valve clearance (1zz-fe) adjustment
14-016 partial engine assy (1zz-fe) components
14-030 partial engine assy (1zz-fe) replacement
14-052 partial engine assy (1zz-fe) overhaul
14-083 chain sub-assy (1zz-fe) components
14-086 chain sub-assy (1zz-fe) replacement
14-097 camshaft (1zz-fe) components
14-100 camshaft (1zz-fe) replacement
14-112 cylinder head gasket (1zz-fe) components
14-116 cylinder head gasket (1zz-fe) replacement
14-132 timing gear cover oil seal (1zz-fe) replacement
14-134 engine rear oil seal (1zz-fe) replacement
14-137 cylinder head assy (1zz-fe) components
14-138 cylinder head assy (1zz-fe) overhaul
14-150 cylinder block (1zz-fe) components
14-151 cylinder block (1zz-fe) overhaul
14-174 engine assy (2zz-ge) inspection
14-177 fan and generator v belt (2zz-ge) replacement
14-179 valve clearance (2zz-ge) adjustment
14-189 partial engine assy (2zz-ge) components
14-218 partial engine assy (2zz-ge) overhaul
14-201 partial engine assy (2zz-ge) replacement
14-244 chain sub-assy (2zz-ge) components
14-247 chain sub-assy (2zz-ge) replacement
14-259 camshaft (2zz-ge) components
14-262 camshaft (2zz-ge) replacement
14-275 cylinder head gasket (2zz-ge) components
14-279 cylinder head gasket (2zz-ge) replacement
14-296 timing gear cover oil seal (2zz-ge) replacement
14-299 engine rear oil seal (2zz-ge) replacement
14-302 cylinder head assy (2zz-ge) components
14-303 cylinder head assy (2zz-ge) overhaul
14-315 cylinder block (2zz-ge) components
14-316 cylinder block (2zz-ge) overhaul
Section 15: exhaust pipe
15-01 exhaust pipe (1zz-fe) components
15-04 exhause pipe (1zz-fe) removal/install and disassembly/reassmbly
15-08 exhaust pipe (2zz-ge) components
15-09 exhause pipe (2zz-ge) removal/install and disassembly/reassmbly
Section 16: cooling
16-01 cooling system on-vehicle inspection
16-02 cooling system inspection
16-04 cooling fan system on-vehicle inspection
16-05 cooling fan system inspection
16-06 coolant replacement
16-07 water pump assy (1zz-fe) replacement
16-09 water pump assy (1zz-fe) inspection
16-10 water pump assy (2zz-ge) replacement
16-12 water pump assy (2zz-ge) inspection
16-13 thermostat replacement
16-15 radiator assy replacement
Section 17: lubrication
17-01 lubrication system (1zz-fe) on-vehicle inspection
17-03 oil pump assy (1zz-fe) components
17-07 oil pump assy (1zz-fe) replacement
17-08 oil pump assy (1zz-fe) overhaul
17-10 oil filter sub-assy (1zz-fe) replacement
17-12 lubrication system (2zz-ge) on-vehicle inspection
17-14 oil pump assy (2zz-ge) components
17-18 oil pump assy (2zz-ge) replacement
17-19 oil pump assy (2zz-ge) overhaul
17-22 oil filter sub-assy (2zz-ge) replacement
Section 18: ignition
18-01 ignition system (1zz-fe) on-vehicle inspection
18-02 ignition system (1zz-fe) inspection
18-04 ignition system (2zz-ge) on-vehicle inspection
18-05 ignition system (2zz-ge) inspection
Section 19: starting and charging
19-01 starting system inspection
19-03 starter assy replacement
19-04 starter assy components
19-05 starter assy overhaul
19-11 charging system precautions
19-12 charging system on-vehicle inspection
19-15 generator assy replacement
19-16 generator assy components
19-17 generator assy overhaul
Section 26: front suspension
26-01 front suspension system problem symptoms table
26-02 front suspension repair
26-03 front suspension components
26-06 front wheel alignment adjustment
26-10 front shock absorber w/ coil spring overhaul
26-14 front shock absorber w/ coil spring disposal
26-15 front suspension arm sub-assy lower no.1 lh replacement
26-20 lower ball joint assy front lh replacement
26-22 stabilizer bar front replacement
Section 27: rear suspension
27-01 rear suspension system problem symptoms table
27-02 rear suspension components
27-06 rear wheel alignment inspection
27-07 rear wheel alignment (4wd) adjustment
27-11 rear shock absorber w/ coil spring overhaul
27-15 rear shock absorber w/ coil spring disposal
27-16 rear shock absorber w/ coil spring (4wd) overhaul
27-20 rear shock absorber w/ coil spring (4wd) disposal
27-21 rear axle beam assy replacement
27-27 rear suspension arm assy no.1 lh (4wd) replacement
27-32 upper control arm assy (4wd) replacement
27-38 stabilizer bar rear replacement
27-39 stabilizer bar rear (4wd) replacement
Section 28: wheel and tire system
28-01 wheel and tire system inspection
Section 29: differential
29-01 differential system (4wd) precaution
29-02 differential system (4wd) problem symptoms table
29-03 differential (4wd) components
29-07 differential oil (4wd) adjustment
29-08 oil diaphragm seal (4wd) replacement
29-10 rear differential side gear shaft oil seal (4wd) replacement
29-12 differential carrier assy rear (4wd) overhaul
Section 30: drive shaft / propeller shaft
30-01 drive shaft, propeller shaft, axle precautions
30-02 drive shaft, propeller shaft, axle problem symptoms table
30-03 drive shaft, propeller shaft, axle on-vehicle inspection
30-05 propeller w/ center bearing shaft assy (4wd) components
30-06 propeller w/ center bearing shaft assy (4wd) overhaul
30-12 front drive shaft (1zz-fe) components
30-15 front drive shaft (1zz-fe) overhaul
30-30 front drive shaft (2zz-ge) components
30-32 front drive shaft (2zz-ge) overhaul
30-45 rear drive shaft (4wd) components
30-46 rear drive shaft (4wd) overhaul
30-55 front axle hub sub-assy lh components
30-56 front axle hub sub-assy lh replacement
30-61 front axle lh hub bolt replacement
30-62 rear axle hub and bearing assy lh components
30-63 rear axle hub and bearing assy lh replacement
30-65 rear axle carrier sub-assy lh (4wd) components
30-66 rear axle carrier sub-assy lh (4wd) replacement
30-72 rear axle hub bolt replacement
Section 31: transfer
31-01 transfer system (u341f) precaution
31-02 transfer system (u341f) problem symptoms table
31-03 transfer oil (u341f) adjustment
31-04 transfer case rh oil seal (u341f)
31-06 transfer case oil seal (u341f) replacement
31-08 transfer extension housing type t oil seal (u341f)
31-09 transfer assy (u341f) components
31-11 transfer assy (u341f) overhaul
Section 32: brake
32-01 brake system precautions
32-02 brake system problem symptoms table
32-06 brake fluid bleeding
32-08 brake pedal sub-assy adjustment
32-10 brake pedal sub-assy components
32-11 brake pedal sub-assy replacement
32-13 brake master cylinder sub-assy components
32-15 brake master cylinder sub-assy overhaul
32-20 brake booster assy on-vehicle inspection
32-21 brake booster assy components
32-22 brake booster assy replacement
32-26 front brake components
32-27 front brake overhaul
32-32 rear drum brake (1zz-fe(ff)) components
32-33 rear drum brake (1zz-fe(ff)) overhaul
32-40 rear drum brake (1zz-fe(4wd)) components
32-41 rear drum brake (1zz-fe(4wd)) overhaul
32-48 rear disc brake components
32-49 rear disc brake overhaul
32-54 proportioning valve assy on-vehicle inspection
32-55 proportioning valve assy replacement
32-56 brake actuator assy on-vehicle inspection
32-57 brake actuator assy replacement
32-60 speed sensor front lh replacement
32-62 skid control sensor (ff)
32-64 speed sensor rear lh (4wd) replacement
32-67 deceleration sensor (4wd) replacement
Section 33: parking brake
32-01 parking brake problem symptoms table
32-02 parking brake adjustment
32-03 parking brake lever sub-assy components
32-04 parking brake lever sub-assy replacement
32-07 parking brake cable assy no.1 components
32-08 parking brake cable assy no.1 replacement
32-10 parking brake cable assy no.3 (ff) components
32-11 parking brake cable assy no.3 (ff) replacement
32-14 parking brake cable assy no.3 (4wd) components
32-15 parking brake cable assy no.3 (4wd) replacement
32-17 parking brake assy (2zz-ge) components
32-18 parking brake assy (2zz-ge) overhaul
Section 40: automatic transmission
40-01 automatic transaxle assy (atm) precautions
40-02 automatic transaxle fluid (atm) on-vehicle inspection
40-03 park/neutral position switch assy (atm) replacement
40-09 park/neutral position switch assy (atm) adjustment
40-10 automatic transaxle assy (a246e) components
40-12 automatic transaxle assy (a246e) replacement
40-23 automatic transaxle assy (u240e) components
40-25 automatic transaxle assy (u240e) replacement
40-35 automatic transaxle assy (u341f) components
40-36 automatic transaxle assy (u341f) replacement
40-43 torque converter clutch and drive plate (atm) inspection
40-45 speedometer sensor (a246e)
40-46 transmission revolution sensor (u240e) replacement
40-48 transmission revolution sensor (u341f) replacement
40-49 transmission valve body assy (a246e) replacement
40-53 transmission valve body assy (u240e) replacement
40-58 transmission valve body assy (u341f) replacement
40-63 transmission wire (a246e) replacement
40-64 transmission wire (u240e) replacement
40-67 transmission wire (u341f) replacement
40-68 front differential oil seal (a246e) replacement
40-70 front differential oil seal (u240e) replacement
40-72 front differential oil seal (u341f) replacement
40-74 shift lock system (atm) on-vehicle inspection
40-76 floor shift assy (atm) components
40-78 floor shift assy (atm) overhaul
40-87 floor shift assy (atm) adjustment
40-88 shift lock control ecu (atm) inspection
40-89 shift lock solenoid (atm) inspection
40-90 floor shift cable transmission control shift (atm) replacement
40-95 floor shift parking lock cable assy (atm) replacement
Section 41: manual transmission
41-001 manual transaxle system (mtm) problem symptoms table
41-002 manual transaxle oil (mtm) on-vehicle inspection
41-003 front differential oil seal (mtm) replacement
41-005 floor shift lever assy (mtm) components
41-006 floor shift lever assy (mtm) replacement
41-009 floor shift cable transmission control shift (mtm) replacement
41-012 floor shift cable transmission control select (mtm) replacement
41-015 manual transaxle assy (mtm) components
41-017 manual transaxle assy (mtm) replacement
41-026 manual transaxle assy (c59) components
41-029 manual transaxle assy (c59) overhaul
41-063 manual transaxle assy (c60) components
41-066 manual transaxle assy (c60) overhaul
41-101 input shaft assy (c59) components
41-102 input shaft assy (c59) overhaul
41-112 input shaft assy (c60) components
41-113 input shaft assy (c60) overhaul
41-122 output shaft assy (c59) components
41-123 output shaft assy (c59) overhaul
41-134 output shaft assy (c60) components
41-135 output shaft assy (c60) overhaul
41-146 differential case assy (mtm) components
41-147 differential case assy (mtm) overhaul
41-152 shift and select lever shaft assy (c59) components
41-154 shift and select lever shaft assy (c59) overhaul
41-159 shift and select lever shaft assy (c60) components
41-161 shift and select lever shaft assy (c60) overhaul
Section 42: clutch
42-01 clutch system (mtm) problem symptoms table
42-02 clutch pedal sub-assy (mtm) adjustment
42-04 clutch pedal sub-assy (mtm) components
42-05 clutch pedal sub-assy (mtm) replacement
42-09 clutch master cylinder assy (mtm) components
42-10 clutch master cylinder assy (mtm) overhaul
42-14 clutch release cylinder assy (mtm) components
42-15 clutch release cylinder assy (mtm) overhaul
42-17 clutch unit (mtm) components
42-18 clutch unit (mtm) overhaul
42-22 clutch start switch assy (mtm) on-vehicle inspection
42-23 clutch start switch assy (mtm) inspection
42-24 clutch start switch assy (mtm) replacement
Section 50: steering
50-01 steering system precautions
50-02 steering system problem symptoms table
50-03 steering column on-vehicle inspection
50-04 steering system repair
50-06 steering column assy components
50-08 steering column assy overhaul
Section 51: power steering
51-01 power steering system precautions
51-02 power steering system problem symptoms table
51-03 power steering system on-vehicle inspection
51-07 vane pump assy components
51-08 vane pump assy overhaul
51-16 rack and pinion power steering gear assy components
51-22 rack and pinion power steering gear assy overhaul
Section 55: heater and air conditioner
55-01 air conditioning system precautions
55-02 air conditioning system on-vehicle inspection
55-03 air conditioning system inspection
55-06 refrigerant on-vehicle inspection
55-11 refrigerant replacement
55-12 refrigerant line components
55-13 air conditioning control assy overhaul
55-15 air conditioning unit assy components
55-17 air conditioning unit assy overhaul
55-33 cooler compressor assy (2zz-ge) components
55-34 cooler compressor assy (2zz-ge) replacement
55-39 cooler compressor assy (1zz-fe) components
55-40 cooler compressor assy (1zz-fe) replacement
55-45 w/ receiver condenser assy on-vehicle inspection
55-46 w/ receiver condenser assy components
55-47 w/ receiver condenser assy overhaul
Section 60: supplemental restraint
60-01 supplemental restraint system precautions
60-08 supplemental restraint system on-vehicle inspection
60-12 horn button assy components
60-13 horn button assy replacement
60-14 horn button assy disposal
60-21 spiral cable sub-assy components
60-22 spiral cable sub-assy replacement
60-24 instrument panel passenger air bag assy components
60-25 instrument panel passenger air bag assy replacement
60-27 instrument panel passenger air bag assy disposal
60-33 front seat airbag assy rh disposal
60-38 air bag sensor assy center components
60-39 air bag sensor assy center replacement
60-40 air bag front rh sensor components
60-41 air bag front rh sensor replacement
60-42 air bag sensor front lh components
60-43 air bag sensor front lh replacement
60-44 side air bag sensor assy rh components
60-45 side air bag sensor assy rh replacement
60-46 seat position air bag sensor components
60-47 seat position air bag sensor replacement
Section 61: seat belt
61-01 seat belt warning system location
61-02 seat belt warning system problem symptoms table
61-03 seat belt warning system inspection
61-05 front seat belt components
61-08 front seat belt disposal
61-06 front seat belt replacement
61-13 rear seat belt components
61-14 rear seat belt replacement
Section 65: lighting
65-01 lighting system precautions
65-02 lighting system problem symptoms table
65-04 lighting system on-vehicle inspection
65-07 lighting system inspection
65-12 lh headlamp assy components
65-13 lh headlamp assy replacement
65-14 lh headlamp assy adjustment
65-16 fog lamp assy lh replacement
65-17 fog lamp assy lh adjustment
65-18 rear combination lamp assy lh replacement
65-19 license plate lamp assy replacement
65-20 center stop lamp assy replacement
65-21 headlamp dimmer switch assy replacement
Section 66: wiper and washer
66-01 wiper and washer system problem symptom table
66-02 wiper and washer system on-vehicle inspection
66-03 wiper and washer system inspection
66-06 windshield wiper motor assy replacement
66-10 wiper rubber lh replacement
66-11 rear wiper motor assy replacement
66-15 rear wiper rubber replacement
66-17 winshield wiper switch assy replacement
66-18 washer nozzle adjustment
Section 67: audio and visual system
67-01 audio and visual system precautions
67-02 audio and visual system components
67-05 radio receiver assy replacement
67-07 navigation receiver assy replacement
67-08 front no.1 speaker assy replacement
67-10 front no.2 speaker assy replacement
67-11 rear speaker assy replacement
67-13 radio wire sub-assy replacement
67-14 antenna cord sub-assy replacement
67-16 amplifier antenna assy replacement
67-18 roof antenna pole sub-assy replacement
67-19 navigation antenna cord sub-assy replacement
67-20 navigation antenna assy replacement
67-21 disc player changer replacement
67-22 cigarette lighter assy replacement
67-23 power point socket assy replacement
67-24 power point socket assy no.2 replacement
67-25 voltage inverter assy replacement
Section 68: wiring
68-01 power source location
Section 69: communication
69-01 horn system location
69-02 horn system problem symptoms table
69-03 horn system inspection
Section 70: windshield, windowglass, mirror
70-01 power window control system location
70-02 power window control system on-vehicle inspection
70-03 power window control system problem symptoms table
70-04 power window control system inspection
70-09 windshield glass components
70-10 windshield glass replacement
70-15 quarter window assy ln components
70-16 quarter window assy lh replacement
70-20 back door glass components
70-21 back door glass replacement
70-24 window defogger system location
70-25 window defogger system problem symptoms table
70-26 window defogger system inspection
70-27 power mirror control system location
70-28 power mirror control system inspection
70-30 inner rear view mirror assy replacement
70-31 inner rear view mirror assy pre-check
70-33 inner rear view mirror assy inspection
70-34 outer rear view mirror assy lh replacement
70-35 back window stay assy lh replacement
70-36 back window stay assy lh disposal
Section 71: instrument panel/meter
71-01 combination meter problem symptoms table
71-02 combination meter on-vehicle inspection
71-07 intrument panel/meter components
71-09 instrument panel sub-assy lower precautions
71-10 instrument panel sub-assy lower replacement
71-18 combination meter assy overhaul
Section 72: seats
72-01 front seat (driver side) components
72-02 front seat (driver side) overhaul
72-05 front seat (passenger side) components
72-06 front seat (passenger side) overhaul
72-09 rear seat assy components
72-10 rear seat assy overhaul
Section 73: theft deterrent and door lock
73-01 power door lock control system on-vehicle inspection
73-03 power door lock control system inspection
73-09 wireless door lock control system on-vehicle inspection
73-08 wireless door lock control system precaution
73-11 transmitter battery replacement
73-12 door control transmitter registration
73-15 glass hatch opener system on-vehicle inspection
73-16 glass hatch opener system location
73-17 glass hatch opener system inspection
73-18 toyota vehicle intrusion protection system on-vehicle inspection
Section 74: sliding roof/convertible
74-01 sliding roof system location
74-02 sliding roof system on-vehicle inspection
74-03 sliding roof system problem symptoms table
74-04 sliding roof system inspection
74-06 sliding roof components
74-07 sliding roof replacement
Section 75: engine hood/door
75-01 hood adjustment
75-03 front door components
75-05 front door overhaul
75-14 front door adjustment
75-16 rear door components
75-18 rear door overhaul
75-25 rear door adjustment
75-27 back door components
75-28 back door overhaul
75-30 back door adjustment
75-32 back door stay assy lh replacement
75-33 back door stay assy lh disposal
Section 76: exterior/interior trim
76-01 front bumper components
76-02 front bumper replacement
76-04 rear bumper components
76-05 rear bumber replacement
76-07 name plate replacement
76-08 front door belt moulding assy lh
76-09 rear door belt moulding assy lh
76-10 rocker manel moulding lh replacement
76-11 side mudguard sub-assy lh replacement
76-12 roof drip side finsih moulding center lh
76-14 roof headlining assy components
76-17 roof headlining assy replacement
Section 80: vehicle control
80-01 ignition or starter switch assy replacement
80-02 ignition or starter switch assy inspection
Section 82: cruise control
82-01 cruise control system on-vehicle inspection
82-03 cruise control main switch assy replacement
82-04 cruise control ecu assy
82-05 cruise control actuator assy replacement
82-06 clutch switch assy replacement
Section 99: maintenance
99-01 outside vehicle general maintenance
99-02 inside vehicle general maintenance
99-04 under hood general maintenance
99-05 engine on-vehicle inspection
99-06 brake on-vehicle inspection
99-07 chassis on-vehicle inspection
99-08 body on-vehicle inspection
TABLE OF CONTENTS
R.M. 2004-2007::Introduction: Repair Instruction: Precaution (Matrix)
R.M. 2004-2007::Introduction: Repair Instruction: Vehicle Lift and Support Locations (Matrix)
R.M. 2004-2007::Introduction: How To Troubleshoot ECU Controlled Systems: General Information, Electronic Circuit Inspection Procedure (Matrix)
R.M. 2004-2007::Introduction: How To Troubleshoot ECU Controlled Systems: How To Proceed With Troubleshooting (Matrix)
R.M. 2004-2007::Introduction: Terms: Abbreviations Used In Manual (Matrix)
R.M. 2004-2007::Introduction: Terms: Glossary of SAE and Toyota Terms (Matrix)
R.M. 2004-2007::Preparation: 1ZZ-FE Engine Control System: Recommended Tools, Equipment (Matrix)
R.M. 2004-2007::Preparation: 1ZZ-FE Engine Mechanical: SST (Matrix)
R.M. 2004-2007::Preparation: 1ZZ-FE Engine Mechanical: Recommended Tools, Equipment (Matrix)
R.M. 2004-2007::Preparation: 1ZZ-FE Engine Mechanical: SSM (Matrix)
R.M. 2004-2007::Preparation: 1ZZ-FE Fuel: SST (Matrix)
R.M. 2004-2007::Preparation: 1ZZ-FE Fuel: Recommended Tools, Equipment (Matrix)
R.M. 2004-2007::Preparation: 1ZZ-FE Fuel: SSM (Matrix)
R.M. 2004-2007::Preparation: 1ZZ-FE Emission Control: SST, Recommended Tools (Matrix)
R.M. 2004-2007::Preparation: 1ZZ-FE Emission Control: Equipment (Matrix)
R.M. 2004-2007::Preparation: 1ZZ-FE Exhaust: SST, Equipment (Matrix)
R.M. 2004-2007::Preparation: 1ZZ-FE Cooling: Equipment, Coolant (Matrix)
R.M. 2004-2007::Preparation: 1ZZ-FE Lubrication: SST, Equipment (Matrix)
R.M. 2004-2007::Preparation: 1ZZ-FE Lubrication: Lubricant, SSM (Matrix)
R.M. 2004-2007::Preparation: 1ZZ-FE Ignition: Recommended Tools, Equipment (Matrix)
R.M. 2004-2007::Preparation: 1ZZ-FE Starting: Recommended Tools, Equipment (Matrix)
R.M. 2004-2007::Preparation: 1ZZ-FE Charging: SST (Matrix)
R.M. 2004-2007::Preparation: 1ZZ-FE Charging: Recommended Tools, Equipment (Matrix)
R.M. 2004-2007::Preparation: A246E Automatic Transaxle: SST (Matrix)
R.M. 2004-2007::Preparation: A246E Automatic Transaxle: Recommended Tools, Equipment (Matrix)
R.M. 2004-2007::Preparation: A246E Automatic Transaxle: Lubricant, SSM (Matrix)
R.M. 2004-2007::Preparation: Clutch: SST, Recommended Tools (Matrix)
R.M. 2004-2007::Preparation: Clutch: Equipment, Lubricant (Matrix)
R.M. 2004-2007::Preparation: C59 Manual Transaxle: SST (Matrix)
R.M. 2004-2007::Preparation: C59 Manual Transaxle: Recommended Tools, Equipment (Matrix)
R.M. 2004-2007::Preparation: C59 Manual Transaxle: Lubricant, SSM (Matrix)
R.M. 2004-2007::Preparation: Drive Shaft: SST (Matrix)
R.M. 2004-2007::Preparation: Drive Shaft: Recommended Tools, Equipment (Matrix)
R.M. 2004-2007::Preparation: Drive Shaft: Lubricant (Matrix)
R.M. 2004-2007::Preparation: Axle: SST (Matrix)
R.M. 2004-2007::Preparation: Axle: Recommended Tools, Equipment (Matrix)
R.M. 2004-2007::Preparation: Suspension: SST (Matrix)
R.M. 2004-2007::Preparation: Suspension: Recommended Tools, Equipment (Matrix)
R.M. 2004-2007::Preparation: Tire and Wheel: Equipment (Matrix)
R.M. 2004-2007::Preparation: Brake Control: SST, Recommended Tools (Matrix)
R.M. 2004-2007::Preparation: Brake Control: Equipment, Lubricant (Matrix)
R.M. 2004-2007::Preparation: Brake: SST, Recommended Tools (Matrix)
R.M. 2004-2007::Preparation: Brake: Equipment, Lubricant (Matrix)
R.M. 2004-2007::Preparation: Parking Brake: SST, Equipment (Matrix)
R.M. 2004-2007::Preparation: Steering Column: SST, Recommended Tools (Matrix)
R.M. 2004-2007::Preparation: Steering Column: Equipment (Matrix)
R.M. 2004-2007::Preparation: Power Steering: SST (Matrix)
R.M. 2004-2007::Preparation: Power Steering: Recommended Tools, Equipment (Matrix)
R.M. 2004-2007::Preparation: Power Steering: Lubricant, SSM (Matrix)
R.M. 2004-2007::Preparation: Air Conditioning: SST (Matrix)
R.M. 2004-2007::Preparation: Air Conditioning: Equipment, Lubricant (Matrix)
R.M. 2004-2007::Preparation: Supplemental Restraint System: SST, Recommended Tools (Matrix)
R.M. 2004-2007::Preparation: Supplemental Restraint System: Equipment (Matrix)
R.M. 2004-2007::Preparation: Seat Belt: SST, Recommended Tools (Matrix)
R.M. 2004-2007::Preparation: Seat Belt: Equipment (Matrix)
R.M. 2004-2007::Preparation: Theft Deterrent System: Recommended Tools (Matrix)
R.M. 2004-2007::Preparation: Engine Immobiliser: SST, Recommended Tools (Matrix)
R.M. 2004-2007::Preparation: Cruise Control: SST, Recommended Tools (Matrix)
R.M. 2004-2007::Preparation: Cruise Control: Equipment (Matrix)
R.M. 2004-2007::Preparation: Lighting: Recommended Tools (Matrix)
R.M. 2004-2007::Preparation: Wiper and Washer: SST, Recommended Tools (Matrix)
R.M. 2004-2007::Preparation: Wiper and Washer: Equipment (Matrix)
R.M. 2004-2007::Preparation: Door Lock: Recommended Tools (Matrix)
R.M. 2004-2007::Preparation: Meter: Recommended Tools (Matrix)
R.M. 2004-2007::Preparation: Audio / Visual: Recommended Tools, Equipment (Matrix)
R.M. 2004-2007::Preparation: Horn: Recommended Tools, Equipment (Matrix)
R.M. 2004-2007::Preparation: Other System: Recommended Tools, Equipment (Matrix)
R.M. 2004-2007::Preparation: Windshield / Windowglass: Recommended Tools, Equipment (Matrix)
R.M. 2004-2007::Preparation: Windshield / Windowglass: SSM (Matrix)
R.M. 2004-2007::Preparation: Mirror: Recommended Tools (Matrix)
R.M. 2004-2007::Preparation: Instrument Panel: SST, Recommended Tools (Matrix)
R.M. 2004-2007::Preparation: Instrument Panel: Equipment (Matrix)
R.M. 2004-2007::Preparation: Seat: Recommended Tools, Equipment (Matrix)
R.M. 2004-2007::Preparation: Engine Hood / Door: SST, Recommended Tools (Matrix)
R.M. 2004-2007::Preparation: Engine Hood / Door: Equipment, Lubricant (Matrix)
R.M. 2004-2007::Preparation: Engine Hood / Door: SSM (Matrix)
R.M. 2004-2007::Preparation: Exterior: Recommended Tools, Equipment (Matrix)
R.M. 2004-2007::Preparation: Interior: Recommended Tools, Equipment (Matrix)
R.M. 2004-2007::Preparation: Sliding Roof: Recommended Tools, Equipment (Matrix)
R.M. 2004-2007::Preparation: CAN Communication: Recommended Tools (Matrix)
R.M. 2004-2007::Service Specifications: Standard Bolt: How To Determine Bolt Strength, Specified Torque For Standard Bolts (Matrix)
R.M. 2004-2007::Service Specifications: Standard Bolt: How To Determine Nut Strength (Matrix)
R.M. 2004-2007::Service Specifications: 1ZZ-FE Engine Control System: Service Data, Torque Specifications (Matrix)
R.M. 2004-2007::Service Specifications: 1ZZ-FE Engine Mechanical: Service Data (Matrix)
R.M. 2004-2007::Service Specifications: 1ZZ-FE Engine Mechanical: Torque Specifications (Matrix)
R.M. 2004-2007::Service Specifications: 1ZZ-FE Fuel: Service Data, Torque Specifications (Matrix)
R.M. 2004-2007::Service Specifications: 1ZZ-FE Emission Control: Service Data (Matrix)
R.M. 2004-2007::Service Specifications: 1ZZ-FE Exhaust: Service Data, Torque Specifications (Matrix)
R.M. 2004-2007::Service Specifications: 1ZZ-FE Cooling: Service Data, Torque Specifications (Matrix)
R.M. 2004-2007::Service Specifications: 1ZZ-FE Lubrication: Service Data, Torque Specifications (Matrix)
R.M. 2004-2007::Service Specifications: 1ZZ-FE Ignition: Service Data, Torque Specifications (Matrix)
R.M. 2004-2007::Service Specifications: 1ZZ-FE Starting: Service Data, Torque Specifications (Matrix)
R.M. 2004-2007::Service Specifications: 1ZZ-FE Charging: Service Data, Torque Specifications (Matrix)
R.M. 2004-2007::Service Specifications: A246E Automatic Transaxle: Service Data, Torque Specifications (Matrix)
R.M. 2004-2007::Service Specifications: Clutch: Service Data, Torque Specifications (Matrix)
R.M. 2004-2007::Service Specifications: C59 Manual Transaxle: Service Data (Matrix)
R.M. 2004-2007::Service Specifications: C59 Manual Transaxle: Torque Specifications (Matrix)
R.M. 2004-2007::Service Specifications: Drive Shaft: Torque Specifications (Matrix)
R.M. 2004-2007::Service Specifications: Axle: Service Data, Torque Specifications (Matrix)
R.M. 2004-2007::Service Specifications: Suspension: Service Data, Torque Specifications (Matrix)
R.M. 2004-2007::Service Specifications: Tire and Wheel: Service Data (Matrix)
R.M. 2004-2007::Service Specifications: Brake Control: Torque Specifications (Matrix)
R.M. 2004-2007::Service Specifications: Brake: Service Data, Torque Specifications (Matrix)
R.M. 2004-2007::Service Specifications: Parking Brake: Service Data, Torque Specifications (Matrix)
R.M. 2004-2007::Service Specifications: Steering Column: Service Data, Torque Specifications (Matrix)
R.M. 2004-2007::Service Specifications: Power Steering: Service Data, Torque Specifications (Matrix)
R.M. 2004-2007::Service Specifications: Air Conditioning: Service Data, Torque Specifications (Matrix)
R.M. 2004-2007::Service Specifications: Supplemental Restraint System: Torque Specifications (Matrix)
R.M. 2004-2007::Service Specifications: Seat Belt: Torque Specifications (Matrix)
R.M. 2004-2007::Service Specifications: Wiper and Washer: Torque Specifications (Matrix)
R.M. 2004-2007::Service Specifications: Audio / Visual: Torque Specifications (Matrix)
R.M. 2004-2007::Service Specifications: Horn: Torque Specifications (Matrix)
R.M. 2004-2007::Service Specifications: Other System: Torque Specifications (Matrix)
R.M. 2004-2007::Service Specifications: Instrument Panel: Torque Specifications (Matrix)
R.M. 2004-2007::Service Specifications: Seat: Torque Specifications (Matrix)
R.M. 2004-2007::Service Specifications: Engine Hood / Door: Torque Specifications (Matrix)
R.M. 2004-2007::Service Specifications: Exterior: Torque Specifications (Matrix)
R.M. 2004-2007::Service Specifications: Interior: Torque Specifications (Matrix)
R.M. 2004-2007::Service Specifications: Sliding Roof: Torque Specifications (Matrix)
R.M. 2004-2007::Maintenance: Outside Vehicle: General Maintenance (Matrix)
R.M. 2004-2007::Maintenance: Inside Vehicle: General Maintenance (Matrix)
R.M. 2004-2007::Maintenance: Under Hood: General Maintenance (Matrix)
R.M. 2004-2007::Maintenance: Engine: General Maintenance (Matrix)
R.M. 2004-2007::Maintenance: Brake: General Maintenance (Matrix)
R.M. 2004-2007::Maintenance: Chassis: General Maintenance (Matrix)
R.M. 2004-2007::Maintenance: Body: General Maintenance (Matrix)
R.M. 2004-2007::1ZZ-FE Engine Control System: SFI System: Definition of Terms, Parts Location (Matrix)
R.M. 2004-2007::1ZZ-FE Engine Control System: SFI System: How To Proceed With Troubleshooting (Matrix)
R.M. 2004-2007::1ZZ-FE Engine Control System: SFI System: Check For Intermittent Problems, Basic Inspection (Matrix)
R.M. 2004-2007::1ZZ-FE Engine Control System: SFI System: Registration (Matrix)
R.M. 2004-2007::1ZZ-FE Engine Control System: SFI System: O2S Test Result (Matrix)
R.M. 2004-2007::1ZZ-FE Engine Control System: SFI System: Checking Monitor Status (Matrix)
R.M. 2004-2007::1ZZ-FE Engine Control System: SFI System: Readiness Monitor Drive Pattern (Matrix)
R.M. 2004-2007::1ZZ-FE Engine Control System: SFI System: Problem Symptoms Table (Matrix)
R.M. 2004-2007::1ZZ-FE Engine Control System: SFI System: Terminals of ECM (Matrix)
R.M. 2004-2007::1ZZ-FE Engine Control System: SFI System: Diagnosis System, DTC Check / Clear, Check Mode Procedure (Matrix)
R.M. 2004-2007::1ZZ-FE Engine Control System: SFI System: Fail-Safe Chart, Data List / Active Test (Matrix)
R.M. 2004-2007::1ZZ-FE Engine Control System: SFI System: Diagnostic Trouble Code Chart (Matrix)
R.M. 2004-2007::1ZZ-FE Engine Control System: SFI System: P0010 (Matrix)
R.M. 2004-2007::1ZZ-FE Engine Control System: SFI System: P0011, P0012 (Matrix)
R.M. 2004-2007::1ZZ-FE Engine Control System: SFI System: P0016 (Matrix)
R.M. 2004-2007::1ZZ-FE Engine Control System: SFI System: P0031, P0032 (Matrix)
R.M. 2004-2007::1ZZ-FE Engine Control System: SFI System: P0037, P0038 (Matrix)
R.M. 2004-2007::1ZZ-FE Engine Control System: SFI System: P0100, P0102, P0103 (Matrix)
R.M. 2004-2007::1ZZ-FE Engine Control System: SFI System: P0101 (Matrix)
R.M. 2004-2007::1ZZ-FE Engine Control System: SFI System: P0110, P0112, P0113 (Matrix)
R.M. 2004-2007::1ZZ-FE Engine Control System: SFI System: P0115, P0117, P0118 (Matrix)
R.M. 2004-2007::1ZZ-FE Engine Control System: SFI System: P0116 (Matrix)
R.M. 2004-2007::1ZZ-FE Engine Control System: SFI System: P0120, P0122, P0123, P0220, P0222, P0223, P2135 (Matrix)
R.M. 2004-2007::1ZZ-FE Engine Control System: SFI System: P0121 (Matrix)
R.M. 2004-2007::1ZZ-FE Engine Control System: SFI System: P0125 (Matrix)
R.M. 2004-2007::1ZZ-FE Engine Control System: SFI System: P0128 (Matrix)
R.M. 2004-2007::1ZZ-FE Engine Control System: SFI System: P0136, P0137, P0138 (Matrix)
R.M. 2004-2007::1ZZ-FE Engine Control System: SFI System: P0171, P0172 (Matrix)
R.M. 2004-2007::1ZZ-FE Engine Control System: SFI System: P0300, P0301, P0302, P0303, P0304 (Matrix)
R.M. 2004-2007::1ZZ-FE Engine Control System: SFI System: P0325, P0327, P0328 (Matrix)
R.M. 2004-2007::1ZZ-FE Engine Control System: SFI System: P0335, P0339 (Matrix)
R.M. 2004-2007::1ZZ-FE Engine Control System: SFI System: P0340, P0341 (Matrix)
R.M. 2004-2007::1ZZ-FE Engine Control System: SFI System: P0351, P0352, P0353, P0354 (Matrix)
R.M. 2004-2007::1ZZ-FE Engine Control System: SFI System: P0420 (Matrix)
R.M. 2004-2007::1ZZ-FE Engine Control System: SFI System: P043E, P043F, P0441 (Matrix)
R.M. 2004-2007::1ZZ-FE Engine Control System: SFI System: P0450, P0451, P0452, P0453 (Matrix)
R.M. 2004-2007::1ZZ-FE Engine Control System: SFI System: P0455, P0456, P0500 (Matrix)
R.M. 2004-2007::1ZZ-FE Engine Control System: SFI System: P0504 (Matrix)
R.M. 2004-2007::1ZZ-FE Engine Control System: SFI System: P0505 (Matrix)
R.M. 2004-2007::1ZZ-FE Engine Control System: SFI System: P0560 (Matrix)
R.M. 2004-2007::1ZZ-FE Engine Control System: SFI System: P0601 (Matrix)
R.M. 2004-2007::1ZZ-FE Engine Control System: SFI System: P0604 (Matrix)
R.M. 2004-2007::1ZZ-FE Engine Control System: SFI System: P0606 (Matrix)
R.M. 2004-2007::1ZZ-FE Engine Control System: SFI System: P0607 (Matrix)
R.M. 2004-2007::1ZZ-FE Engine Control System: SFI System: P0617 (Matrix)
R.M. 2004-2007::1ZZ-FE Engine Control System: SFI System: P0630 (Matrix)
R.M. 2004-2007::1ZZ-FE Engine Control System: SFI System: P0657 (Matrix)
R.M. 2004-2007::1ZZ-FE Engine Control System: SFI System: P2102, P2103 (Matrix)
R.M. 2004-2007::1ZZ-FE Engine Control System: SFI System: P2111, P2112 (Matrix)
R.M. 2004-2007::1ZZ-FE Engine Control System: SFI System: P2118 (Matrix)
R.M. 2004-2007::1ZZ-FE Engine Control System: SFI System: P2119 (Matrix)
R.M. 2004-2007::1ZZ-FE Engine Control System: SFI System: P2120, P2122, P2123, P2125, P2127, P2128, P2138 (Matrix)
R.M. 2004-2007::1ZZ-FE Engine Control System: SFI System: P2121 (Matrix)
R.M. 2004-2007::1ZZ-FE Engine Control System: SFI System: P2195, P2196 (Matrix)
R.M. 2004-2007::1ZZ-FE Engine Control System: SFI System: P2238, P2239, P2252, P2253 (Matrix)
R.M. 2004-2007::1ZZ-FE Engine Control System: SFI System: P2401, P2402, P2419 (Matrix)
R.M. 2004-2007::1ZZ-FE Engine Control System: SFI System: P2420, P2610 (Matrix)
R.M. 2004-2007::1ZZ-FE Engine Control System: SFI System: P2A00 (Matrix)
R.M. 2004-2007::1ZZ-FE Engine Control System: SFI System: EVAP System (Matrix)
R.M. 2004-2007::1ZZ-FE Engine Control System: SFI System: ECM Power Source Circuit (Matrix)
R.M. 2004-2007::1ZZ-FE Engine Control System: SFI System: Fuel Pump Control Circuit (Matrix)
R.M. 2004-2007::1ZZ-FE Engine Control System: SFI System: MIL Circuit (Matrix)
R.M. 2004-2007::1ZZ-FE Engine Control System: Mass Air Flow Meter: On-Vehicle Inspection (Matrix)
R.M. 2004-2007::1ZZ-FE Engine Control System: Camshaft Timing Oil Control Valve Assembly: On-Vehicle Inspection, Inspection (Matrix)
R.M. 2004-2007::1ZZ-FE Engine Control System: Camshaft Position Sensor: Inspection (Matrix)
R.M. 2004-2007::1ZZ-FE Engine Control System: Crankshaft Position Sensor: Inspection (Matrix)
R.M. 2004-2007::1ZZ-FE Engine Control System: Engine Coolant Temperature Sensor: Inspection (Matrix)
R.M. 2004-2007::1ZZ-FE Engine Control System: Throttle Body: Components (Matrix)
R.M. 2004-2007::1ZZ-FE Engine Control System: Throttle Body: On-Vehicle Inspection, Removal, Installation (Matrix)
R.M. 2004-2007::1ZZ-FE Engine Control System: Throttle Body: Inspection (Matrix)
R.M. 2004-2007::1ZZ-FE Engine Control System: Knock Sensor: Inspection (Matrix)
R.M. 2004-2007::1ZZ-FE Engine Control System: IG1 Relay: Inspection (Matrix)
R.M. 2004-2007::1ZZ-FE Engine Control System: EFI Relay: Inspection (Matrix)
R.M. 2004-2007::1ZZ-FE Engine Control System: Circuit Opening Relay: Inspection (Matrix)
R.M. 2004-2007::1ZZ-FE Engine Control System: ECM: Components (Matrix)
R.M. 2004-2007::1ZZ-FE Engine Control System: ECM: Removal, Installation (Matrix)
R.M. 2004-2007::1ZZ-FE Engine Control System: Accelerator Pedal: Components, On-Vehicle Inspection (Matrix)
R.M. 2004-2007::1ZZ-FE Engine Control System: Accelerator Pedal: Removal, Installation, Inspection (Matrix)
R.M. 2004-2007::1ZZ-FE Engine Mechanical: Engine: On-Vehicle Inspection (Matrix)
R.M. 2004-2007::1ZZ-FE Engine Mechanical: Drive Belt: Components, Removal, Installation (Matrix)
R.M. 2004-2007::1ZZ-FE Engine Mechanical: Valve Clearance: Adjustment (Matrix)
R.M. 2004-2007::1ZZ-FE Engine Mechanical: Timing Chain: Components (Matrix)
R.M. 2004-2007::1ZZ-FE Engine Mechanical: Timing Chain: Removal (Matrix)
R.M. 2004-2007::1ZZ-FE Engine Mechanical: Timing Chain: Installation (Matrix)
R.M. 2004-2007::1ZZ-FE Engine Mechanical: Camshaft: Components (Matrix)
R.M. 2004-2007::1ZZ-FE Engine Mechanical: Camshaft: Removal (Matrix)
R.M. 2004-2007::1ZZ-FE Engine Mechanical: Camshaft: Inspection, Installation (Matrix)
R.M. 2004-2007::1ZZ-FE Engine Mechanical: Cylinder Head: Components (Matrix)
R.M. 2004-2007::1ZZ-FE Engine Mechanical: Cylinder Head: Removal, Disassembly (Matrix)
R.M. 2004-2007::1ZZ-FE Engine Mechanical: Cylinder Head: Inspection, Reassembly, Installation (Matrix)
R.M. 2004-2007::1ZZ-FE Engine Mechanical: Engine Front Oil Seal: Components (Matrix)
R.M. 2004-2007::1ZZ-FE Engine Mechanical: Engine Front Oil Seal: Removal, Installation (Matrix)
R.M. 2004-2007::1ZZ-FE Engine Mechanical: Engine Rear Oil Seal: Components (Matrix)
R.M. 2004-2007::1ZZ-FE Engine Mechanical: Engine Rear Oil Seal: Removal, Installation (Matrix)
R.M. 2004-2007::1ZZ-FE Engine Mechanical: Engine Assembly: Components (Matrix)
R.M. 2004-2007::1ZZ-FE Engine Mechanical: Engine Assembly: Removal (Matrix)
R.M. 2004-2007::1ZZ-FE Engine Mechanical: Engine Assembly: Installation (Matrix)
R.M. 2004-2007::1ZZ-FE Engine Mechanical: Engine Unit: Components (Matrix)
R.M. 2004-2007::1ZZ-FE Engine Mechanical: Engine Unit: Disassembly, Inspection (Matrix)
R.M. 2004-2007::1ZZ-FE Engine Mechanical: Engine Unit: Reassembly (Matrix)
R.M. 2004-2007::1ZZ-FE Fuel: Fuel System: Precaution, On-Vehicle Inspection (Matrix)
R.M. 2004-2007::1ZZ-FE Fuel: Fuel Injector: Components, Removal (Matrix)
R.M. 2004-2007::1ZZ-FE Fuel: Fuel Injector: Inspection, Installation (Matrix)
R.M. 2004-2007::1ZZ-FE Fuel: Fuel Pump: Components (Matrix)
R.M. 2004-2007::1ZZ-FE Fuel: Fuel Pump: Removal (Matrix)
R.M. 2004-2007::1ZZ-FE Fuel: Fuel Pump: Inspection, Installation (Matrix)
R.M. 2004-2007::1ZZ-FE Fuel: Fuel Tank: Components (Matrix)
R.M. 2004-2007::1ZZ-FE Fuel: Fuel Tank: Removal, Installation (Matrix)
R.M. 2004-2007::1ZZ-FE Emission Control: Emission Control System: Parts Location (Matrix)
R.M. 2004-2007::1ZZ-FE Emission Control: Emission Control System: On-Vehicle Inspection, Inspection (Matrix)
R.M. 2004-2007::1ZZ-FE Emission Control: Canister: Inspection (Matrix)
R.M. 2004-2007::1ZZ-FE Emission Control: Vacuum Switching Valve: Inspection (Matrix)
R.M. 2004-2007::1ZZ-FE Emission Control: Ventilation Valve: Inspection (Matrix)
R.M. 2004-2007::1ZZ-FE Emission Control: Air Fuel Ratio Sensor: Inspection (Matrix)
R.M. 2004-2007::1ZZ-FE Emission Control: Heated Oxygen Sensor: Inspection (Matrix)
R.M. 2004-2007::1ZZ-FE Exhaust: Exhaust Pipe: Components, Removal (Matrix)
R.M. 2004-2007::1ZZ-FE Exhaust: Exhaust Pipe: Installation (Matrix)
R.M. 2004-2007::1ZZ-FE Cooling: Cooling System: On-Vehicle Inspection (Matrix)
R.M. 2004-2007::1ZZ-FE Cooling: Cooling Fan System: Parts Location, On-Vehicle Inspection (Matrix)
R.M. 2004-2007::1ZZ-FE Cooling: Cooling Fan System: Inspection (Matrix)
R.M. 2004-2007::1ZZ-FE Cooling: Coolant: On-Vehicle Inspection (Matrix)
R.M. 2004-2007::1ZZ-FE Cooling: Water Pump: Components (Matrix)
R.M. 2004-2007::1ZZ-FE Cooling: Water Pump: Removal, Installation, Inspection (Matrix)
R.M. 2004-2007::1ZZ-FE Cooling: Thermostat: Components (Matrix)
R.M. 2004-2007::1ZZ-FE Cooling: Thermostat: Removal, Inspection, Installation (Matrix)
R.M. 2004-2007::1ZZ-FE Cooling: Radiator: Components, On-Vehicle Inspection, On-Vehicle Cleaning (Matrix)
R.M. 2004-2007::1ZZ-FE Cooling: Radiator: Removal, Installation (Matrix)
R.M. 2004-2007::1ZZ-FE Lubrication: Lubrication System: On-Vehicle Inspection (Matrix)
R.M. 2004-2007::1ZZ-FE Lubrication: Oil and Oil Filter: Components, Replacement (Matrix)
R.M. 2004-2007::1ZZ-FE Lubrication: Oil Pump: Components (Matrix)
R.M. 2004-2007::1ZZ-FE Lubrication: Oil Pump: Removal, Disassembly (Matrix)
R.M. 2004-2007::1ZZ-FE Lubrication: Oil Pump: Inspection, Reassembly, Installation (Matrix)
R.M. 2004-2007::1ZZ-FE Ignition: Ignition System: Parts Location (Matrix)
R.M. 2004-2007::1ZZ-FE Ignition: Ignition System: On-Vehicle Inspection, Inspection (Matrix)
R.M. 2004-2007::1ZZ-FE Starting: Starting System: Parts Location (Matrix)
R.M. 2004-2007::1ZZ-FE Starting: Starter: Components (Matrix)
R.M. 2004-2007::1ZZ-FE Starting: Starter: Removal, Disassembly (Matrix)
R.M. 2004-2007::1ZZ-FE Starting: Starter: Inspection, Reassembly, Installation (Matrix)
R.M. 2004-2007::1ZZ-FE Starting: Starter Relay: Inspection (Matrix)
R.M. 2004-2007::1ZZ-FE Starting: Ignition Switch: Components (Matrix)
R.M. 2004-2007::1ZZ-FE Starting: Ignition Switch: Removal, Installation, Inspection (Matrix)
R.M. 2004-2007::1ZZ-FE Charging: Charging System: Precaution, On-Vehicle Inspection (Matrix)
R.M. 2004-2007::1ZZ-FE Charging: Generator: Components (Matrix)
R.M. 2004-2007::1ZZ-FE Charging: Generator: Removal, Disassembly (Matrix)
R.M. 2004-2007::1ZZ-FE Charging: Generator: Inspection, Reassembly, Installation (Matrix)
R.M. 2004-2007::A246E Automatic Transaxle: Automatic Transaxle System: Precaution (Matrix)
R.M. 2004-2007::A246E Automatic Transaxle: Automatic Transaxle System: Definition of Terms, Parts Location (Matrix)
R.M. 2004-2007::A246E Automatic Transaxle: Automatic Transaxle System: System Diagram, System Description (Matrix)
R.M. 2004-2007::A246E Automatic Transaxle: Automatic Transaxle System: How To Proceed With Troubleshooting (Matrix)
R.M. 2004-2007::A246E Automatic Transaxle: Automatic Transaxle System: Road Test (Matrix)
R.M. 2004-2007::A246E Automatic Transaxle: Automatic Transaxle System: Mechanical System Tests, Hydraulic Test (Matrix)
R.M. 2004-2007::A246E Automatic Transaxle: Automatic Transaxle System: Manual Shifting Test, Initialization (Matrix)
R.M. 2004-2007::A246E Automatic Transaxle: Automatic Transaxle System: Monitor Drive Pattern (Matrix)
R.M. 2004-2007::A246E Automatic Transaxle: Automatic Transaxle System: Problem Symptoms Table (Matrix)
R.M. 2004-2007::A246E Automatic Transaxle: Automatic Transaxle System: Terminals of ECM (Matrix)
R.M. 2004-2007::A246E Automatic Transaxle: Automatic Transaxle System: Diagnosis System (Matrix)
R.M. 2004-2007::A246E Automatic Transaxle: Automatic Transaxle System: DTC Check / Clear, Check Mode Procedure (Matrix)
R.M. 2004-2007::A246E Automatic Transaxle: Automatic Transaxle System: Fail-Safe Chart (Matrix)
R.M. 2004-2007::A246E Automatic Transaxle: Automatic Transaxle System: Data List / Active Test (Matrix)
R.M. 2004-2007::A246E Automatic Transaxle: Automatic Transaxle System: Diagnostic Trouble Code Chart (Matrix)
R.M. 2004-2007::A246E Automatic Transaxle: Automatic Transaxle System: P0705, P0850 (Matrix)
R.M. 2004-2007::A246E Automatic Transaxle: Automatic Transaxle System: P0724 (Matrix)
R.M. 2004-2007::A246E Automatic Transaxle: Automatic Transaxle System: P0741 (Matrix)
R.M. 2004-2007::A246E Automatic Transaxle: Automatic Transaxle System: P0751 (Matrix)
R.M. 2004-2007::A246E Automatic Transaxle: Automatic Transaxle System: P0756 (Matrix)
R.M. 2004-2007::A246E Automatic Transaxle: Automatic Transaxle System: P0973, P0974 (Matrix)
R.M. 2004-2007::A246E Automatic Transaxle: Automatic Transaxle System: P0976, P0977 (Matrix)
R.M. 2004-2007::A246E Automatic Transaxle: Automatic Transaxle System: P2716 (Matrix)
R.M. 2004-2007::A246E Automatic Transaxle: Automatic Transaxle System: P2769, P2770 (Matrix)
R.M. 2004-2007::A246E Automatic Transaxle: Automatic Transaxle System: O/D Main Switch Circuit (Matrix)
R.M. 2004-2007::A246E Automatic Transaxle: Automatic Transaxle Fluid: On-Vehicle Inspection (Matrix)
R.M. 2004-2007::A246E Automatic Transaxle: Park / Neutral Position Switch: Components (Matrix)
R.M. 2004-2007::A246E Automatic Transaxle: Park / Neutral Position Switch: Removal, Adjustment, Installation (Matrix)
R.M. 2004-2007::A246E Automatic Transaxle: Transmission Wire: Components (Matrix)
R.M. 2004-2007::A246E Automatic Transaxle: Transmission Wire: Removal, Installation (Matrix)
R.M. 2004-2007::A246E Automatic Transaxle: Valve Body Assembly: Components (Matrix)
R.M. 2004-2007::A246E Automatic Transaxle: Valve Body Assembly: Removal, Installation (Matrix)
R.M. 2004-2007::A246E Automatic Transaxle: Shift Lock System: On-Vehicle Inspection (Matrix)
R.M. 2004-2007::A246E Automatic Transaxle: Transmission Control Cable Assembly: Components (Matrix)
R.M. 2004-2007::A246E Automatic Transaxle: Transmission Control Cable Assembly: Removal (Matrix)
R.M. 2004-2007::A246E Automatic Transaxle: Transmission Control Cable Assembly: Installation (Matrix)
R.M. 2004-2007::A246E Automatic Transaxle: Floor Shift Parking Lock Cable Assembly: Components (Matrix)
R.M. 2004-2007::A246E Automatic Transaxle: Floor Shift Parking Lock Cable Assembly: Removal (Matrix)
R.M. 2004-2007::A246E Automatic Transaxle: Floor Shift Parking Lock Cable Assembly: Installation (Matrix)
R.M. 2004-2007::A246E Automatic Transaxle: Floor Shift Assembly: Components (Matrix)
R.M. 2004-2007::A246E Automatic Transaxle: Floor Shift Assembly: Removal, Disassembly, Adjustment, Reassembly (Matrix)
R.M. 2004-2007::A246E Automatic Transaxle: Floor Shift Assembly: Installation (Matrix)
R.M. 2004-2007::A246E Automatic Transaxle: Differential Oil Seal: Components (Matrix)
R.M. 2004-2007::A246E Automatic Transaxle: Differential Oil Seal: Removal, Installation (Matrix)
R.M. 2004-2007::A246E Automatic Transaxle: Automatic Transaxle Assembly: Components (Matrix)
R.M. 2004-2007::A246E Automatic Transaxle: Automatic Transaxle Assembly: Removal, Installation (Matrix)
R.M. 2004-2007::A246E Automatic Transaxle: Torque Converter Clutch and Drive Plate: Inspection (Matrix)
R.M. 2004-2007::A246E Automatic Transaxle: Automatic Transaxle Unit: Components (Matrix)
R.M. 2004-2007::A246E Automatic Transaxle: Automatic Transaxle Unit: Disassembly (Matrix)
R.M. 2004-2007::A246E Automatic Transaxle: Automatic Transaxle Unit: Inspection (Matrix)
R.M. 2004-2007::A246E Automatic Transaxle: Automatic Transaxle Unit: Reassembly (Matrix)
R.M. 2004-2007::A246E Automatic Transaxle: Oil Pump: Components, Disassembly (Matrix)
R.M. 2004-2007::A246E Automatic Transaxle: Oil Pump: Inspection, Reassembly (Matrix)
R.M. 2004-2007::A246E Automatic Transaxle: Second Coast Brake: Components, Reassembly, Disassembly, Inspection (Matrix)
R.M. 2004-2007::A246E Automatic Transaxle: Planetary Ring Gear: Components, Disassembly, Inspection, Reassembly (Matrix)
R.M. 2004-2007::A246E Automatic Transaxle: Second Brake Piston: Components, Reassembly, Disassembly (Matrix)
R.M. 2004-2007::A246E Automatic Transaxle: One-way Clutch: Components, Disassembly, Inspection, Reassembly (Matrix)
R.M. 2004-2007::A246E Automatic Transaxle: Forward Clutch: Components, Disassembly, Inspection, Reassembly (Matrix)
R.M. 2004-2007::A246E Automatic Transaxle: Direct Clutch: Components, Disassembly, Inspection, Reassembly (Matrix)
R.M. 2004-2007::A246E Automatic Transaxle: Intermediate Shaft: Components, Reassembly, Disassembly (Matrix)
R.M. 2004-2007::A246E Automatic Transaxle: Counter Shaft: Components (Matrix)
R.M. 2004-2007::A246E Automatic Transaxle: Counter Shaft: Disassembly, Inspection, Reassembly (Matrix)
R.M. 2004-2007::A246E Automatic Transaxle: Underdrive Clutch: Components, Disassembly (Matrix)
R.M. 2004-2007::A246E Automatic Transaxle: Underdrive Clutch: Inspection, Reassembly (Matrix)
R.M. 2004-2007::A246E Automatic Transaxle: Differential Case: Components, Disassembly, Reassembly (Matrix)
R.M. 2004-2007::A246E Automatic Transaxle: Differential Case: Inspection (Matrix)
R.M. 2004-2007::A246E Automatic Transaxle: Speed Sensor: Components, Removal, Installation (Matrix)
R.M. 2004-2007::Clutch: Clutch System: Problem Symptoms Table (Matrix)
R.M. 2004-2007::Clutch: Clutch Pedal: Components (Matrix)
R.M. 2004-2007::Clutch: Clutch Pedal: On-Vehicle Inspection (Matrix)
R.M. 2004-2007::Clutch: Clutch Pedal: Removal, Installation (Matrix)
R.M. 2004-2007::Clutch: Clutch Master Cylinder: Components, Removal, Disassembly, Reassembly (Matrix)
R.M. 2004-2007::Clutch: Clutch Master Cylinder: Installation (Matrix)
R.M. 2004-2007::Clutch: Clutch Release Cylinder: Components, Removal (Matrix)
R.M. 2004-2007::Clutch: Clutch Release Cylinder: Disassembly, Reassembly, Installation (Matrix)
R.M. 2004-2007::Clutch: Clutch Unit: Components, Removal, Inspection, Installation (Matrix)
R.M. 2004-2007::Clutch: Clutch Start Switch: Components, On-Vehicle Inspection (Matrix)
R.M. 2004-2007::Clutch: Clutch Start Switch: Removal, Inspection, Installation (Matrix)
R.M. 2004-2007::C59 Manual Transaxle: Manual Transaxle System: Problem Symptoms Table (Matrix)
R.M. 2004-2007::C59 Manual Transaxle: Manual Transaxle Oil: On-Vehicle Inspection (Matrix)
R.M. 2004-2007::C59 Manual Transaxle: Differential Oil Seal: Components, Removal, Installation (Matrix)
R.M. 2004-2007::C59 Manual Transaxle: Floor Shift Lever Assembly: Components (Matrix)
R.M. 2004-2007::C59 Manual Transaxle: Floor Shift Lever Assembly: Removal, Installation (Matrix)
R.M. 2004-2007::C59 Manual Transaxle: Transmission Control Cable: Components, Removal (Matrix)
R.M. 2004-2007::C59 Manual Transaxle: Transmission Control Cable: Installation (Matrix)
R.M. 2004-2007::C59 Manual Transaxle: Manual Transaxle Assembly: Components (Matrix)
R.M. 2004-2007::C59 Manual Transaxle: Manual Transaxle Assembly: Removal (Matrix)
R.M. 2004-2007::C59 Manual Transaxle: Manual Transaxle Assembly: Installation (Matrix)
R.M. 2004-2007::C59 Manual Transaxle: Manual Transaxle Unit: Components (Matrix)
R.M. 2004-2007::C59 Manual Transaxle: Manual Transaxle Unit: Disassembly (Matrix)
R.M. 2004-2007::C59 Manual Transaxle: Manual Transaxle Unit: Inspection (Matrix)
R.M. 2004-2007::C59 Manual Transaxle: Manual Transaxle Unit: Reassembly (Matrix)
R.M. 2004-2007::C59 Manual Transaxle: Input Shaft: Components, Disassembly (Matrix)
R.M. 2004-2007::C59 Manual Transaxle: Input Shaft: Inspection (Matrix)
R.M. 2004-2007::C59 Manual Transaxle: Input Shaft: Reassembly (Matrix)
R.M. 2004-2007::C59 Manual Transaxle: Output Shaft: Components, Disassembly (Matrix)
R.M. 2004-2007::C59 Manual Transaxle: Output Shaft: Inspection (Matrix)
R.M. 2004-2007::C59 Manual Transaxle: Output Shaft: Reassembly (Matrix)
R.M. 2004-2007::C59 Manual Transaxle: Shift and Select Lever Shaft: Components (Matrix)
R.M. 2004-2007::C59 Manual Transaxle: Shift and Select Lever Shaft: Disassembly (Matrix)
R.M. 2004-2007::C59 Manual Transaxle: Shift and Select Lever Shaft: Reassembly (Matrix)
R.M. 2004-2007::C59 Manual Transaxle: Differential Case: Components, Disassembly, Inspection (Matrix)
R.M. 2004-2007::C59 Manual Transaxle: Differential Case: Reassembly (Matrix)
R.M. 2004-2007::Drive Shaft: Drive Shaft System: Problem Symptoms Table (Matrix)
R.M. 2004-2007::Drive Shaft: Front Drive Shaft: Components (Matrix)
R.M. 2004-2007::Drive Shaft: Front Drive Shaft: Removal, Disassembly, Inspection, Reassembly, Installation (Matrix)
R.M. 2004-2007::Axle: Axle System: Problem Symptoms Table (Matrix)
R.M. 2004-2007::Axle: Front Axle Hub Bolt: Components, Removal, Installation (Matrix)
R.M. 2004-2007::Axle: Front Axle Hub: Components, On-Vehicle Inspection (Matrix)
R.M. 2004-2007::Axle: Front Axle Hub: Removal, Installation (Matrix)
R.M. 2004-2007::Axle: Rear Axle Hub Bolt: Components, Removal, Installation (Matrix)
R.M. 2004-2007::Axle: Rear Axle Hub: Components, On-Vehicle Inspection (Matrix)
R.M. 2004-2007::Axle: Rear Axle Hub: Removal, Installation (Matrix)
R.M. 2004-2007::Suspension: Suspension System: How To Proceed With Troubleshooting (Matrix)
R.M. 2004-2007::Suspension: Suspension System: Problem Symptoms Table (Matrix)
R.M. 2004-2007::Suspension: Front Wheel Alignment: Adjustment (Matrix)
R.M. 2004-2007::Suspension: Rear Wheel Alignment: Adjustment (Matrix)
R.M. 2004-2007::Suspension: Front Strut Bar: Components, Installation, Removal, Inspection (Matrix)
R.M. 2004-2007::Suspension: Front Strut Bar: Disposal (Matrix)
R.M. 2004-2007::Suspension: Front Shock Absorber: Components, Removal, Inspection, Installation (Matrix)
R.M. 2004-2007::Suspension: Front Shock Absorber: Disposal (Matrix)
R.M. 2004-2007::Suspension: Front Lower Suspension Arm: Components (Matrix)
R.M. 2004-2007::Suspension: Front Lower Suspension Arm: Removal, Installation (Matrix)
R.M. 2004-2007::Suspension: Front Lower Ball Joint: Components (Matrix)
R.M. 2004-2007::Suspension: Front Lower Ball Joint: On-Vehicle Inspection, Removal (Matrix)
R.M. 2004-2007::Suspension: Front Lower Ball Joint: Inspection, Installation (Matrix)
R.M. 2004-2007::Suspension: Front Stabilizer Bar: Components, Removal, Inspection (Matrix)
R.M. 2004-2007::Suspension: Front Stabilizer Bar: Installation (Matrix)
R.M. 2004-2007::Suspension: Rear Shock Absorber: Components, Removal, Inspection (Matrix)
R.M. 2004-2007::Suspension: Rear Shock Absorber: Installation (Matrix)
R.M. 2004-2007::Suspension: Rear Shock Absorber: Disposal (Matrix)
R.M. 2004-2007::Suspension: Rear Axle Beam: Components, Removal (Matrix)
R.M. 2004-2007::Suspension: Rear Axle Beam: Disassembly, Reassembly, Installation (Matrix)
R.M. 2004-2007::Suspension: Rear Stabilizer Bar: Components, Removal, Installation (Matrix)
R.M. 2004-2007::Tire and Wheel: Tire and Wheel System: How To Proceed With Troubleshooting (Matrix)
R.M. 2004-2007::Tire and Wheel: Tire and Wheel System: Inspection (Matrix)
R.M. 2004-2007::Tire and Wheel: Tire Pressure Warning System: Precaution, How To Proceed With Troubleshooting (Matrix)
R.M. 2004-2007::Tire and Wheel: Tire Pressure Warning System: Parts Location, System Diagram (Matrix)
R.M. 2004-2007::Tire and Wheel: Tire Pressure Warning System: System Description, Initialization, Test Mode Procedure (Matrix)
R.M. 2004-2007::Tire and Wheel: Tire Pressure Warning System: Problem Symptoms Table (Matrix)
R.M. 2004-2007::Tire and Wheel: Tire Pressure Warning System: Terminals of ECU, Diagnosis System (Matrix)
R.M. 2004-2007::Tire and Wheel: Tire Pressure Warning System: Data List / Active Test, ABS System Malfunction (Matrix)
R.M. 2004-2007::Tire and Wheel: Tire Pressure Warning System: Stop Light Switch Circuit (Matrix)
R.M. 2004-2007::Tire and Wheel: Tire Pressure Warning System: Tire Pressure Warning Reset Switch Circuit (Matrix)
R.M. 2004-2007::Tire and Wheel: Tire Pressure Warning System: Tire Pressure Warning Light Circuit (Matrix)
R.M. 2004-2007::Tire and Wheel: Tire Pressure Warning System: Ambient Temperature Sensor Circuit (Matrix)
R.M. 2004-2007::Brake Control: Anti-Lock Brake System: Precaution, Parts Location (Matrix)
R.M. 2004-2007::Brake Control: Anti-Lock Brake System: System Diagram, System Description (Matrix)
R.M. 2004-2007::Brake Control: Anti-Lock Brake System: How To Proceed With Troubleshooting (Matrix)
R.M. 2004-2007::Brake Control: Anti-Lock Brake System: Test Mode Procedure (Matrix)
R.M. 2004-2007::Brake Control: Anti-Lock Brake System: Problem Symptoms Table, Terminals of ECU (Matrix)
R.M. 2004-2007::Brake Control: Anti-Lock Brake System: Diagnosis System, DTC Check / Clear (Matrix)
R.M. 2004-2007::Brake Control: Anti-Lock Brake System: Freeze Frame Data, Fail-Safe Chart (Matrix)
R.M. 2004-2007::Brake Control: Anti-Lock Brake System: Data List / Active Test (Matrix)
R.M. 2004-2007::Brake Control: Anti-Lock Brake System: Diagnostic Trouble Code Chart (Matrix)
R.M. 2004-2007::Brake Control: Anti-Lock Brake System: C0200/31, C0205/32, C1235/35, C1236/36, C1271/71, C1272/72, C1275/75, C1276/76 (Matrix)
R.M. 2004-2007::Brake Control: Anti-Lock Brake System: C0210/33, C0215/34, C1238/38, C1239/39, C1273/73, C1274/74, C1277/77, C1278/78 (Matrix)
R.M. 2004-2007::Brake Control: Anti-Lock Brake System: C0226/21, C0236/22, C0246/23, C0256/24 (Matrix)
R.M. 2004-2007::Brake Control: Anti-Lock Brake System: C0273/13, C0274/14 (Matrix)
R.M. 2004-2007::Brake Control: Anti-Lock Brake System: C0278/11, C0279/12 (Matrix)
R.M. 2004-2007::Brake Control: Anti-Lock Brake System: C1241/41 (Matrix)
R.M. 2004-2007::Brake Control: Anti-Lock Brake System: C1249/49 (Matrix)
R.M. 2004-2007::Brake Control: Anti-Lock Brake System: C1251/51 (Matrix)
R.M. 2004-2007::Brake Control: Anti-Lock Brake System: ABS Warning Light Remains On (Matrix)
R.M. 2004-2007::Brake Control: Anti-Lock Brake System: ABS Warning Light Does Not Come On (Matrix)
R.M. 2004-2007::Brake Control: Anti-Lock Brake System: Brake Warning Light Circuit (Matrix)
R.M. 2004-2007::Brake Control: Anti-Lock Brake System: TC and CG Terminal Circuit (Matrix)
R.M. 2004-2007::Brake Control: Anti-Lock Brake System: TS and CG Terminal Circuit (Matrix)
R.M. 2004-2007::Brake Control: Vehicle Stability Control System: Precaution, Parts Location (Matrix)
R.M. 2004-2007::Brake Control: Vehicle Stability Control System: System Diagram (Matrix)
R.M. 2004-2007::Brake Control: Vehicle Stability Control System: System Description (Matrix)
R.M. 2004-2007::Brake Control: Vehicle Stability Control System: How To Proceed With Troubleshooting (Matrix)
R.M. 2004-2007::Brake Control: Vehicle Stability Control System: Calibration (Matrix)
R.M. 2004-2007::Brake Control: Vehicle Stability Control System: Test Mode Procedure (Matrix)
R.M. 2004-2007::Brake Control: Vehicle Stability Control System: Problem Symptoms Table (Matrix)
R.M. 2004-2007::Brake Control: Vehicle Stability Control System: Terminals of ECU (Matrix)
R.M. 2004-2007::Brake Control: Vehicle Stability Control System: Diagnosis System, DTC Check / Clear (Matrix)
R.M. 2004-2007::Brake Control: Vehicle Stability Control System: Freeze Frame Data (Matrix)
R.M. 2004-2007::Brake Control: Vehicle Stability Control System: Fail-Safe Chart, Data List / Active Test (Matrix)
R.M. 2004-2007::Brake Control: Vehicle Stability Control System: Diagnostic Trouble Code Chart (Matrix)
R.M. 2004-2007::Brake Control: Vehicle Stability Control System: C0200/31, C0205/32, C1235/35, C1236/36, C1271/71, C1272/72, C1275/75, C1276/76 (Matrix)
R.M. 2004-2007::Brake Control: Vehicle Stability Control System: C0210/33, C0215/34, C1238/38, C1239/39, C1273/73, C1274/74, C1277/77, C1278/78 (Matrix)
R.M. 2004-2007::Brake Control: Vehicle Stability Control System: C0226/21, C0236/22, C0246/23, C0256/24, C1225/25 (Matrix)
R.M. 2004-2007::Brake Control: Vehicle Stability Control System: C0273/13, C0274/14, C1361/91 (Matrix)
R.M. 2004-2007::Brake Control: Vehicle Stability Control System: C0278/11, C0279/12 (Matrix)
R.M. 2004-2007::Brake Control: Vehicle Stability Control System: C1201/51, C1203/53 (Matrix)
R.M. 2004-2007::Brake Control: Vehicle Stability Control System: C1210/36, C1336/39 (Matrix)
R.M. 2004-2007::Brake Control: Vehicle Stability Control System: C1223/43, C1224/44 (Matrix)
R.M. 2004-2007::Brake Control: Vehicle Stability Control System: C1231/31 (Matrix)
R.M. 2004-2007::Brake Control: Vehicle Stability Control System: C1232/32, C0371/71, C1234/34, C1243/43, C1244/44, C1245/45, C1279/79, C1381/97 (Matrix)
R.M. 2004-2007::Brake Control: Vehicle Stability Control System: C1241/41 (Matrix)
R.M. 2004-2007::Brake Control: Vehicle Stability Control System: C1246/46, C1281/81 (Matrix)
R.M. 2004-2007::Brake Control: Vehicle Stability Control System: C1249/49 (Matrix)
R.M. 2004-2007::Brake Control: Vehicle Stability Control System: C1251/51 (Matrix)
R.M. 2004-2007::Brake Control: Vehicle Stability Control System: U0073/94, U0100/65, U0123/62, U0124/95, U0126/63, ABS Warning Light Remains On (Matrix)
R.M. 2004-2007::Brake Control: Vehicle Stability Control System: ABS Warning Light Does Not Come On (Matrix)
R.M. 2004-2007::Brake Control: Vehicle Stability Control System: VSC Warning Light Remains On (Matrix)
R.M. 2004-2007::Brake Control: Vehicle Stability Control System: VSC Warning Light Does Not Come On (Matrix)
R.M. 2004-2007::Brake Control: Vehicle Stability Control System: Brake Warning Light Circuit (Matrix)
R.M. 2004-2007::Brake Control: Vehicle Stability Control System: Slip Indicator Light Circuit (Matrix)
R.M. 2004-2007::Brake Control: Vehicle Stability Control System: Skid Control Buzzer Circuit (Matrix)
R.M. 2004-2007::Brake Control: Vehicle Stability Control System: TC and CG Terminal Circuit (Matrix)
R.M. 2004-2007::Brake Control: Vehicle Stability Control System: TS and CG Terminal Circuit (Matrix)
R.M. 2004-2007::Brake Control: Brake Actuator: Components (Matrix)
R.M. 2004-2007::Brake Control: Brake Actuator: On-Vehicle Inspection (Matrix)
R.M. 2004-2007::Brake Control: Brake Actuator: Removal, Installation (Matrix)
R.M. 2004-2007::Brake Control: ABS and Traction Actuator: Components (Matrix)
R.M. 2004-2007::Brake Control: ABS and Traction Actuator: On-Vehicle Inspection (Matrix)
R.M. 2004-2007::Brake Control: ABS and Traction Actuator: Removal, Installation (Matrix)
R.M. 2004-2007::Brake Control: Front Speed Sensor: Components (Matrix)
R.M. 2004-2007::Brake Control: Front Speed Sensor: Removal, Installation (Matrix)
R.M. 2004-2007::Brake Control: Skid Control Sensor: Components (Matrix)
R.M. 2004-2007::Brake Control: Skid Control Sensor: Removal, Installation (Matrix)
R.M. 2004-2007::Brake Control: Yaw Rate and Acceleration Sensor: Components (Matrix)
R.M. 2004-2007::Brake Control: Yaw Rate and Acceleration Sensor: Removal, Installation (Matrix)
R.M. 2004-2007::Brake Control: Steering Angle Sensor: Components (Matrix)
R.M. 2004-2007::Brake Control: Steering Angle Sensor: Removal, Installation (Matrix)
R.M. 2004-2007::Brake: Brake System: Precaution, Problem Symptoms Table (Matrix)
R.M. 2004-2007::Brake: Brake Fluid: Bleeding (Matrix)
R.M. 2004-2007::Brake: Brake Pedal: Components, Removal (Matrix)
R.M. 2004-2007::Brake: Brake Pedal: Adjustment (Matrix)
R.M. 2004-2007::Brake: Brake Pedal: Installation (Matrix)
R.M. 2004-2007::Brake: Brake Master Cylinder: Components (Matrix)
R.M. 2004-2007::Brake: Brake Master Cylinder: Removal (Matrix)
R.M. 2004-2007::Brake: Brake Master Cylinder: Disassembly (Matrix)
R.M. 2004-2007::Brake: Brake Master Cylinder: Inspection, Reassembly (Matrix)
R.M. 2004-2007::Brake: Brake Master Cylinder: Installation (Matrix)
R.M. 2004-2007::Brake: Brake Booster: Components, On-Vehicle Inspection (Matrix)
R.M. 2004-2007::Brake: Brake Booster: Removal (Matrix)
R.M. 2004-2007::Brake: Brake Booster: Installation (Matrix)
R.M. 2004-2007::Brake: Front Brake: Components, Removal (Matrix)
R.M. 2004-2007::Brake: Front Brake: Disassembly (Matrix)
R.M. 2004-2007::Brake: Front Brake: Inspection, Reassembly, Installation (Matrix)
R.M. 2004-2007::Brake: Rear Disc Brake: Components, Removal (Matrix)
R.M. 2004-2007::Brake: Rear Disc Brake: Disassembly, Inspection, Reassembly (Matrix)
R.M. 2004-2007::Brake: Rear Disc Brake: Installation (Matrix)
R.M. 2004-2007::Brake: Rear Drum Brake: Components, Disassembly (Matrix)
R.M. 2004-2007::Brake: Rear Drum Brake: Inspection, Reassembly (Matrix)
R.M. 2004-2007::Brake: Proportioning Valve: Components, On-Vehicle Inspection, Removal (Matrix)
R.M. 2004-2007::Brake: Proportioning Valve: Installation (Matrix)
R.M. 2004-2007::Parking Brake: Parking Brake System: Problem Symptoms Table, Adjustment (Matrix)
R.M. 2004-2007::Parking Brake: Parking Brake Lever: Components (Matrix)
R.M. 2004-2007::Parking Brake: Parking Brake Lever: Removal (Matrix)
R.M. 2004-2007::Parking Brake: Parking Brake Lever: Installation (Matrix)
R.M. 2004-2007::Parking Brake: Parking Brake Cable: Components, Removal (Matrix)
R.M. 2004-2007::Parking Brake: Parking Brake Cable: Installation (Matrix)
R.M. 2004-2007::Parking Brake: Parking Brake Assembly: Components, Disassembly, Reassembly (Matrix)
R.M. 2004-2007::Parking Brake: Parking Brake Assembly: Inspection (Matrix)
R.M. 2004-2007::Steering Column: Steering System: Precaution, Problem Symptoms Table, On-Vehicle Inspection (Matrix)
R.M. 2004-2007::Steering Column: Steering System: Repair (Matrix)
R.M. 2004-2007::Steering Column: Steering Column Assembly: Components (Matrix)
R.M. 2004-2007::Steering Column: Steering Column Assembly: Removal, Disassembly (Matrix)
R.M. 2004-2007::Steering Column: Steering Column Assembly: Inspection, Reassembly, Installation (Matrix)
R.M. 2004-2007::Power Steering: Power Steering System: Precaution, Problem Symptoms Table, On-Vehicle Inspection (Matrix)
R.M. 2004-2007::Power Steering: Vane Pump: Components, Removal (Matrix)
R.M. 2004-2007::Power Steering: Vane Pump: Disassembly, Inspection, Reassembly (Matrix)
R.M. 2004-2007::Power Steering: Vane Pump: Installation (Matrix)
R.M. 2004-2007::Power Steering: Rack and Pinion Power Steering Gear: Components (Matrix)
R.M. 2004-2007::Power Steering: Rack and Pinion Power Steering Gear: Removal (Matrix)
R.M. 2004-2007::Power Steering: Rack and Pinion Power Steering Gear: Disassembly, Inspection, Reassembly (Matrix)
R.M. 2004-2007::Power Steering: Rack and Pinion Power Steering Gear: Installation (Matrix)
R.M. 2004-2007::Air Conditioning: Air Conditioning System (For Manual Air Conditioning System): Precaution (Matrix)
R.M. 2004-2007::Air Conditioning: Air Conditioning System (For Manual Air Conditioning System): Parts Location (Matrix)
R.M. 2004-2007::Air Conditioning: Air Conditioning System (For Manual Air Conditioning System): Problem Symptoms Table (Matrix)
R.M. 2004-2007::Air Conditioning: Refrigerant: On-Vehicle Inspection (Matrix)
R.M. 2004-2007::Air Conditioning: Refrigerant: Replacement (Matrix)
R.M. 2004-2007::Air Conditioning: Refrigerant Line: Components (Matrix)
R.M. 2004-2007::Air Conditioning: Air Conditioning Unit: Components (Matrix)
R.M. 2004-2007::Air Conditioning: Air Conditioning Unit: Removal, Disassembly (Matrix)
R.M. 2004-2007::Air Conditioning: Air Conditioning Unit: Reassembly, Installation (Matrix)
R.M. 2004-2007::Air Conditioning: Blower Motor: On-Vehicle Inspection (Matrix)
R.M. 2004-2007::Air Conditioning: Blower Resistor: Inspection (Matrix)
R.M. 2004-2007::Air Conditioning: Compressor and Magnetic Clutch (For 1ZZ-FE): Components, On-Vehicle Inspection (Matrix)
R.M. 2004-2007::Air Conditioning: Compressor and Magnetic Clutch (For 1ZZ-FE): Removal, Disassembly, Inspection, Reassembly, Installation (Matrix)
R.M. 2004-2007::Air Conditioning: Condenser: Components, On-Vehicle Inspection (Matrix)
R.M. 2004-2007::Air Conditioning: Condenser: Removal, Disassembly, Reassembly, Installation (Matrix)
R.M. 2004-2007::Air Conditioning: Evaporator Temperature Sensor: Inspection (Matrix)
R.M. 2004-2007::Air Conditioning: Pressure Switch: On-Vehicle Inspection (Matrix)
R.M. 2004-2007::Air Conditioning: Heater Blower Motor Relay: On-Vehicle Inspection (Matrix)
R.M. 2004-2007::Air Conditioning: Magnetic Clutch Relay: On-Vehicle Inspection (Matrix)
R.M. 2004-2007::Air Conditioning: Air Conditioning Control Assembly: Components, On-Vehicle Inspection (Matrix)
R.M. 2004-2007::Air Conditioning: Air Conditioning Control Assembly: Removal, Disassembly, Inspection (Matrix)
R.M. 2004-2007::Air Conditioning: Air Conditioning Control Assembly: Reassembly, Installation (Matrix)
R.M. 2004-2007::Supplemental Restraint System: Airbag System: Precaution (Matrix)
R.M. 2004-2007::Supplemental Restraint System: Airbag System: Parts Location, System Diagram (Matrix)
R.M. 2004-2007::Supplemental Restraint System: Airbag System: System Description (Matrix)
R.M. 2004-2007::Supplemental Restraint System: Airbag System: How To Proceed With Troubleshooting (Matrix)
R.M. 2004-2007::Supplemental Restraint System: Airbag System: Problem Symptoms Table, Terminals of ECU (Matrix)
R.M. 2004-2007::Supplemental Restraint System: Airbag System: Diagnosis System (Matrix)
R.M. 2004-2007::Supplemental Restraint System: Airbag System: DTC Check / Clear, Check Mode Procedure (Matrix)
R.M. 2004-2007::Supplemental Restraint System: Airbag System: Data List / Active Test, Diagnostic Trouble Code Chart (Matrix)
R.M. 2004-2007::Supplemental Restraint System: Airbag System: B1000/31, B1610/13 (Matrix)
R.M. 2004-2007::Supplemental Restraint System: Airbag System: B1615/14 (Matrix)
R.M. 2004-2007::Supplemental Restraint System: Airbag System: B1620/21 (Matrix)
R.M. 2004-2007::Supplemental Restraint System: Airbag System: B1625/22 (Matrix)
R.M. 2004-2007::Supplemental Restraint System: Airbag System: B1630/23 (Matrix)
R.M. 2004-2007::Supplemental Restraint System: Airbag System: B1635/24 (Matrix)
R.M. 2004-2007::Supplemental Restraint System: Airbag System: B1650/32 (Matrix)
R.M. 2004-2007::Supplemental Restraint System: Airbag System: B1653/35 (Matrix)
R.M. 2004-2007::Supplemental Restraint System: Airbag System: B1655/37 (Matrix)
R.M. 2004-2007::Supplemental Restraint System: Airbag System: B1660/43 (Matrix)
R.M. 2004-2007::Supplemental Restraint System: Airbag System: B1800/51, B1801/51, B1802/51, B1803/51 (Matrix)
R.M. 2004-2007::Supplemental Restraint System: Airbag System: B1805/52, B1806/52, B1807/52, B1808/52 (Matrix)
R.M. 2004-2007::Supplemental Restraint System: Airbag System: B1810/53, B1811/53, B1812/53, B1813/53 (Matrix)
R.M. 2004-2007::Supplemental Restraint System: Airbag System: B1815/54, B1816/54, B1817/54, B1818/54 (Matrix)
R.M. 2004-2007::Supplemental Restraint System: Airbag System: B1820/55, B1821/55, B1822/55, B1823/55 (Matrix)
R.M. 2004-2007::Supplemental Restraint System: Airbag System: B1825/56, B1826/56, B1827/56, B1828/56 (Matrix)
R.M. 2004-2007::Supplemental Restraint System: Airbag System: B1830/57, B1831/57, B1832/57, B1833/57 (Matrix)
R.M. 2004-2007::Supplemental Restraint System: Airbag System: B1835/58, B1836/58, B1837/58, B1838/58 (Matrix)
R.M. 2004-2007::Supplemental Restraint System: Airbag System: B1900/73, B1901/73, B1902/73, B1903/73 (Matrix)
R.M. 2004-2007::Supplemental Restraint System: Airbag System: B1905/74, B1906/74, B1907/74, B1908/74 (Matrix)
R.M. 2004-2007::Supplemental Restraint System: Airbag System: SRS Warning Light Remains On (Matrix)
R.M. 2004-2007::Supplemental Restraint System: Airbag System: SRS Warning Light Does Not Come On (Matrix)
R.M. 2004-2007::Supplemental Restraint System: Airbag System: TC and CG Terminal Circuit (Matrix)
R.M. 2004-2007::Supplemental Restraint System: Occupant Classification System: Precaution, Parts Location (Matrix)
R.M. 2004-2007::Supplemental Restraint System: Occupant Classification System: System Diagram, System Description (Matrix)
R.M. 2004-2007::Supplemental Restraint System: Occupant Classification System: How To Proceed With Troubleshooting (Matrix)
R.M. 2004-2007::Supplemental Restraint System: Occupant Classification System: Initialization (Matrix)
R.M. 2004-2007::Supplemental Restraint System: Occupant Classification System: Problem Symptoms Table, Terminals of ECU (Matrix)
R.M. 2004-2007::Supplemental Restraint System: Occupant Classification System: Diagnosis System (Matrix)
R.M. 2004-2007::Supplemental Restraint System: Occupant Classification System: DTC Check / Clear, Data List / Active Test (Matrix)
R.M. 2004-2007::Supplemental Restraint System: Occupant Classification System: Diagnostic Trouble Code Chart (Matrix)
R.M. 2004-2007::Supplemental Restraint System: Occupant Classification System: B1771 (Matrix)
R.M. 2004-2007::Supplemental Restraint System: Occupant Classification System: B1780 (Matrix)
R.M. 2004-2007::Supplemental Restraint System: Occupant Classification System: B1781 (Matrix)
R.M. 2004-2007::Supplemental Restraint System: Occupant Classification System: B1782 (Matrix)
R.M. 2004-2007::Supplemental Restraint System: Occupant Classification System: B1783 (Matrix)
R.M. 2004-2007::Supplemental Restraint System: Occupant Classification System: B1785 (Matrix)
R.M. 2004-2007::Supplemental Restraint System: Occupant Classification System: B1786 (Matrix)
R.M. 2004-2007::Supplemental Restraint System: Occupant Classification System: B1787 (Matrix)
R.M. 2004-2007::Supplemental Restraint System: Occupant Classification System: B1788 (Matrix)
R.M. 2004-2007::Supplemental Restraint System: Occupant Classification System: B1790 (Matrix)
R.M. 2004-2007::Supplemental Restraint System: Occupant Classification System: B1793 (Matrix)
R.M. 2004-2007::Supplemental Restraint System: Occupant Classification System: B1795 (Matrix)
R.M. 2004-2007::Supplemental Restraint System: Occupant Classification System: B1796 (Matrix)
R.M. 2004-2007::Supplemental Restraint System: Occupant Classification System: Trouble In Passenger Airbag On / Off Indicator (Matrix)
R.M. 2004-2007::Supplemental Restraint System: Steering Pad: Components, On-Vehicle Inspection (Matrix)
R.M. 2004-2007::Supplemental Restraint System: Steering Pad: Removal, Installation, Disposal (Matrix)
R.M. 2004-2007::Supplemental Restraint System: Spiral Cable: Components, Removal (Matrix)
R.M. 2004-2007::Supplemental Restraint System: Spiral Cable: Inspection, Installation (Matrix)
R.M. 2004-2007::Supplemental Restraint System: Front Passenger Airbag Assembly: Components, On-Vehicle Inspection (Matrix)
R.M. 2004-2007::Supplemental Restraint System: Front Passenger Airbag Assembly: Removal, Installation, Disposal (Matrix)
R.M. 2004-2007::Supplemental Restraint System: Curtain Shield Airbag Assembly: Components, On-Vehicle Inspection (Matrix)
R.M. 2004-2007::Supplemental Restraint System: Curtain Shield Airbag Assembly: Removal, Installation, Disposal (Matrix)
R.M. 2004-2007::Supplemental Restraint System: Front Seat Side Airbag Assembly: On-Vehicle Inspection, Disposal (Matrix)
R.M. 2004-2007::Supplemental Restraint System: Center Airbag Sensor Assembly: Components, On-Vehicle Inspection (Matrix)
R.M. 2004-2007::Supplemental Restraint System: Center Airbag Sensor Assembly: Removal, Installation (Matrix)
R.M. 2004-2007::Supplemental Restraint System: Front Airbag Sensor: Components, On-Vehicle Inspection (Matrix)
R.M. 2004-2007::Supplemental Restraint System: Front Airbag Sensor: Removal, Installation (Matrix)
R.M. 2004-2007::Supplemental Restraint System: Side Airbag Sensor: Components, On-Vehicle Inspection (Matrix)
R.M. 2004-2007::Supplemental Restraint System: Side Airbag Sensor: Removal, Installation (Matrix)
R.M. 2004-2007::Supplemental Restraint System: Rear Airbag Sensor: Components, On-Vehicle Inspection (Matrix)
R.M. 2004-2007::Supplemental Restraint System: Rear Airbag Sensor: Removal, Installation (Matrix)
R.M. 2004-2007::Supplemental Restraint System: Seat Position Sensor: Components, On-Vehicle Inspection (Matrix)
R.M. 2004-2007::Supplemental Restraint System: Seat Position Sensor: Removal (Matrix)
R.M. 2004-2007::Supplemental Restraint System: Seat Position Sensor: Installation (Matrix)
R.M. 2004-2007::Supplemental Restraint System: Occupant Classification ECU: Components, On-Vehicle Inspection (Matrix)
R.M. 2004-2007::Supplemental Restraint System: Occupant Classification ECU: Removal, Installation (Matrix)
R.M. 2004-2007::Seat Belt: Seat Belt Warning System: Parts Location, Problem Symptoms Table (Matrix)
R.M. 2004-2007::Seat Belt: Front Seat Inner Belt Assembly: Components, Removal, Inspection (Matrix)
R.M. 2004-2007::Seat Belt: Front Seat Inner Belt Assembly: Installation (Matrix)
R.M. 2004-2007::Seat Belt: Front Seat Outer Belt Assembly: Components, Removal (Matrix)
R.M. 2004-2007::Seat Belt: Front Seat Outer Belt Assembly: Installation, Disposal (Matrix)
R.M. 2004-2007::Seat Belt: Rear Seat Inner Belt Assembly: Components (Matrix)
R.M. 2004-2007::Seat Belt: Rear Seat Inner Belt Assembly: Removal, Installation (Matrix)
R.M. 2004-2007::Seat Belt: Rear Seat Outer Belt Assembly: Components (Matrix)
R.M. 2004-2007::Seat Belt: Rear Seat Outer Belt Assembly: Removal, Installation (Matrix)
R.M. 2004-2007::Seat Belt: Rear Center Seat Inner Belt Assembly: Components (Matrix)
R.M. 2004-2007::Seat Belt: Rear Center Seat Inner Belt Assembly: Removal, Installation (Matrix)
R.M. 2004-2007::Seat Belt: Rear Center Seat Outer Belt Assembly: Components (Matrix)
R.M. 2004-2007::Seat Belt: Rear Center Seat Outer Belt Assembly: Removal, Installation (Matrix)
R.M. 2004-2007::Seat Belt: Child Restraint Seat Anchor Bracket: Components (Matrix)
R.M. 2004-2007::Seat Belt: Child Restraint Seat Anchor Bracket: Removal, Installation (Matrix)
R.M. 2004-2007::Theft Deterrent: Toyota Vehicle Intrusion Protection System: Parts Location (Matrix)
R.M. 2004-2007::Theft Deterrent: Toyota Vehicle Intrusion Protection System: System Description (Matrix)
R.M. 2004-2007::Theft Deterrent: Toyota Vehicle Intrusion Protection System: How To Proceed With Troubleshooting, Problem Symptoms Table (Matrix)
R.M. 2004-2007::Theft Deterrent: Toyota Vehicle Intrusion Protection System: Terminals of ECU (Matrix)
R.M. 2004-2007::Theft Deterrent: Toyota Vehicle Intrusion Protection System: Horn Circuit (Matrix)
R.M. 2004-2007::Theft Deterrent: Toyota Vehicle Intrusion Protection System: Ignition Switch Circuit (Matrix)
R.M. 2004-2007::Theft Deterrent: Toyota Vehicle Intrusion Protection System: Security Indicator Light Circuit (Matrix)
R.M. 2004-2007::Theft Deterrent: Toyota Vehicle Intrusion Protection System: Tvip ECU Communication Circuit (Matrix)
R.M. 2004-2007::Theft Deterrent: Toyota Vehicle Intrusion Protection System: Glass Breakage Sensor Circuit (Matrix)
R.M. 2004-2007::Theft Deterrent: Toyota Vehicle Intrusion Protection System: Hazard Warning Switch Circuit (Matrix)
R.M. 2004-2007::Theft Deterrent: Toyota Vehicle Intrusion Protection System: Light Control Switch Circuit (Matrix)
R.M. 2004-2007::Theft Deterrent: Toyota Vehicle Intrusion Protection System: Door Courtesy Switch Circuit (Matrix)
R.M. 2004-2007::Theft Deterrent: Toyota Vehicle Intrusion Protection System: Door Unlock Detection Switch Circuit (Matrix)
R.M. 2004-2007::Theft Deterrent: Toyota Vehicle Intrusion Protection System: Starter Relay Circuit (Matrix)
R.M. 2004-2007::Theft Deterrent: Toyota Vehicle Intrusion Protection System: Door Key Lock / Unlock Switch Circuit (Matrix)
R.M. 2004-2007::Theft Deterrent: Toyota Vehicle Intrusion Protection System: ECU Power Source Circuit (Matrix)
R.M. 2004-2007::Theft Deterrent: Toyota Vehicle Intrusion Protection System: Unlock Warning Switch Circuit (Matrix)
R.M. 2004-2007::Engine Immobiliser: Engine Immobiliser System: Parts Location, System Diagram (Matrix)
R.M. 2004-2007::Engine Immobiliser: Engine Immobiliser System: System Description (Matrix)
R.M. 2004-2007::Engine Immobiliser: Engine Immobiliser System: How To Proceed With Troubleshooting (Matrix)
R.M. 2004-2007::Engine Immobiliser: Engine Immobiliser System: Registration (Matrix)
R.M. 2004-2007::Engine Immobiliser: Engine Immobiliser System: Problem Symptoms Table, Terminals of ECU (Matrix)
R.M. 2004-2007::Engine Immobiliser: Engine Immobiliser System: Diagnosis System, DTC Check / Clear (Matrix)
R.M. 2004-2007::Engine Immobiliser: Engine Immobiliser System: Data List / Active Test (Matrix)
R.M. 2004-2007::Engine Immobiliser: Engine Immobiliser System: Diagnostic Trouble Code Chart, B2780 (Matrix)
R.M. 2004-2007::Engine Immobiliser: Engine Immobiliser System: B2784 (Matrix)
R.M. 2004-2007::Engine Immobiliser: Engine Immobiliser System: B2793, B2794 (Matrix)
R.M. 2004-2007::Engine Immobiliser: Engine Immobiliser System: B2795, B2796, B2798 (Matrix)
R.M. 2004-2007::Engine Immobiliser: Engine Immobiliser System: B2797 (Matrix)
R.M. 2004-2007::Engine Immobiliser: Engine Immobiliser System: B2799 (Matrix)
R.M. 2004-2007::Engine Immobiliser: Engine Immobiliser System: Security Indicator Light Circuit (Matrix)
R.M. 2004-2007::Engine Immobiliser: Engine Immobiliser System: Door Courtesy Switch Circuit (Matrix)
R.M. 2004-2007::Engine Immobiliser: Engine Immobiliser System: ECU Power Source Circuit (Matrix)
R.M. 2004-2007::Engine Immobiliser: Engine Immobiliser System: Diagnosis Circuit (Matrix)
R.M. 2004-2007::Cruise Control: Cruise Control System: Precaution, How To Proceed With Troubleshooting (Matrix)
R.M. 2004-2007::Cruise Control: Cruise Control System: Parts Location, System Description, Road Test (Matrix)
R.M. 2004-2007::Cruise Control: Cruise Control System: Problem Symptoms Table, Terminals of ECM (Matrix)
R.M. 2004-2007::Cruise Control: Cruise Control System: Diagnosis System (Matrix)
R.M. 2004-2007::Cruise Control: Cruise Control System: DTC Check / Clear, Fail-Safe Chart (Matrix)
R.M. 2004-2007::Cruise Control: Cruise Control System: Data List / Active Test, Diagnostic Trouble Code Chart (Matrix)
R.M. 2004-2007::Cruise Control: Cruise Control System: P0500, P0503, P0571 (Matrix)
R.M. 2004-2007::Cruise Control: Cruise Control System: P0607, Clutch Switch Circuit (Matrix)
R.M. 2004-2007::Cruise Control: Cruise Control System: Cruise Control Switch Circuit (Matrix)
R.M. 2004-2007::Cruise Control: Cruise Control System: Cruise Main Indicator Light Circuit (Matrix)
R.M. 2004-2007::Cruise Control: Cruise Control System: Diagnosis Circuit (Matrix)
R.M. 2004-2007::Cruise Control: Cruise Control Main Switch: Components, Removal (Matrix)
R.M. 2004-2007::Cruise Control: Cruise Control Main Switch: Installation (Matrix)
R.M. 2004-2007::Cruise Control: Clutch Switch: Components, Removal (Matrix)
R.M. 2004-2007::Cruise Control: Clutch Switch: Installation (Matrix)
R.M. 2004-2007::Lighting: Lighting System: Precaution, How To Proceed With Troubleshooting (Matrix)
R.M. 2004-2007::Lighting: Lighting System: Parts Location (Matrix)
R.M. 2004-2007::Lighting: Lighting System: Operation Check, Problem Symptoms Table (Matrix)
R.M. 2004-2007::Lighting: Headlight Assembly: Components (Matrix)
R.M. 2004-2007::Lighting: Headlight Assembly: Removal, Adjustment (Matrix)
R.M. 2004-2007::Lighting: Headlight Assembly: Installation (Matrix)
R.M. 2004-2007::Lighting: Fog Light Assembly: Components, Removal (Matrix)
R.M. 2004-2007::Lighting: Fog Light Assembly: Adjustment (Matrix)
R.M. 2004-2007::Lighting: Fog Light Assembly: Installation (Matrix)
R.M. 2004-2007::Lighting: Rear Combination Light Assembly: Components, Removal (Matrix)
R.M. 2004-2007::Lighting: Rear Combination Light Assembly: Installation (Matrix)
R.M. 2004-2007::Lighting: License Plate Light Assembly: Components (Matrix)
R.M. 2004-2007::Lighting: License Plate Light Assembly: Removal, Installation (Matrix)
R.M. 2004-2007::Lighting: High Mounted Stop Light Assembly: Components, Removal (Matrix)
R.M. 2004-2007::Lighting: High Mounted Stop Light Assembly: Installation (Matrix)
R.M. 2004-2007::Lighting: Personal Light Assembly: Inspection (Matrix)
R.M. 2004-2007::Lighting: Room Light Assembly: Inspection (Matrix)
R.M. 2004-2007::Lighting: Headlight Dimmer Switch: Components, Removal, Inspection (Matrix)
R.M. 2004-2007::Lighting: Headlight Dimmer Switch: Installation (Matrix)
R.M. 2004-2007::Lighting: Hazard Warning Switch: Inspection (Matrix)
R.M. 2004-2007::Lighting: Stop Light Switch: Inspection (Matrix)
R.M. 2004-2007::Lighting: Back-Up Light Switch: Inspection (Matrix)
R.M. 2004-2007::Lighting: Front Door Courtesy Switch: Inspection (Matrix)
R.M. 2004-2007::Lighting: Rear Door Courtesy Switch: Inspection (Matrix)
R.M. 2004-2007::Lighting: Back Door Courtesy Switch: Inspection (Matrix)
R.M. 2004-2007::Lighting: Turn Signal Flasher Assembly: On-Vehicle Inspection (Matrix)
R.M. 2004-2007::Lighting: Headlight Relay: On-Vehicle Inspection (Matrix)
R.M. 2004-2007::Lighting: Daytime Running Light Relay: On-Vehicle Inspection (Matrix)
R.M. 2004-2007::Lighting: Headlight Dimmer Relay: On-Vehicle Inspection (Matrix)
R.M. 2004-2007::Lighting: Taillight Relay: On-Vehicle Inspection (Matrix)
R.M. 2004-2007::Lighting: Fog Light Relay: On-Vehicle Inspection (Matrix)
R.M. 2004-2007::Wiper and Washer: Wiper and Washer System: Precaution, How To Proceed With Troubleshooting (Matrix)
R.M. 2004-2007::Wiper and Washer: Wiper and Washer System: Parts Location (Matrix)
R.M. 2004-2007::Wiper and Washer: Wiper and Washer System: Problem Symptoms Table (Matrix)
R.M. 2004-2007::Wiper and Washer: Front Wiper Motor: Components (Matrix)
R.M. 2004-2007::Wiper and Washer: Front Wiper Motor: Removal, Inspection, Installation (Matrix)
R.M. 2004-2007::Wiper and Washer: Front Wiper Rubber: Components, Removal, Installation (Matrix)
R.M. 2004-2007::Wiper and Washer: Rear Wiper Motor: Components, Removal (Matrix)
R.M. 2004-2007::Wiper and Washer: Rear Wiper Motor: Inspection, Installation (Matrix)
R.M. 2004-2007::Wiper and Washer: Rear Wiper Rubber: Components, Removal, Installation (Matrix)
R.M. 2004-2007::Wiper and Washer: Wiper Relay: On-Vehicle Inspection (Matrix)
R.M. 2004-2007::Wiper and Washer: Wiper Switch: Components, Removal, Inspection (Matrix)
R.M. 2004-2007::Wiper and Washer: Wiper Switch: Installation (Matrix)
R.M. 2004-2007::Wiper and Washer: Front Washer Motor: On-Vehicle Inspection (Matrix)
R.M. 2004-2007::Wiper and Washer: Rear Washer Motor: On-Vehicle Inspection (Matrix)
R.M. 2004-2007::Wiper and Washer: Washer Nozzle: On-Vehicle Inspection (Matrix)
R.M. 2004-2007::Door Lock: Power Door Lock Control System: Parts Location (Matrix)
R.M. 2004-2007::Door Lock: Power Door Lock Control System: How To Proceed With Troubleshooting, Operation Check (Matrix)
R.M. 2004-2007::Door Lock: Power Door Lock Control System: Problem Symptoms Table, Terminals of ECU (Matrix)
R.M. 2004-2007::Door Lock: Power Door Lock Control System: All Doors Lock / Unlock Functions Do Not Operate Via Master Switch, Driver Side Door Key Cylinder (Matrix)
R.M. 2004-2007::Door Lock: Power Door Lock Control System: Key Lock-in Prevention Function Does Not Work Properly (Matrix)
R.M. 2004-2007::Door Lock: Wireless Door Lock Control System: Parts Location (Matrix)
R.M. 2004-2007::Door Lock: Wireless Door Lock Control System: How To Proceed With Troubleshooting (Matrix)
R.M. 2004-2007::Door Lock: Wireless Door Lock Control System: Operation Check (Matrix)
R.M. 2004-2007::Door Lock: Wireless Door Lock Control System: Registration (Matrix)
R.M. 2004-2007::Door Lock: Wireless Door Lock Control System: Problem Symptoms Table, Terminals of ECU (Matrix)
R.M. 2004-2007::Door Lock: Wireless Door Lock Control System: Only Wireless Control Function Is Inoperative (Matrix)
R.M. 2004-2007::Door Lock: Transmitter Battery: Replacement (Matrix)
R.M. 2004-2007::Door Lock: Door Control Switch: Inspection (Matrix)
R.M. 2004-2007::Door Lock: Front Door Lock: Inspection (Matrix)
R.M. 2004-2007::Door Lock: Rear Door Lock: Inspection (Matrix)
R.M. 2004-2007::Door Lock: Back Door Lock: Inspection (Matrix)
R.M. 2004-2007::Meter: Meter / Gauge System: Parts Location (Matrix)
R.M. 2004-2007::Meter: Meter / Gauge System: How To Proceed With Troubleshooting, Customize Parameters (Matrix)
R.M. 2004-2007::Meter: Meter / Gauge System: Problem Symptoms Table (Matrix)
R.M. 2004-2007::Meter: Meter / Gauge System: Terminals of ECU (Matrix)
R.M. 2004-2007::Meter: Meter / Gauge System: Data List / Active Test, On-Vehicle Inspection (Matrix)
R.M. 2004-2007::Meter: Meter / Gauge System: Entire Combination Meter Does Not Operate (Matrix)
R.M. 2004-2007::Meter: Meter / Gauge System: Speedometer Malfunction (Matrix)
R.M. 2004-2007::Meter: Meter / Gauge System: Tachometer Malfunction (Matrix)
R.M. 2004-2007::Meter: Meter / Gauge System: Fuel Receiver Gauge Malfunction (Matrix)
R.M. 2004-2007::Meter: Meter / Gauge System: Engine Coolant Temperature Receiver Gauge Malfunction (Matrix)
R.M. 2004-2007::Meter: Meter / Gauge System: Warning Buzzer Does Not Sound (Matrix)
R.M. 2004-2007::Meter: Meter / Gauge System: Driver Side Seat Belt Warning Light Does Not Operate (Matrix)
R.M. 2004-2007::Meter: Meter / Gauge System: Front Passenger Side Seat Belt Warning Light Malfunction (Matrix)
R.M. 2004-2007::Meter: Meter / Gauge System: Operating Light Control RHEOSTAT Does Not Change Light Brightness (Matrix)
R.M. 2004-2007::Meter: Combination Meter: Components, Removal, Disassembly, Reassembly, Installation (Matrix)
R.M. 2004-2007::Audio / Visual: Audio and Visual System: Precaution, Parts Location (Matrix)
R.M. 2004-2007::Audio / Visual: Audio and Visual System: System Diagram (Matrix)
R.M. 2004-2007::Audio / Visual: Audio and Visual System: System Description (Matrix)
R.M. 2004-2007::Audio / Visual: Audio and Visual System: How To Proceed With Troubleshooting (Matrix)
R.M. 2004-2007::Audio / Visual: Audio and Visual System: Identification of Noise Source (Matrix)
R.M. 2004-2007::Audio / Visual: Audio and Visual System: Problem Symptoms Table, Terminals of ECU (Matrix)
R.M. 2004-2007::Audio / Visual: Audio and Visual System: DTC Check / Clear (Matrix)
R.M. 2004-2007::Audio / Visual: Audio and Visual System: Diagnostic Trouble Code Chart (Matrix)
R.M. 2004-2007::Audio / Visual: Audio and Visual System: 01-21, 01-22, 01-D5, 01-D8, 01-D9, 01-DA, 01-DB, 01-DE (Matrix)
R.M. 2004-2007::Audio / Visual: Audio and Visual System: 01-D6, 01-D7 (Matrix)
R.M. 2004-2007::Audio / Visual: Audio and Visual System: 01-DC (Matrix)
R.M. 2004-2007::Audio / Visual: Audio and Visual System: 01-DD, 01-E1 (Matrix)
R.M. 2004-2007::Audio / Visual: Audio and Visual System: 01-DF (Matrix)
R.M. 2004-2007::Audio / Visual: Audio and Visual System: 01-E0, 01-E3, 01-E4, 01-E2 (Matrix)
R.M. 2004-2007::Audio / Visual: Audio and Visual System: 62-10, 62-11, 62-12, 63-10, 63-11, 63-12, 62-41, 62-42, 63-41, 63-42 (Matrix)
R.M. 2004-2007::Audio / Visual: Audio and Visual System: 62-43, 63-43, 62-44, 62-48, 62-50, 63-44, 63-48, 63-50 (Matrix)
R.M. 2004-2007::Audio / Visual: Audio and Visual System: 62-45, 62-51, 62-52, 63-45, 63-51, 63-52, 62-46, 63-46 (Matrix)
R.M. 2004-2007::Audio / Visual: Audio and Visual System: 62-47, 63-47, Noise Occurs (Matrix)
R.M. 2004-2007::Audio / Visual: Audio and Visual System: Sound Quality Is Bad In All Modes, Sound Quality Is Bad Only When CD Is Played (Volume Is Too Low) (Matrix)
R.M. 2004-2007::Audio / Visual: Audio and Visual System: CD Cannot Be Ejected, CD Cannot Be Inserted / Played Or CD Is Ejected Right After Insertion (Matrix)
R.M. 2004-2007::Audio / Visual: Audio and Visual System: CD Sound Skips (Matrix)
R.M. 2004-2007::Audio / Visual: Audio and Visual System: Radio Broadcast Cannot Be Received Or Poor Reception (Matrix)
R.M. 2004-2007::Audio / Visual: Audio and Visual System: Illumination Circuit (Matrix)
R.M. 2004-2007::Audio / Visual: Audio and Visual System: Speaker Circuit (Matrix)
R.M. 2004-2007::Audio / Visual: Audio and Visual System: Sound Signal Circuit Between Radio Receiver and Stereo Component Amplifier (Matrix)
R.M. 2004-2007::Audio / Visual: Audio and Visual System: Mute Signal Circuit Between Radio Receiver and Stereo Component Amplifier (Matrix)
R.M. 2004-2007::Audio / Visual: Audio and Visual System: AVC-LAN Circuit (Matrix)
R.M. 2004-2007::Audio / Visual: Audio and Visual System: Radio Receiver Communication Error (Matrix)
R.M. 2004-2007::Audio / Visual: Audio and Visual System: Stereo Component Amplifier Communication Error (Matrix)
R.M. 2004-2007::Audio / Visual: Audio and Visual System: Radio Receiver Power Source Circuit (Matrix)
R.M. 2004-2007::Audio / Visual: Audio and Visual System: Stereo Component Amplifier Power Source Circuit (Matrix)
R.M. 2004-2007::Audio / Visual: Radio Receiver: Components, Removal (Matrix)
R.M. 2004-2007::Audio / Visual: Radio Receiver: Installation (Matrix)
R.M. 2004-2007::Audio / Visual: Stereo Component Amplifier: Components, Removal (Matrix)
R.M. 2004-2007::Audio / Visual: Stereo Component Amplifier: Installation (Matrix)
R.M. 2004-2007::Audio / Visual: Front Side Speaker: Components (Matrix)
R.M. 2004-2007::Audio / Visual: Front Side Speaker: On-Vehicle Inspection, Removal (Matrix)
R.M. 2004-2007::Audio / Visual: Front Side Speaker: Installation (Matrix)
R.M. 2004-2007::Audio / Visual: Rear Side Speaker: Components, On-Vehicle Inspection (Matrix)
R.M. 2004-2007::Audio / Visual: Rear Side Speaker: Removal, Installation (Matrix)
R.M. 2004-2007::Audio / Visual: Radio Antenna Cord: Components, Removal (Matrix)
R.M. 2004-2007::Audio / Visual: Radio Antenna Cord: Installation (Matrix)
R.M. 2004-2007::Audio / Visual: Radio Antenna Pole: Components, Removal (Matrix)
R.M. 2004-2007::Audio / Visual: Radio Antenna Pole: Installation (Matrix)
R.M. 2004-2007::Audio / Visual: Amplifier Antenna: Components, Removal, Installation (Matrix)
R.M. 2004-2007::Audio / Visual: No. 1 Speaker With Box: Components, On-Vehicle Inspection (Matrix)
R.M. 2004-2007::Audio / Visual: No. 1 Speaker With Box: Removal, Installation (Matrix)
R.M. 2004-2007::Horn: Horn System: Parts Location, Problem Symptoms Table (Matrix)
R.M. 2004-2007::Horn: Horn Relay: Inspection (Matrix)
R.M. 2004-2007::Horn: Low Pitched Horn: Components, Removal, Inspection, Installation (Matrix)
R.M. 2004-2007::1ZZ-FE Engine Control System: SFI System: Definition of Terms, Parts Location (Matrix)
R.M. 2004-2007::1ZZ-FE Engine Control System: SFI System: How To Proceed With Troubleshooting (Matrix)
R.M. 2004-2007::1ZZ-FE Engine Control System: SFI System: Check For Intermittent Problems, Basic Inspection (Matrix)
R.M. 2004-2007::1ZZ-FE Engine Control System: SFI System: Registration (Matrix)
R.M. 2004-2007::1ZZ-FE Engine Control System: SFI System: O2S Test Result (Matrix)
R.M. 2004-2007::1ZZ-FE Engine Control System: SFI System: Checking Monitor Status (Matrix)
R.M. 2004-2007::1ZZ-FE Engine Control System: SFI System: Readiness Monitor Drive Pattern (Matrix)
R.M. 2004-2007::1ZZ-FE Engine Control System: SFI System: Problem Symptoms Table (Matrix)
R.M. 2004-2007::1ZZ-FE Engine Control System: SFI System: Terminals of ECM (Matrix)
R.M. 2004-2007::1ZZ-FE Engine Control System: SFI System: Diagnosis System, DTC Check / Clear, Check Mode Procedure (Matrix)
R.M. 2004-2007::1ZZ-FE Engine Control System: SFI System: Fail-Safe Chart, Data List / Active Test (Matrix)
R.M. 2004-2007::1ZZ-FE Engine Control System: SFI System: Diagnostic Trouble Code Chart (Matrix)
R.M. 2004-2007::1ZZ-FE Engine Control System: SFI System: P0010 (Matrix)
R.M. 2004-2007::1ZZ-FE Engine Control System: SFI System: P0011, P0012 (Matrix)
R.M. 2004-2007::1ZZ-FE Engine Control System: SFI System: P0016 (Matrix)
R.M. 2004-2007::1ZZ-FE Engine Control System: SFI System: P0031, P0032 (Matrix)
R.M. 2004-2007::1ZZ-FE Engine Control System: SFI System: P0037, P0038 (Matrix)
R.M. 2004-2007::1ZZ-FE Engine Control System: SFI System: P0100, P0102, P0103 (Matrix)
R.M. 2004-2007::1ZZ-FE Engine Control System: SFI System: P0101 (Matrix)
R.M. 2004-2007::1ZZ-FE Engine Control System: SFI System: P0110, P0112, P0113 (Matrix)
R.M. 2004-2007::1ZZ-FE Engine Control System: SFI System: P0115, P0117, P0118 (Matrix)
R.M. 2004-2007::1ZZ-FE Engine Control System: SFI System: P0116 (Matrix)
R.M. 2004-2007::1ZZ-FE Engine Control System: SFI System: P0120, P0122, P0123, P0220, P0222, P0223, P2135 (Matrix)
R.M. 2004-2007::1ZZ-FE Engine Control System: SFI System: P0121 (Matrix)
R.M. 2004-2007::1ZZ-FE Engine Control System: SFI System: P0125 (Matrix)
R.M. 2004-2007::1ZZ-FE Engine Control System: SFI System: P0128 (Matrix)
R.M. 2004-2007::1ZZ-FE Engine Control System: SFI System: P0136, P0137, P0138 (Matrix)
R.M. 2004-2007::1ZZ-FE Engine Control System: SFI System: P0171, P0172 (Matrix)
R.M. 2004-2007::1ZZ-FE Engine Control System: SFI System: P0300, P0301, P0302, P0303, P0304 (Matrix)
R.M. 2004-2007::1ZZ-FE Engine Control System: SFI System: P0325, P0327, P0328 (Matrix)
R.M. 2004-2007::1ZZ-FE Engine Control System: SFI System: P0335, P0339 (Matrix)
R.M. 2004-2007::1ZZ-FE Engine Control System: SFI System: P0340, P0341 (Matrix)
R.M. 2004-2007::1ZZ-FE Engine Control System: SFI System: P0351, P0352, P0353, P0354 (Matrix)
R.M. 2004-2007::1ZZ-FE Engine Control System: SFI System: P0420 (Matrix)
R.M. 2004-2007::1ZZ-FE Engine Control System: SFI System: P043E, P043F, P0441 (Matrix)
R.M. 2004-2007::1ZZ-FE Engine Control System: SFI System: P0450, P0451, P0452, P0453 (Matrix)
R.M. 2004-2007::1ZZ-FE Engine Control System: SFI System: P0455, P0456, P0500 (Matrix)
R.M. 2004-2007::1ZZ-FE Engine Control System: SFI System: P0504 (Matrix)
R.M. 2004-2007::1ZZ-FE Engine Control System: SFI System: P0505 (Matrix)
R.M. 2004-2007::1ZZ-FE Engine Control System: SFI System: P0560 (Matrix)
R.M. 2004-2007::1ZZ-FE Engine Control System: SFI System: P0601 (Matrix)
R.M. 2004-2007::1ZZ-FE Engine Control System: SFI System: P0604 (Matrix)
R.M. 2004-2007::1ZZ-FE Engine Control System: SFI System: P0606 (Matrix)
R.M. 2004-2007::1ZZ-FE Engine Control System: SFI System: P0607 (Matrix)
R.M. 2004-2007::1ZZ-FE Engine Control System: SFI System: P0617 (Matrix)
R.M. 2004-2007::1ZZ-FE Engine Control System: SFI System: P0630 (Matrix)
R.M. 2004-2007::1ZZ-FE Engine Control System: SFI System: P0657 (Matrix)
R.M. 2004-2007::1ZZ-FE Engine Control System: SFI System: P2102, P2103 (Matrix)
R.M. 2004-2007::1ZZ-FE Engine Control System: SFI System: P2111, P2112 (Matrix)
R.M. 2004-2007::1ZZ-FE Engine Control System: SFI System: P2118 (Matrix)
R.M. 2004-2007::1ZZ-FE Engine Control System: SFI System: P2119 (Matrix)
R.M. 2004-2007::1ZZ-FE Engine Control System: SFI System: P2120, P2122, P2123, P2125, P2127, P2128, P2138 (Matrix)
R.M. 2004-2007::1ZZ-FE Engine Control System: SFI System: P2121 (Matrix)
R.M. 2004-2007::1ZZ-FE Engine Control System: SFI System: P2195, P2196 (Matrix)
R.M. 2004-2007::1ZZ-FE Engine Control System: SFI System: P2238, P2239, P2252, P2253 (Matrix)
R.M. 2004-2007::1ZZ-FE Engine Control System: SFI System: P2401, P2402, P2419 (Matrix)
R.M. 2004-2007::1ZZ-FE Engine Control System: SFI System: P2420, P2610 (Matrix)
R.M. 2004-2007::1ZZ-FE Engine Control System: SFI System: P2A00 (Matrix)
R.M. 2004-2007::1ZZ-FE Engine Control System: SFI System: EVAP System (Matrix)
R.M. 2004-2007::1ZZ-FE Engine Control System: SFI System: ECM Power Source Circuit (Matrix)
R.M. 2004-2007::1ZZ-FE Engine Control System: SFI System: Fuel Pump Control Circuit (Matrix)
R.M. 2004-2007::1ZZ-FE Engine Control System: SFI System: MIL Circuit (Matrix)
R.M. 2004-2007::1ZZ-FE Engine Control System: Mass Air Flow Meter: On-Vehicle Inspection (Matrix)
R.M. 2004-2007::1ZZ-FE Engine Control System: Camshaft Timing Oil Control Valve Assembly: On-Vehicle Inspection, Inspection (Matrix)
R.M. 2004-2007::1ZZ-FE Engine Control System: Camshaft Position Sensor: Inspection (Matrix)
R.M. 2004-2007::1ZZ-FE Engine Control System: Crankshaft Position Sensor: Inspection (Matrix)
R.M. 2004-2007::1ZZ-FE Engine Control System: Engine Coolant Temperature Sensor: Inspection (Matrix)
R.M. 2004-2007::1ZZ-FE Engine Control System: Throttle Body: Components (Matrix)
R.M. 2004-2007::1ZZ-FE Engine Control System: Throttle Body: On-Vehicle Inspection, Removal, Installation (Matrix)
R.M. 2004-2007::1ZZ-FE Engine Control System: Throttle Body: Inspection (Matrix)
R.M. 2004-2007::1ZZ-FE Engine Control System: Knock Sensor: Inspection (Matrix)
R.M. 2004-2007::1ZZ-FE Engine Control System: IG1 Relay: Inspection (Matrix)
R.M. 2004-2007::1ZZ-FE Engine Control System: EFI Relay: Inspection (Matrix)
R.M. 2004-2007::1ZZ-FE Engine Control System: Circuit Opening Relay: Inspection (Matrix)
R.M. 2004-2007::1ZZ-FE Engine Control System: ECM: Components (Matrix)
R.M. 2004-2007::1ZZ-FE Engine Control System: ECM: Removal, Installation (Matrix)
R.M. 2004-2007::1ZZ-FE Engine Control System: Accelerator Pedal: Components, On-Vehicle Inspection (Matrix)
R.M. 2004-2007::1ZZ-FE Engine Control System: Accelerator Pedal: Removal, Installation, Inspection (Matrix)
R.M. 2004-2007::Supplemental Restraint System: Airbag System: Precaution (Matrix)
R.M. 2004-2007::Supplemental Restraint System: Airbag System: Parts Location, System Diagram (Matrix)
R.M. 2004-2007::Supplemental Restraint System: Airbag System: System Description (Matrix)
R.M. 2004-2007::Supplemental Restraint System: Airbag System: How To Proceed With Troubleshooting (Matrix)
R.M. 2004-2007::Supplemental Restraint System: Airbag System: Problem Symptoms Table, Terminals of ECU (Matrix)
R.M. 2004-2007::Supplemental Restraint System: Airbag System: Diagnosis System (Matrix)
R.M. 2004-2007::Supplemental Restraint System: Airbag System: DTC Check / Clear, Check Mode Procedure (Matrix)
R.M. 2004-2007::Supplemental Restraint System: Airbag System: Data List / Active Test, Diagnostic Trouble Code Chart (Matrix)
R.M. 2004-2007::Supplemental Restraint System: Airbag System: B1000/31, B1610/13 (Matrix)
R.M. 2004-2007::Supplemental Restraint System: Airbag System: B1615/14 (Matrix)
R.M. 2004-2007::Supplemental Restraint System: Airbag System: B1620/21 (Matrix)
R.M. 2004-2007::Supplemental Restraint System: Airbag System: B1625/22 (Matrix)
R.M. 2004-2007::Supplemental Restraint System: Airbag System: B1630/23 (Matrix)
R.M. 2004-2007::Supplemental Restraint System: Airbag System: B1635/24 (Matrix)
R.M. 2004-2007::Supplemental Restraint System: Airbag System: B1650/32 (Matrix)
R.M. 2004-2007::Supplemental Restraint System: Airbag System: B1653/35 (Matrix)
R.M. 2004-2007::Supplemental Restraint System: Airbag System: B1655/37 (Matrix)
R.M. 2004-2007::Supplemental Restraint System: Airbag System: B1660/43 (Matrix)
R.M. 2004-2007::Supplemental Restraint System: Airbag System: B1800/51, B1801/51, B1802/51, B1803/51 (Matrix)
R.M. 2004-2007::Supplemental Restraint System: Airbag System: B1805/52, B1806/52, B1807/52, B1808/52 (Matrix)
R.M. 2004-2007::Supplemental Restraint System: Airbag System: B1810/53, B1811/53, B1812/53, B1813/53 (Matrix)
R.M. 2004-2007::Supplemental Restraint System: Airbag System: B1815/54, B1816/54, B1817/54, B1818/54 (Matrix)
R.M. 2004-2007::Supplemental Restraint System: Airbag System: B1820/55, B1821/55, B1822/55, B1823/55 (Matrix)
R.M. 2004-2007::Supplemental Restraint System: Airbag System: B1825/56, B1826/56, B1827/56, B1828/56 (Matrix)
R.M. 2004-2007::Supplemental Restraint System: Airbag System: B1830/57, B1831/57, B1832/57, B1833/57 (Matrix)
R.M. 2004-2007::Supplemental Restraint System: Airbag System: B1835/58, B1836/58, B1837/58, B1838/58 (Matrix)
R.M. 2004-2007::Supplemental Restraint System: Airbag System: B1900/73, B1901/73, B1902/73, B1903/73 (Matrix)
R.M. 2004-2007::Supplemental Restraint System: Airbag System: B1905/74, B1906/74, B1907/74, B1908/74 (Matrix)
R.M. 2004-2007::Supplemental Restraint System: Airbag System: SRS Warning Light Remains On (Matrix)
R.M. 2004-2007::Supplemental Restraint System: Airbag System: SRS Warning Light Does Not Come On (Matrix)
R.M. 2004-2007::Supplemental Restraint System: Airbag System: TC and CG Terminal Circuit (Matrix)
R.M. 2004-2007::Supplemental Restraint System: Occupant Classification System: Precaution, Parts Location (Matrix)
R.M. 2004-2007::Supplemental Restraint System: Occupant Classification System: System Diagram, System Description (Matrix)
R.M. 2004-2007::Supplemental Restraint System: Occupant Classification System: How To Proceed With Troubleshooting (Matrix)
R.M. 2004-2007::Supplemental Restraint System: Occupant Classification System: Initialization (Matrix)
R.M. 2004-2007::Supplemental Restraint System: Occupant Classification System: Problem Symptoms Table, Terminals of ECU (Matrix)
R.M. 2004-2007::Supplemental Restraint System: Occupant Classification System: Diagnosis System (Matrix)
R.M. 2004-2007::Supplemental Restraint System: Occupant Classification System: DTC Check / Clear, Data List / Active Test (Matrix)
R.M. 2004-2007::Supplemental Restraint System: Occupant Classification System: Diagnostic Trouble Code Chart (Matrix)
R.M. 2004-2007::Supplemental Restraint System: Occupant Classification System: B1771 (Matrix)
R.M. 2004-2007::Supplemental Restraint System: Occupant Classification System: B1780 (Matrix)
R.M. 2004-2007::Supplemental Restraint System: Occupant Classification System: B1781 (Matrix)
R.M. 2004-2007::Supplemental Restraint System: Occupant Classification System: B1782 (Matrix)
R.M. 2004-2007::Supplemental Restraint System: Occupant Classification System: B1783 (Matrix)
R.M. 2004-2007::Supplemental Restraint System: Occupant Classification System: B1785 (Matrix)
R.M. 2004-2007::Supplemental Restraint System: Occupant Classification System: B1786 (Matrix)
R.M. 2004-2007::Supplemental Restraint System: Occupant Classification System: B1787 (Matrix)
R.M. 2004-2007::Supplemental Restraint System: Occupant Classification System: B1788 (Matrix)
R.M. 2004-2007::Supplemental Restraint System: Occupant Classification System: B1790 (Matrix)
R.M. 2004-2007::Supplemental Restraint System: Occupant Classification System: B1793 (Matrix)
R.M. 2004-2007::Supplemental Restraint System: Occupant Classification System: B1795 (Matrix)
R.M. 2004-2007::Supplemental Restraint System: Occupant Classification System: B1796 (Matrix)
R.M. 2004-2007::Supplemental Restraint System: Occupant Classification System: Trouble In Passenger Airbag On / Off Indicator (Matrix)
R.M. 2004-2007::Supplemental Restraint System: Steering Pad: Components, On-Vehicle Inspection (Matrix)
R.M. 2004-2007::Supplemental Restraint System: Steering Pad: Removal, Installation, Disposal (Matrix)
R.M. 2004-2007::Supplemental Restraint System: Spiral Cable: Components, Removal (Matrix)
R.M. 2004-2007::Supplemental Restraint System: Spiral Cable: Inspection, Installation (Matrix)
R.M. 2004-2007::Supplemental Restraint System: Front Passenger Airbag Assembly: Components, On-Vehicle Inspection (Matrix)
R.M. 2004-2007::Supplemental Restraint System: Front Passenger Airbag Assembly: Removal, Installation, Disposal (Matrix)
R.M. 2004-2007::Supplemental Restraint System: Curtain Shield Airbag Assembly: Components, On-Vehicle Inspection (Matrix)
R.M. 2004-2007::Supplemental Restraint System: Curtain Shield Airbag Assembly: Removal, Installation, Disposal (Matrix)
R.M. 2004-2007::Supplemental Restraint System: Front Seat Side Airbag Assembly: On-Vehicle Inspection, Disposal (Matrix)
R.M. 2004-2007::Supplemental Restraint System: Center Airbag Sensor Assembly: Components, On-Vehicle Inspection (Matrix)
R.M. 2004-2007::Supplemental Restraint System: Center Airbag Sensor Assembly: Removal, Installation (Matrix)
R.M. 2004-2007::Supplemental Restraint System: Front Airbag Sensor: Components, On-Vehicle Inspection (Matrix)
R.M. 2004-2007::Supplemental Restraint System: Front Airbag Sensor: Removal, Installation (Matrix)
R.M. 2004-2007::Supplemental Restraint System: Side Airbag Sensor: Components, On-Vehicle Inspection (Matrix)
R.M. 2004-2007::Supplemental Restraint System: Side Airbag Sensor: Removal, Installation (Matrix)
R.M. 2004-2007::Supplemental Restraint System: Rear Airbag Sensor: Components, On-Vehicle Inspection (Matrix)
R.M. 2004-2007::Supplemental Restraint System: Rear Airbag Sensor: Removal, Installation (Matrix)
R.M. 2004-2007::Supplemental Restraint System: Seat Position Sensor: Components, On-Vehicle Inspection (Matrix)
R.M. 2004-2007::Supplemental Restraint System: Seat Position Sensor: Removal (Matrix)
R.M. 2004-2007::Supplemental Restraint System: Seat Position Sensor: Installation (Matrix)
R.M. 2004-2007::Supplemental Restraint System: Occupant Classification ECU: Components, On-Vehicle Inspection (Matrix)
R.M. 2004-2007::Supplemental Restraint System: Occupant Classification ECU: Removal, Installation (Matrix)
R.M. 2004-2007::Other System: Clock: Components, Removal, Installation (Matrix)
R.M. 2004-2007::Other System: Cigarette Lighter Assembly: Components (Matrix)
R.M. 2004-2007::Other System: Cigarette Lighter Assembly: Removal, Installation (Matrix)
R.M. 2004-2007::Other System: Voltage Inverter: Components (Matrix)
R.M. 2004-2007::Other System: Voltage Inverter: On-Vehicle Inspection, Removal, Installation (Matrix)
R.M. 2004-2007::Other System: Power Point Socket (For Front Side): Components (Matrix)
R.M. 2004-2007::Other System: Power Point Socket (For Front Side): Removal, Installation (Matrix)
R.M. 2004-2007::Other System: Power Point Socket (For Rear Side): Components (Matrix)
R.M. 2004-2007::Other System: Power Point Socket (For Rear Side): Removal, Installation (Matrix)
R.M. 2004-2007::Windshield / Windowglass: Power Window Control System: Parts Location, System Diagram (Matrix)
R.M. 2004-2007::Windshield / Windowglass: Power Window Control System: Problem Symptoms Table, On-Vehicle Inspection (Matrix)
R.M. 2004-2007::Windshield / Windowglass: Power Window Master Switch: Inspection (Matrix)
R.M. 2004-2007::Windshield / Windowglass: Front Passenger Side Power Window Switch: Inspection (Matrix)
R.M. 2004-2007::Windshield / Windowglass: Rear Power Window Switch: Inspection (Matrix)
R.M. 2004-2007::Windshield / Windowglass: Power Window Regulator Motor: Inspection (Matrix)
R.M. 2004-2007::Windshield / Windowglass: Windshield Glass: Components, Removal, Installation (Matrix)
R.M. 2004-2007::Windshield / Windowglass: Back Door Glass: Components, Removal (Matrix)
R.M. 2004-2007::Windshield / Windowglass: Back Door Glass: Installation (Matrix)
R.M. 2004-2007::Windshield / Windowglass: Window Defogger System: Parts Location, Problem Symptoms Table (Matrix)
R.M. 2004-2007::Windshield / Windowglass: Window Defogger Switch: Inspection (Matrix)
R.M. 2004-2007::Windshield / Windowglass: Power Relay: On-Vehicle Inspection (Matrix)
R.M. 2004-2007::Windshield / Windowglass: Defogger Relay: On-Vehicle Inspection (Matrix)
R.M. 2004-2007::Windshield / Windowglass: Quarter Window Glass: Components, Removal (Matrix)
R.M. 2004-2007::Windshield / Windowglass: Quarter Window Glass: Installation (Matrix)
R.M. 2004-2007::Windshield / Windowglass: Glass Hatch Opener System: Parts Location, On-Vehicle Inspection (Matrix)
R.M. 2004-2007::Windshield / Windowglass: Back Window Lock: Inspection (Matrix)
R.M. 2004-2007::Windshield / Windowglass: Glass Hatch Opener Switch: Inspection (Matrix)
R.M. 2004-2007::Mirror: Power Mirror Control System: Parts Location, Problem Symptoms Table (Matrix)
R.M. 2004-2007::Mirror: Inner Rear View Mirror: Parts Location, Components (Matrix)
R.M. 2004-2007::Mirror: Inner Rear View Mirror: Calibration (Matrix)
R.M. 2004-2007::Mirror: Inner Rear View Mirror: Problem Symptoms Table, Removal, Inspection, Installation (Matrix)
R.M. 2004-2007::Mirror: Outer Rear View Mirror: Components (Matrix)
R.M. 2004-2007::Mirror: Outer Rear View Mirror: Removal, Inspection (Matrix)
R.M. 2004-2007::Mirror: Outer Rear View Mirror: Installation (Matrix)
R.M. 2004-2007::Mirror: Outer Mirror Switch: Inspection (Matrix)
R.M. 2004-2007::Instrument Panel: Instrument Panel Safety Pad: Precaution, Components (Matrix)
R.M. 2004-2007::Instrument Panel: Instrument Panel Safety Pad: Removal (Matrix)
R.M. 2004-2007::Instrument Panel: Instrument Panel Safety Pad: Installation (Matrix)
R.M. 2004-2007::Seat Belt: Seat Belt Warning System: Parts Location, Problem Symptoms Table (Matrix)
R.M. 2004-2007::Seat Belt: Front Seat Inner Belt Assembly: Components, Removal, Inspection (Matrix)
R.M. 2004-2007::Seat Belt: Front Seat Inner Belt Assembly: Installation (Matrix)
R.M. 2004-2007::Seat Belt: Front Seat Outer Belt Assembly: Components, Removal (Matrix)
R.M. 2004-2007::Seat Belt: Front Seat Outer Belt Assembly: Installation, Disposal (Matrix)
R.M. 2004-2007::Seat Belt: Rear Seat Inner Belt Assembly: Components (Matrix)
R.M. 2004-2007::Seat Belt: Rear Seat Inner Belt Assembly: Removal, Installation (Matrix)
R.M. 2004-2007::Seat Belt: Rear Seat Outer Belt Assembly: Components (Matrix)
R.M. 2004-2007::Seat Belt: Rear Seat Outer Belt Assembly: Removal, Installation (Matrix)
R.M. 2004-2007::Seat Belt: Rear Center Seat Inner Belt Assembly: Components (Matrix)
R.M. 2004-2007::Seat Belt: Rear Center Seat Inner Belt Assembly: Removal, Installation (Matrix)
R.M. 2004-2007::Seat Belt: Rear Center Seat Outer Belt Assembly: Components (Matrix)
R.M. 2004-2007::Seat Belt: Rear Center Seat Outer Belt Assembly: Removal, Installation (Matrix)
R.M. 2004-2007::Seat Belt: Child Restraint Seat Anchor Bracket: Components (Matrix)
R.M. 2004-2007::Seat Belt: Child Restraint Seat Anchor Bracket: Removal, Installation (Matrix)
R.M. 2004-2007::Seat: Front Seat Assembly (For LH Side): Components, Removal (Matrix)
R.M. 2004-2007::Seat: Front Seat Assembly (For LH Side): Disassembly, Reassembly (Matrix)
R.M. 2004-2007::Seat: Front Seat Assembly (For LH Side): Installation (Matrix)
R.M. 2004-2007::Seat: Front Seat Assembly (For RH Side): Components (Matrix)
R.M. 2004-2007::Seat: Front Seat Assembly (For RH Side): Removal (Matrix)
R.M. 2004-2007::Seat: Front Seat Assembly (For RH Side): Disassembly (Matrix)
R.M. 2004-2007::Seat: Front Seat Assembly (For RH Side): Reassembly, Installation (Matrix)
R.M. 2004-2007::Seat: Rear Seat Assembly: Components (Matrix)
R.M. 2004-2007::Seat: Rear Seat Assembly: Removal, Disassembly (Matrix)
R.M. 2004-2007::Seat: Rear Seat Assembly: Reassembly (Matrix)
R.M. 2004-2007::Seat: Rear Seat Assembly: Installation (Matrix)
R.M. 2004-2007::Engine Hood / Door: Hood: Adjustment (Matrix)
R.M. 2004-2007::Engine Hood / Door: Front Door: Components (Matrix)
R.M. 2004-2007::Engine Hood / Door: Front Door: Disassembly (Matrix)
R.M. 2004-2007::Engine Hood / Door: Front Door: Adjustment, Reassembly (Matrix)
R.M. 2004-2007::Engine Hood / Door: Rear Door: Components (Matrix)
R.M. 2004-2007::Engine Hood / Door: Rear Door: Disassembly (Matrix)
R.M. 2004-2007::Engine Hood / Door: Rear Door: Adjustment, Reassembly (Matrix)
R.M. 2004-2007::Engine Hood / Door: Back Door: Components (Matrix)
R.M. 2004-2007::Engine Hood / Door: Back Door: Disassembly (Matrix)
R.M. 2004-2007::Engine Hood / Door: Back Door: Adjustment (Matrix)
R.M. 2004-2007::Engine Hood / Door: Back Door: Reassembly (Matrix)
R.M. 2004-2007::Engine Hood / Door: Back Door Support: Components, Removal (Matrix)
R.M. 2004-2007::Engine Hood / Door: Back Door Support: Installation, Disposal (Matrix)
R.M. 2004-2007::Exterior: Front Bumper: Components (Matrix)
R.M. 2004-2007::Exterior: Front Bumper: Removal (Matrix)
R.M. 2004-2007::Exterior: Front Bumper: Installation (Matrix)
R.M. 2004-2007::Exterior: Rear Bumper: Components (Matrix)
R.M. 2004-2007::Exterior: Rear Bumper: Removal (Matrix)
R.M. 2004-2007::Exterior: Rear Bumper: Installation (Matrix)
R.M. 2004-2007::Exterior: Name Plate: Components (Matrix)
R.M. 2004-2007::Exterior: Front Door Belt Moulding: Components, Removal (Matrix)
R.M. 2004-2007::Exterior: Front Door Belt Moulding: Installation (Matrix)
R.M. 2004-2007::Exterior: Rear Door Belt Moulding: Components, Removal (Matrix)
R.M. 2004-2007::Exterior: Rear Door Belt Moulding: Installation (Matrix)
R.M. 2004-2007::Exterior: Roof Drip Side Finish Moulding: Components, Removal (Matrix)
R.M. 2004-2007::Exterior: Roof Drip Side Finish Moulding: Installation (Matrix)
R.M. 2004-2007::Exterior: Rocker Panel Moulding: Components, Installation, Removal (Matrix)
R.M. 2004-2007::Exterior: Side Moulding: Components, Installation, Removal (Matrix)
R.M. 2004-2007::Interior: Roof Headlining: Components (Matrix)
R.M. 2004-2007::Interior: Roof Headlining: Removal (Matrix)
R.M. 2004-2007::Interior: Roof Headlining: Installation (Matrix)
R.M. 2004-2007::Sliding Roof: Sliding Roof System: Parts Location, Problem Symptoms Table (Matrix)
R.M. 2004-2007::Sliding Roof: Sliding Roof System: On-Vehicle Inspection (Matrix)
R.M. 2004-2007::Sliding Roof: Sliding Roof Housing: Components (Matrix)
R.M. 2004-2007::Sliding Roof: Sliding Roof Housing: Removal (Matrix)
R.M. 2004-2007::Sliding Roof: Sliding Roof Housing: Inspection (Matrix)
R.M. 2004-2007::Sliding Roof: Sliding Roof Housing: Installation (Matrix)
R.M. 2004-2007::CAN Communication: CAN Communication System: Precaution (Matrix)
R.M. 2004-2007::CAN Communication: CAN Communication System: Parts Location, System Diagram (Matrix)
R.M. 2004-2007::CAN Communication: CAN Communication System: System Description, How To Proceed With Troubleshooting (Matrix)
R.M. 2004-2007::CAN Communication: CAN Communication System: Problem Symptoms Table, Terminals of ECU (Matrix)
R.M. 2004-2007::CAN Communication: CAN Communication System: Diagnosis System, Skid Control ECU Communication Stop Mode (Matrix)
R.M. 2004-2007::CAN Communication: CAN Communication System: Steering Angle Sensor Communication Stop Mode (Matrix)
R.M. 2004-2007::CAN Communication: CAN Communication System: Yaw Rate Sensor Communication Stop Mode (Matrix)
R.M. 2004-2007::CAN Communication: CAN Communication System: CAN Main BUS Line For Disconnection (Matrix)
R.M. 2004-2007::CAN Communication: CAN Communication System: Check CAN BUS Line (Matrix)
R.M. 2004-2007::CAN Communication: CAN Communication System: Check CAN BUS Lines For Short Circuit (Matrix)
R.M. 2004-2007::CAN Communication: CAN Communication System: Check CAN BUS Line For Short To +B (Matrix)
R.M. 2004-2007::CAN Communication: CAN Communication System: Check CAN BUS Line For Short To GND (Matrix)


