Toyota Avensis Verso, Picnic 2001-2009 Workshop Repair & Service Manual
Catalog:
Model:
Complete digital official workshop repair manual contains service, maintenance, and troubleshooting information for the Toyota Avensis Verso, Picnic 2001-2009. Diagnostic and repair procedures are covered in great detail to repair, maintain, rebuild, refurbish or restore your Avensis Verso, Picnic like a professional mechanic in local service/repair workshop. This cost-effective quality manual is 100% complete and intact as should be without any missing pages. It is the same factory shop manual used by dealers that guaranteed to be fully functional to save your precious time.
This manual for Toyota Avensis Verso, Picnic 2001-2009 is divided into different sections. Each section covers a specific component or system and, in addition to the standard service procedures, includes disassembling, inspecting, and assembling instructions. A table of contents is placed at the beginning of each section. Pages are easily found by category, and each page is expandable for great detail. It is in the cross-platform PDF document format so that it works like a charm on all kinds of devices. You do not need to be skilled with a computer to use the manual.
MAKE: Toyota
YEAR: 2001 2002 2003 2004 2005 2006 2007 2008 2009
MODEL: Avensis Verso / Picnic / SportsVan / Ipsum
DOCUMENT FORMAT: PDF
=====================================================================================================
Toyota Avensis Verso, Toyota Picnic repair manual, service manual, workshop manual, maintenance, electrical wiring diagrams Toyota Avensis Verso, body repair manual.
Toyota Avensis Verso, Toyota Picnic Applicable Vehicles 05/2001 onwards--> ACM20, CLM20, ACM21 LHD & RHD Models.
Toyota Avensis Verso, Toyota Picnic Engines Repair Manual 1CD-FTV, 1AZ-FE, 2AZ-FE
Toyota Transmission Repair Manual A/T - U241E, E355, E356
Toyota Avensis Verso, Toyota Picnic Repair Manuals (RM)
Repair manuals are primarily for use by workshop technicians. They explain procedures for disassembly, inspection, adjustment and assembly of vehicles and parts. The manual types are divided into Engine R/M, Chassis & Body R/M, Automatic Transmission (Transaxle) .
Toyota Avensis Verso, Toyota Picnic Electrical Wiring Diagram (EWD)
These manuals are used in the inspection and repair of electrical circuits. The separate wiring manual for each model contains circuit diagrams of each electrical system, wiring route diagrams and diagrams showing the location of relays, etc.
Toyota Avensis Verso, Toyota Picnic Collision Damaged Body Repair Manuals (BRM)
These manuals contain information on body construction, basic dimensions and repair procedures required for body repair of collision damaged vehicles.
Toyota Avensis Verso, Toyota Picnic Service Data Sheets (SDS)
The specifications frequently used in vehicle inspection and repair are provided on one sheet for each model.
Toyota Avensis Verso, Toyota Picnic Technical Service Bulletins(TSB)
EXCERPT:
1. REMOVE REAR SEAT HEADREST ASSY
2. REMOVE REAR NO. 1 SEAT ASSY LH
(a) Using a screwdriver, disengage the 4 claws and remove the 4 seat track covers.
HINT: Tape the screwdriver tip before use.
(b) Remove the 4 bolts and seat assy.
3. REMOVE REAR NO. 1 SEAT CUSHION ASSY
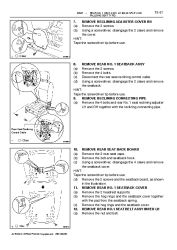
(a) Pull up the seat cushion, as shown in the illustration.
(b) Remove the 4 bolts and seat cushion.
4. REMOVE REAR NO. 1 SEAT CUSHION COVER
(a) Remove the screw and rear seat cushion lock cover.
(b) Remove the 4 clips and rear seat cushion carpet under.
(c) Using a screwdriver, disengage the hooks and seat cushion cover together with the pad.
HINT: Tape the screwdriver tip before use.
(d) Remove the hog rings and seat cushion cover.
5. REMOVE RECLINING ADJUSTER RELEASE HANDLE
NO.1 LH
(a) Using a screwdriver, pry out the reclining adjuster release handle.
HINT: Tape the screwdriver tip before use.
6. REMOVE RECLINING ADJUSTER COVER LH
(a) Remove the 2 screws.
(b) Using a screwdriver, disengage the 3 claws and remove the cover.
HINT: Tape the screwdriver tip before use.
7. REMOVE RECLINING ADJUSTER COVER RH
(a) Remove the 2 screws.
(b) Using a screwdriver, disengage the 2 claws and remove the cover.
HINT: Tape the screwdriver tip before use.
8. REMOVE REAR NO. 1 SEATBACK ASSY
(a) Remove the 2 screws.
(b) Remove the 4 bolts.
(c) Disconnect the rear seat reclining control cable.
(d) Using a screwdriver, disengage the 2 claws and remove the seatback.
HINT: Tape the screwdriver tip before use.
9. REMOVE RECLINING CONNECTING PIPE
(a) Remove the 4 bolts and rear No. 1 seat reclining adjuster LH and RH together with the reclining connecting pipe.
10. REMOVE REAR SEAT BACK BOARD
(a) Remove the 2 rear seat caps.
(b) Remove the bolt and seatback hook.
(c) Using a screwdriver, disengage the 4 claws and remove the seatback cover.
HINT: Tape the screwdriver tip before use.
(d) Remove the 2 screws and the seatback board, as shown in the illustration.
11. REMOVE REAR NO. 1 SEATBACK COVER
(a) Remove the 2 headrest supports.
(b) Remove the hog rings and the seatback cover together with the pad from the seatback spring.
(c) Remove the hog rings and the seatback cover.
12. REMOVE REAR NO.1 SEAT BELT ASSY INNER LH
(a) Remove the nut and belt.
...


